YUM与开源项目(Web运维)
1、项目背景
运维小于,目前刚入职了一家电子商务公司。php开发网站
主要负责大型商城系统维护,公司主营母婴用品,如奶瓶、奶嘴、童装等等,最近。
很多客服发现一个问题:很多宝妈会在评论区互相咨询产品相关信息。
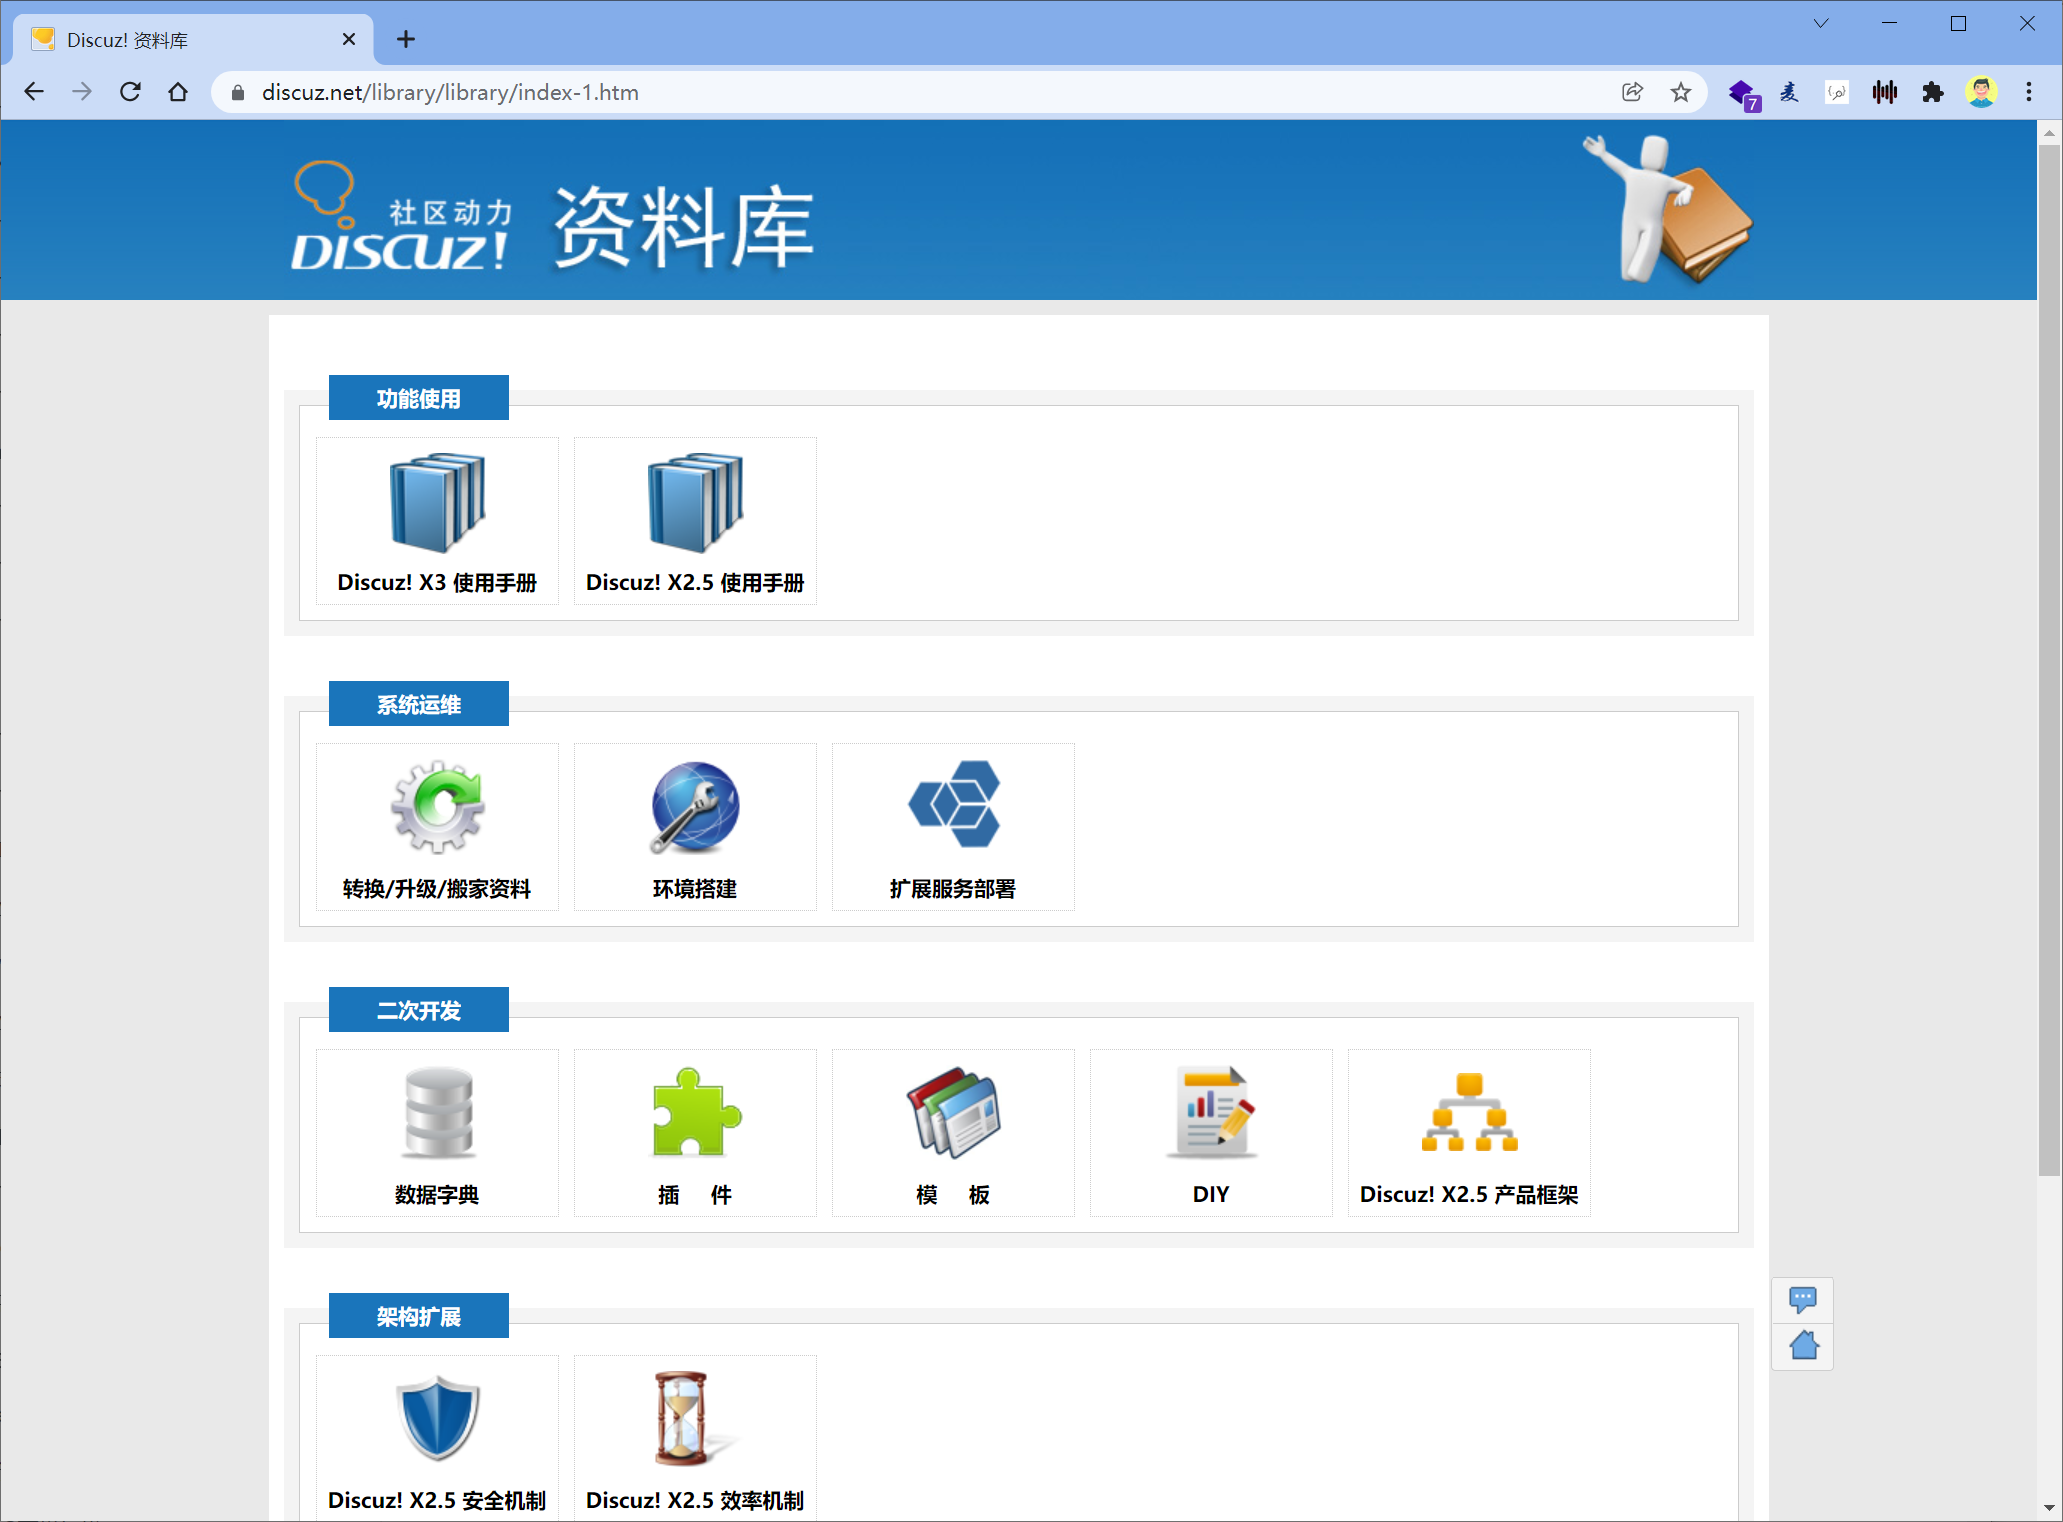
于是公司决定针对这一需求,要求运维为公司迅速上线一款论坛系统,方便宝妈交流产品、育儿心得等等。
https://foruda.gitee.com/attach_file/1716183924840081332/discuz_x3.5_sc_utf8_20240520.zip?token=f9d93f17d9e76dee2a61735d125577c5&ts=1735209488&attname=Discuz_X3.5_SC_UTF8_20240520.zip


# 源码下载地址
https://www.discuz.vip/download
2、项目需求
满足功能,并且省钱(开源项目),暂时没时间招程序员了,招人,写代码,上线,三个月就过去了!!
市面上会有很多开源组织,开源技术团队,产品开发完毕后,秉着开源精神,公开源代码让网民免费下载、使用,这样也会获得更大的曝光量,更多的技术人加入组织。
也给大量用户,带来方便,开箱即用。
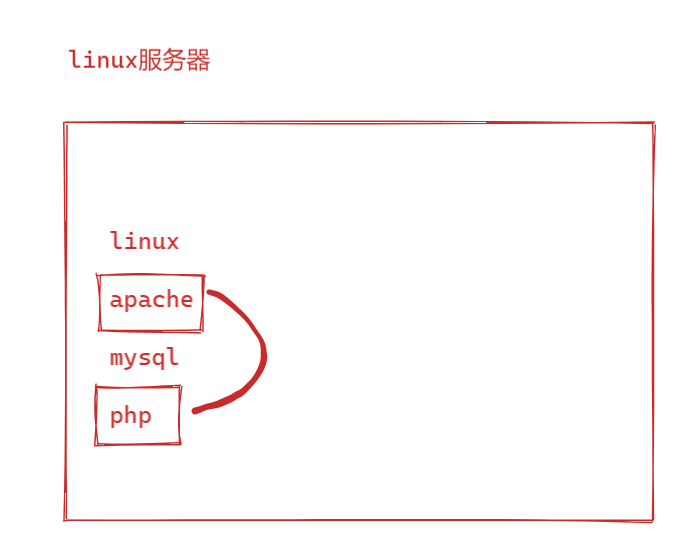
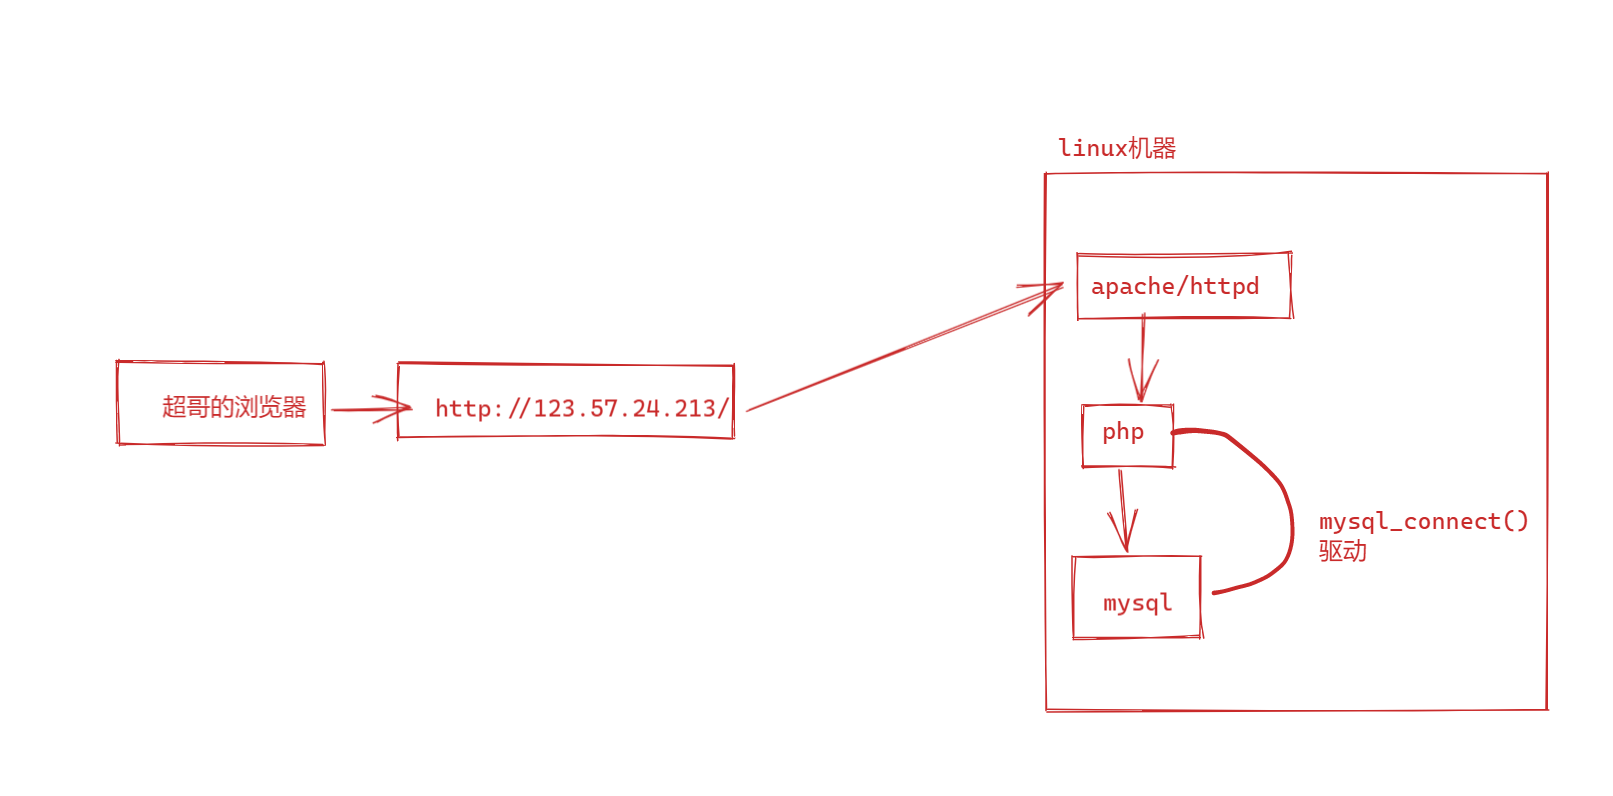
Discuz! = Apache + PHP + MySQL
70多个人独立管理,练习代码。10W块钱。6W
python jupyter Notebook
docker Notebook
https://addon.dismall.com/library/system/env/env_linux.html

1.开发语言是什么,该语言对应环境是什么
php
python
golang
java
方法流程,基本是固定的,启动,后端就有了

2.后端,链接数据库,准备database
3. 网站启动,前端(nginx) 后端(任意语言)  数据库(mysql) 缓存(redis)
4. 统一放linux ,建站黄金架构,linux nginx(apache)  mysql php/python
LAMP
LNMP
LNMJ linux nginx mysql java
一、YUM/APT 概述
2025 全新 ubuntu 大师就业班
1、Linux软件的安装方式
linux apache mysql php
在CentOS系统中,软件管理方式通常有三种方式:rpm安装、yum安装以及编译安装。
ubuntu
- deb包,dpkg命令
- apt安装
- 编译安装
LNMP 编译安装一遍
编译安装,从过程上来讲比较麻烦,包需要用户自行下载,下载的是源码包,需要进行编译操作,编译好了才能进行安装,这个过程对于刚接触Linux的人来说比较麻烦,而且还容易出错。
好处在于是源码包,对于有需要自定义模块的用户来说非常方便。
专业linux运维肯定是要掌握编译软件的方法。
2、什么是yum/apt
Yum(全称为 Yellow dog Updater, Modified)是一个在Fedora和RedHat以及CentOS中的Shell前端软件包管理器。
基于rpm包管理,能够从指定的服务器(yum源)自动下载RPM包并且安装,可以==自动处理依赖性关系==,并且==一次安装所有依赖的软件包==,无须繁琐地一次次下载、安装。
先回忆下,rpm包管理
在 RPM(红帽软件包管理器)公布之前,要想在 Linux 系统中安装软件只能采取源码包 的方式安装。
早期在 Linux 系统中安装程序是一件非常困难、耗费耐心的事情,而且大多数 的服务程序仅仅提供源代码,需要运维人员自行编译代码并解决许多的软件依赖关系,==因此 要安装好一个服务程序,运维人员需要具备丰富知识、高超的技能,甚至良好的耐心。==
==而且在 安装、升级、卸载服务程序时还要考虑到其他程序、库的依赖关系,所以在进行校验、安装、 卸载、查询、升级等管理软件操作时难度都非常大。==
软件包依赖关系
在早期系统运维中,安装软件是一件非常费事费力的事情。系统管理员不得不下载软件源代码编译软件,并且为了系统做各种调整。
==尽管源代码编译形式的软件增强了用户定制的自由度,但是在小软件上耗费精力是缺乏效率的,于是软件包应运而生。==
软件包管理可以将管理员从无休止的兼容问题中释放。yum工具就可以自动搜索依赖关系,并执行安装。
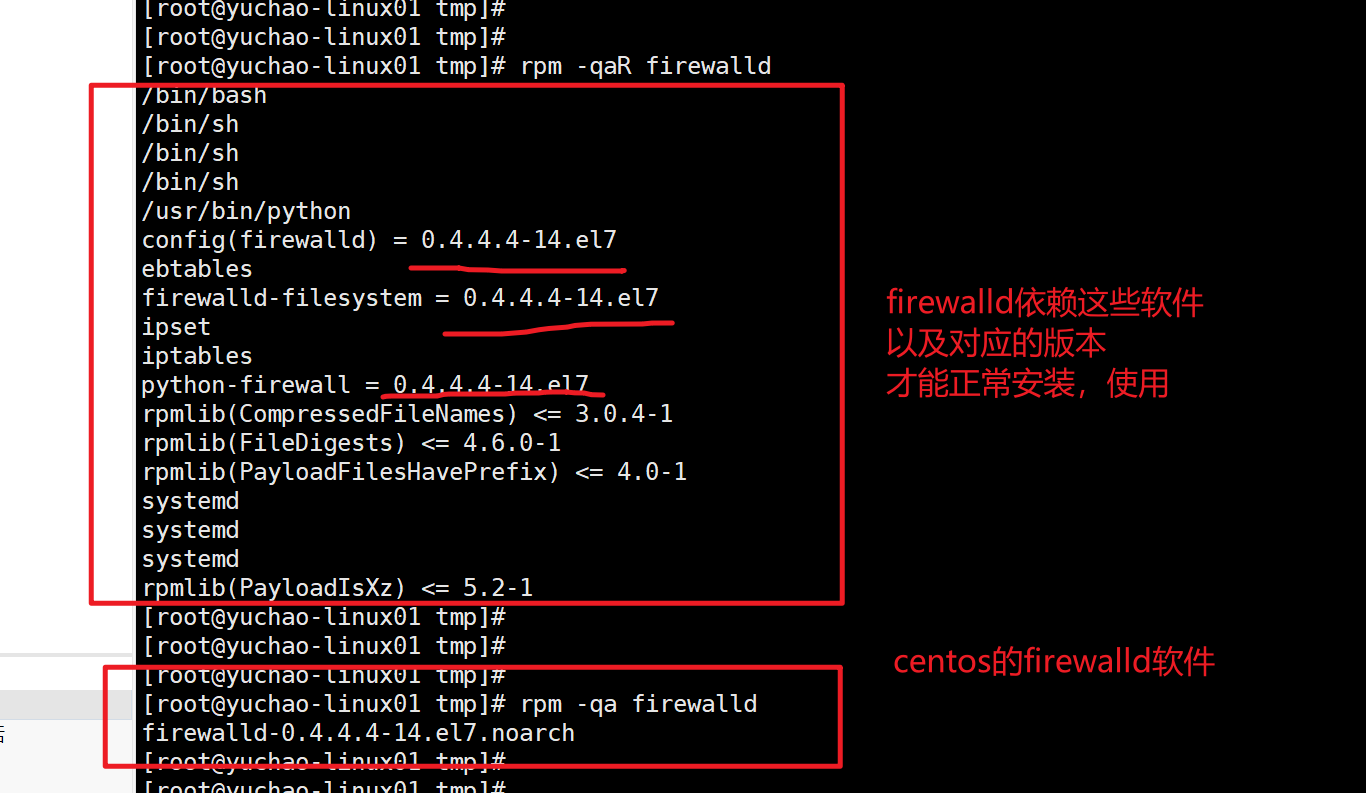
rpm软件包在安装的时候,由作者定义依赖关系
必须解决依赖关系,软件才能正常工作
如何检查软件依赖
通过rpm命令,可以检查某软件的依赖关系。
注意,这种方法只适用于已安装的包。如果你需要检查一个未安装包的依赖关系,你首先需要把这个包先下载到本地来(不需要安装)。
只能查询已安装的应用程序,依赖哪些其他软件。
dpkg命令,查询
其他检查rpm包依赖关系的方法,待会学完yum工具,再用
yum配置文件
/etc/yum.conf
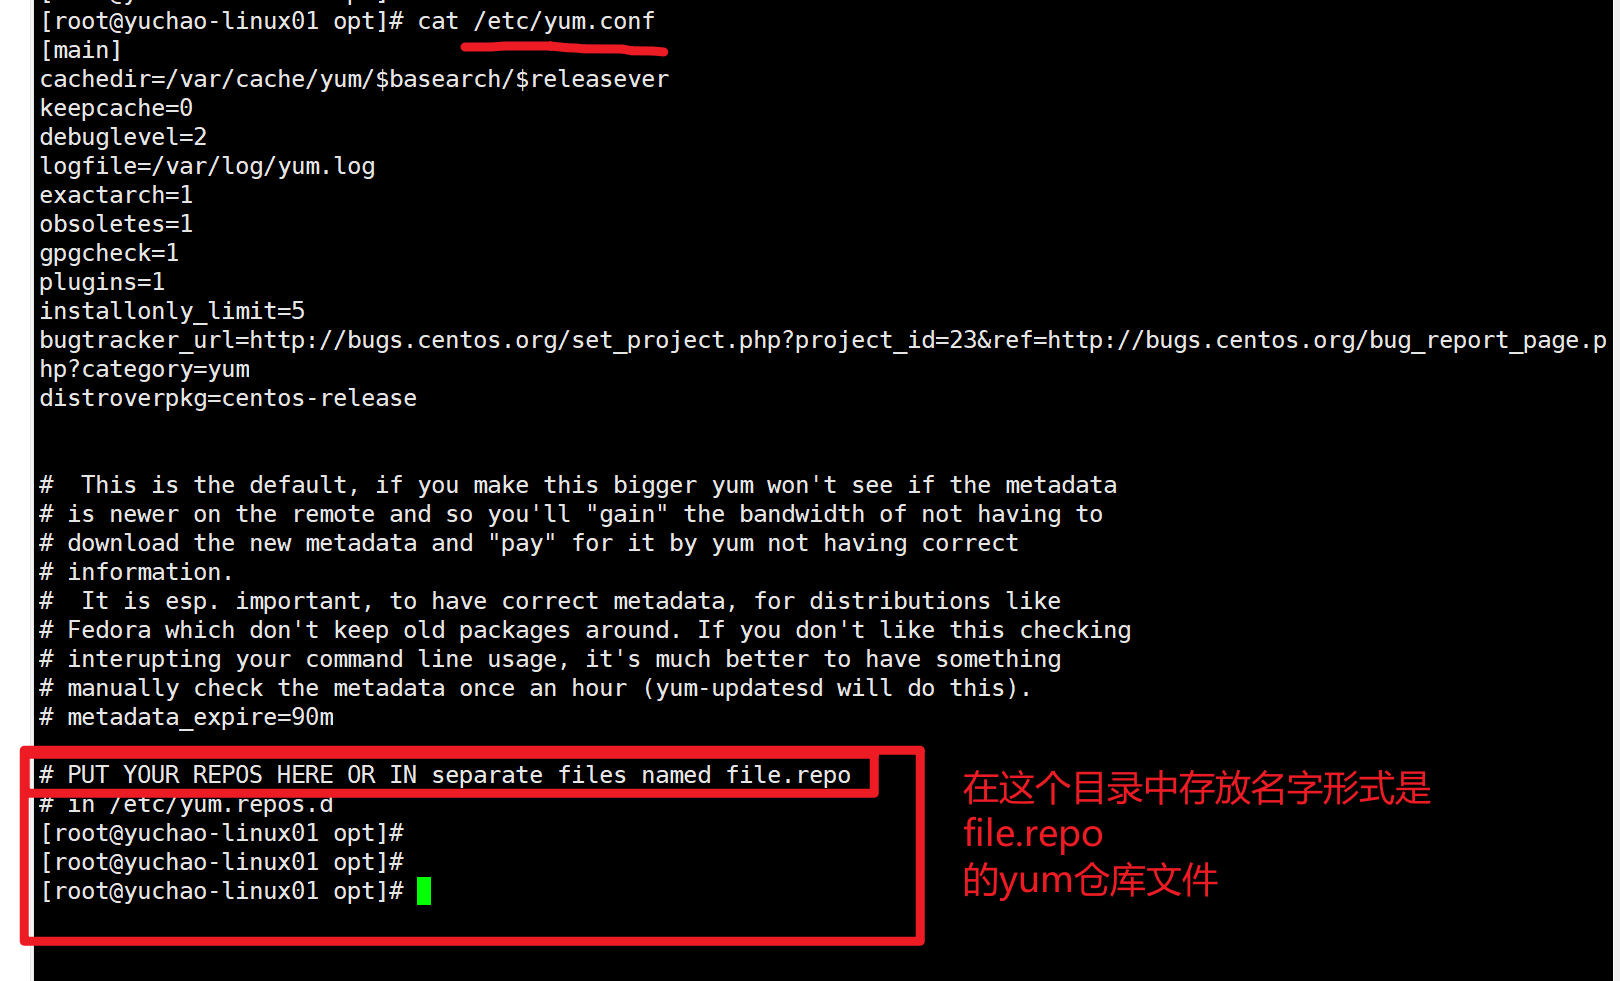
系统默认的yum仓库文件
[root@yuchao-linux01 opt]# ls /etc/yum.repos.d/ -l
total 32
-rw-r--r--. 1 root root 1664 Apr 29  2018 CentOS-Base.repo       网络yum源配置文件
-rw-r--r--. 1 root root 1309 Apr 29  2018 CentOS-CR.repo
-rw-r--r--. 1 root root  649 Apr 29  2018 CentOS-Debuginfo.repo   内核更新相关软件包
-rw-r--r--. 1 root root  314 Apr 29  2018 CentOS-fasttrack.repo   快速下载通道
-rw-r--r--. 1 root root  630 Apr 29  2018 CentOS-Media.repo        本地光盘yum配置文件
-rw-r--r--. 1 root root 1331 Apr 29  2018 CentOS-Sources.repo
-rw-r--r--. 1 root root 4768 Apr 29  2018 CentOS-Vault.repo
软件包管理神器
为了能让用户更方便、省心的管理软件,进行安装、卸载、升级,系统都会有一些方便的工具。
比如windows的360软件管家
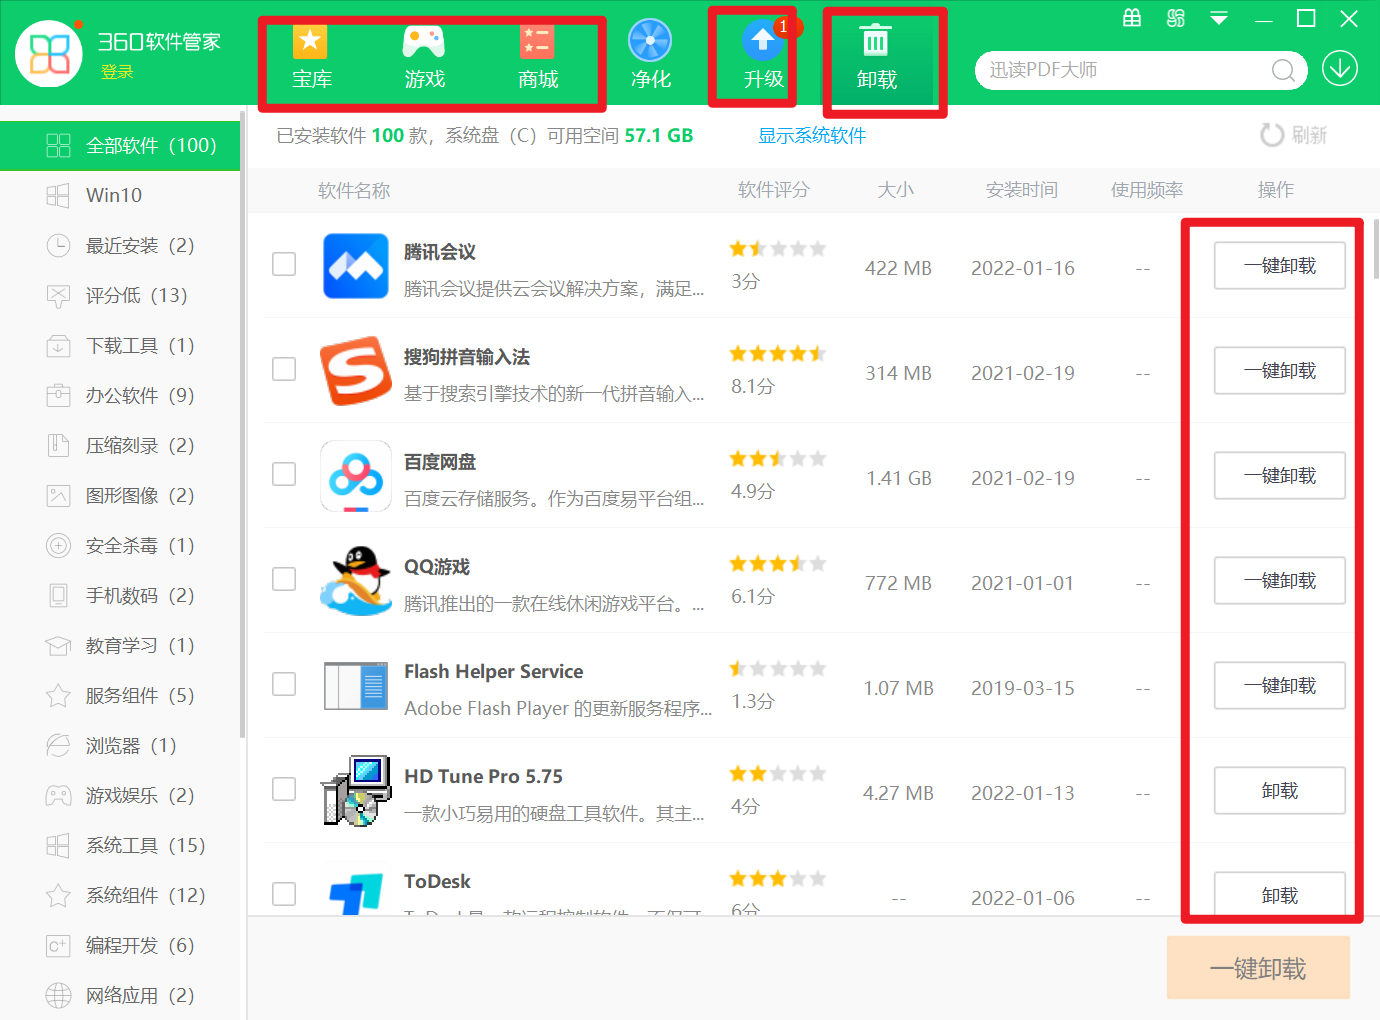
而Linux的软件管家是什么?就是yum
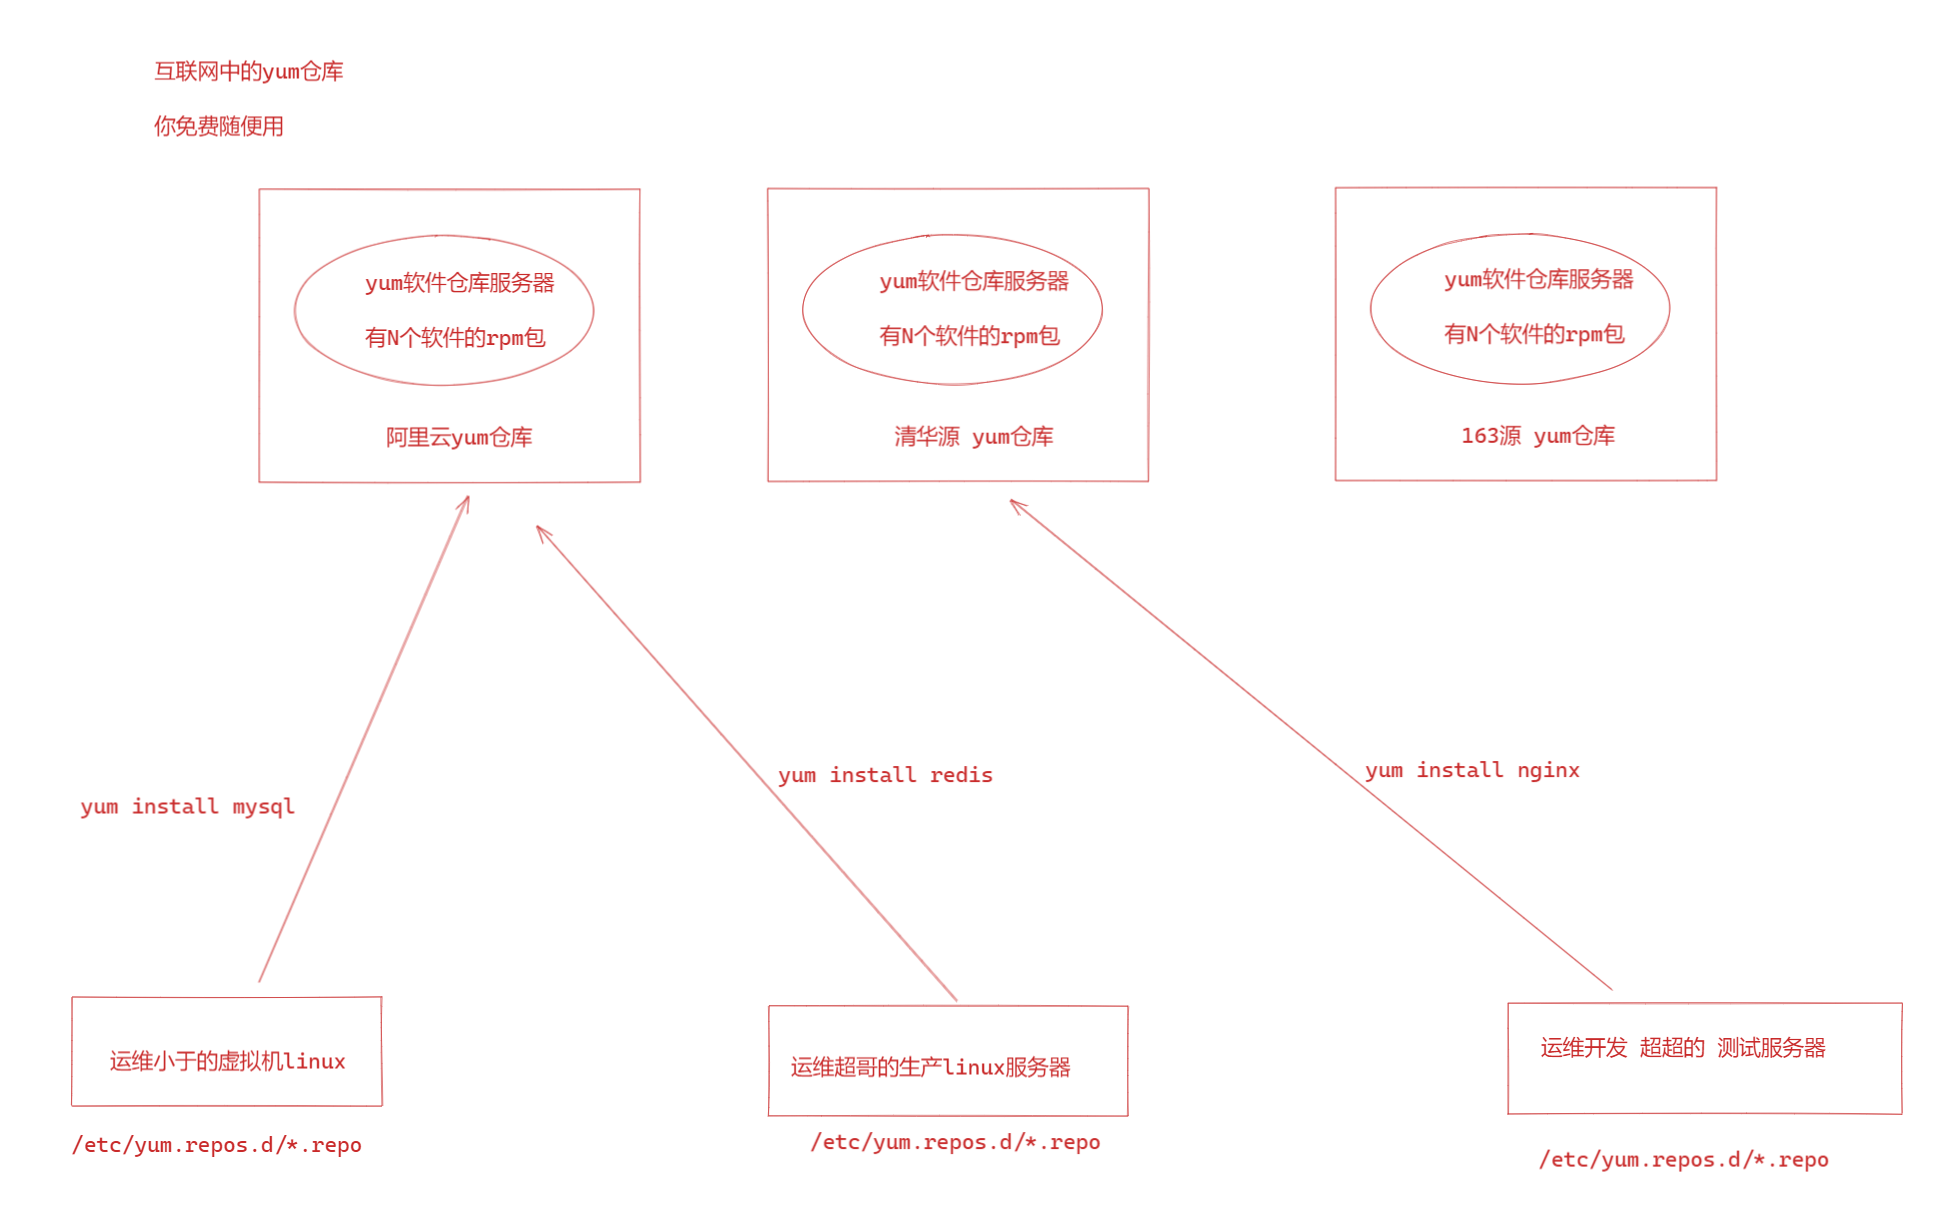
3、配置阿里yum/apt源
使用阿里yum源代替系统默认的yum源
备份默认的yum源

下载新的阿里云yum网络源,当我们yum install 就能够自动去阿里云的yum仓库寻找rpm包,而不是centos官网了。
教程https://developer.aliyun.com/mirror/centos?spm=a2c6h.13651102.0.0.3e221b11nCvpuy
ubuntu版本,阿里云版本
deb https://mirrors.aliyun.com/ubuntu/ jammy main restricted universe multiverse
deb-src https://mirrors.aliyun.com/ubuntu/ jammy main restricted universe multiverse

deb https://mirrors.aliyun.com/ubuntu/ jammy-security main restricted universe multiverse
deb-src https://mirrors.aliyun.com/ubuntu/ jammy-security main restricted universe multiverse

deb https://mirrors.aliyun.com/ubuntu/ jammy-updates main restricted universe multiverse
deb-src https://mirrors.aliyun.com/ubuntu/ jammy-updates main restricted universe multiverse

# deb https://mirrors.aliyun.com/ubuntu/ jammy-proposed main restricted universe multiverse
# deb-src https://mirrors.aliyun.com/ubuntu/ jammy-proposed main restricted universe multiverse

deb https://mirrors.aliyun.com/ubuntu/ jammy-backports main restricted universe multiverse
deb-src https://mirrors.aliyun.com/ubuntu/ jammy-backports main restricted universe multiverse
清华源版本apt源
root@yc-ubuntu ~# cat /etc/apt/sources.list
# 默认注释了源码镜像以提高 apt update 速度,如有需要可自行取消注释
deb https://mirrors.tuna.tsinghua.edu.cn/ubuntu/ jammy main restricted universe multiverse
# deb-src https://mirrors.tuna.tsinghua.edu.cn/ubuntu/ jammy main restricted universe multiverse
deb https://mirrors.tuna.tsinghua.edu.cn/ubuntu/ jammy-updates main restricted universe multiverse
# deb-src https://mirrors.tuna.tsinghua.edu.cn/ubuntu/ jammy-updates main restricted universe multiverse
deb https://mirrors.tuna.tsinghua.edu.cn/ubuntu/ jammy-backports main restricted universe multiverse
# deb-src https://mirrors.tuna.tsinghua.edu.cn/ubuntu/ jammy-backports main restricted universe multiverse

# 以下安全更新软件源包含了官方源与镜像站配置,如有需要可自行修改注释切换
deb http://security.ubuntu.com/ubuntu/ jammy-security main restricted universe multiverse
# deb-src http://security.ubuntu.com/ubuntu/ jammy-security main restricted universe multiverse

# 预发布软件源,不建议启用
# deb https://mirrors.tuna.tsinghua.edu.cn/ubuntu/ jammy-proposed main restricted universe multiverse
# # deb-src https://mirrors.tuna.tsinghua.edu.cn/ubuntu/ jammy-proposed main restricted universe multiverse
root@yc-ubuntu ~#
更新源
root@yc-ubuntu ~# apt update -y
...
获取:16 http://security.ubuntu.com/ubuntu jammy-security/multiverse amd64 DEP-11 Metadata [208 B]
已下载 1,038 kB,耗时 7秒 (141 kB/s)
正在读取软件包列表... 完成
正在分析软件包的依赖关系树... 完成
正在读取状态信息... 完成
所有软件包均为最新。
https://developer.aliyun.com/mirror/ubuntu?spm=a2c6h.13651102.0.0.42f21b11zVRaRr
找到你自己对应的os版本号即可
1. 做好备份
[root@yuchao-linux01 yum.repos.d]# pwd
/etc/yum.repos.d
[root@yuchao-linux01 yum.repos.d]# ls
CentOS-Base.repo CentOS-Debuginfo.repo CentOS-Media.repo CentOS-Vault.repo
CentOS-CR.repo CentOS-fasttrack.repo CentOS-Sources.repo
[root@yuchao-linux01 yum.repos.d]#
[root@yuchao-linux01 yum.repos.d]# mv CentOS-Base.repo CentOS-Base.repo.bak
# 2.获取阿里云yum源
wget -O /etc/yum.repos.d/CentOS-Base.repo https://mirrors.aliyun.com/repo/Centos-7.repo
# 3.查看新的yum源
[root@yuchao-linux01 yum.repos.d]# wget -O /etc/yum.repos.d/CentOS-Base.repo https://mirrors.aliyun.com/repo/Centos-7.repo
--2022-01-18 14:13:57-- https://mirrors.aliyun.com/repo/Centos-7.repo
Resolving mirrors.aliyun.com (mirrors.aliyun.com)... 124.165.127.206, 125.39.76.202, 125.39.76.204, ...
Connecting to mirrors.aliyun.com (mirrors.aliyun.com)|124.165.127.206|:443... connected.
HTTP request sent, awaiting response... 200 OK
Length: 2523 (2.5K) [application/octet-stream]
Saving to: ‘/etc/yum.repos.d/CentOS-Base.repo’
100%[======================================================================>] 2,523 --.-K/s in 0s
2022-01-18 14:13:57 (490 MB/s) - ‘/etc/yum.repos.d/CentOS-Base.repo’ saved [2523/2523]
[root@yuchao-linux01 yum.repos.d]# ll
total 36
-rw--w--w- 1 root root 2523 Dec 26 2020 CentOS-Base.repo 这是新下载的
-rw-r--r--. 1 root root 1664 Apr 29 2018 CentOS-Base.repo.bak
-rw-r--r--. 1 root root 1309 Apr 29 2018 CentOS-CR.repo
-rw-r--r--. 1 root root 649 Apr 29 2018 CentOS-Debuginfo.repo
-rw-r--r--. 1 root root 314 Apr 29 2018 CentOS-fasttrack.repo
-rw-r--r--. 1 root root 630 Apr 29 2018 CentOS-Media.repo
-rw-r--r--. 1 root root 1331 Apr 29 2018 CentOS-Sources.repo
-rw-r--r--. 1 root root 4768 Apr 29 2018 CentOS-Vault.repo
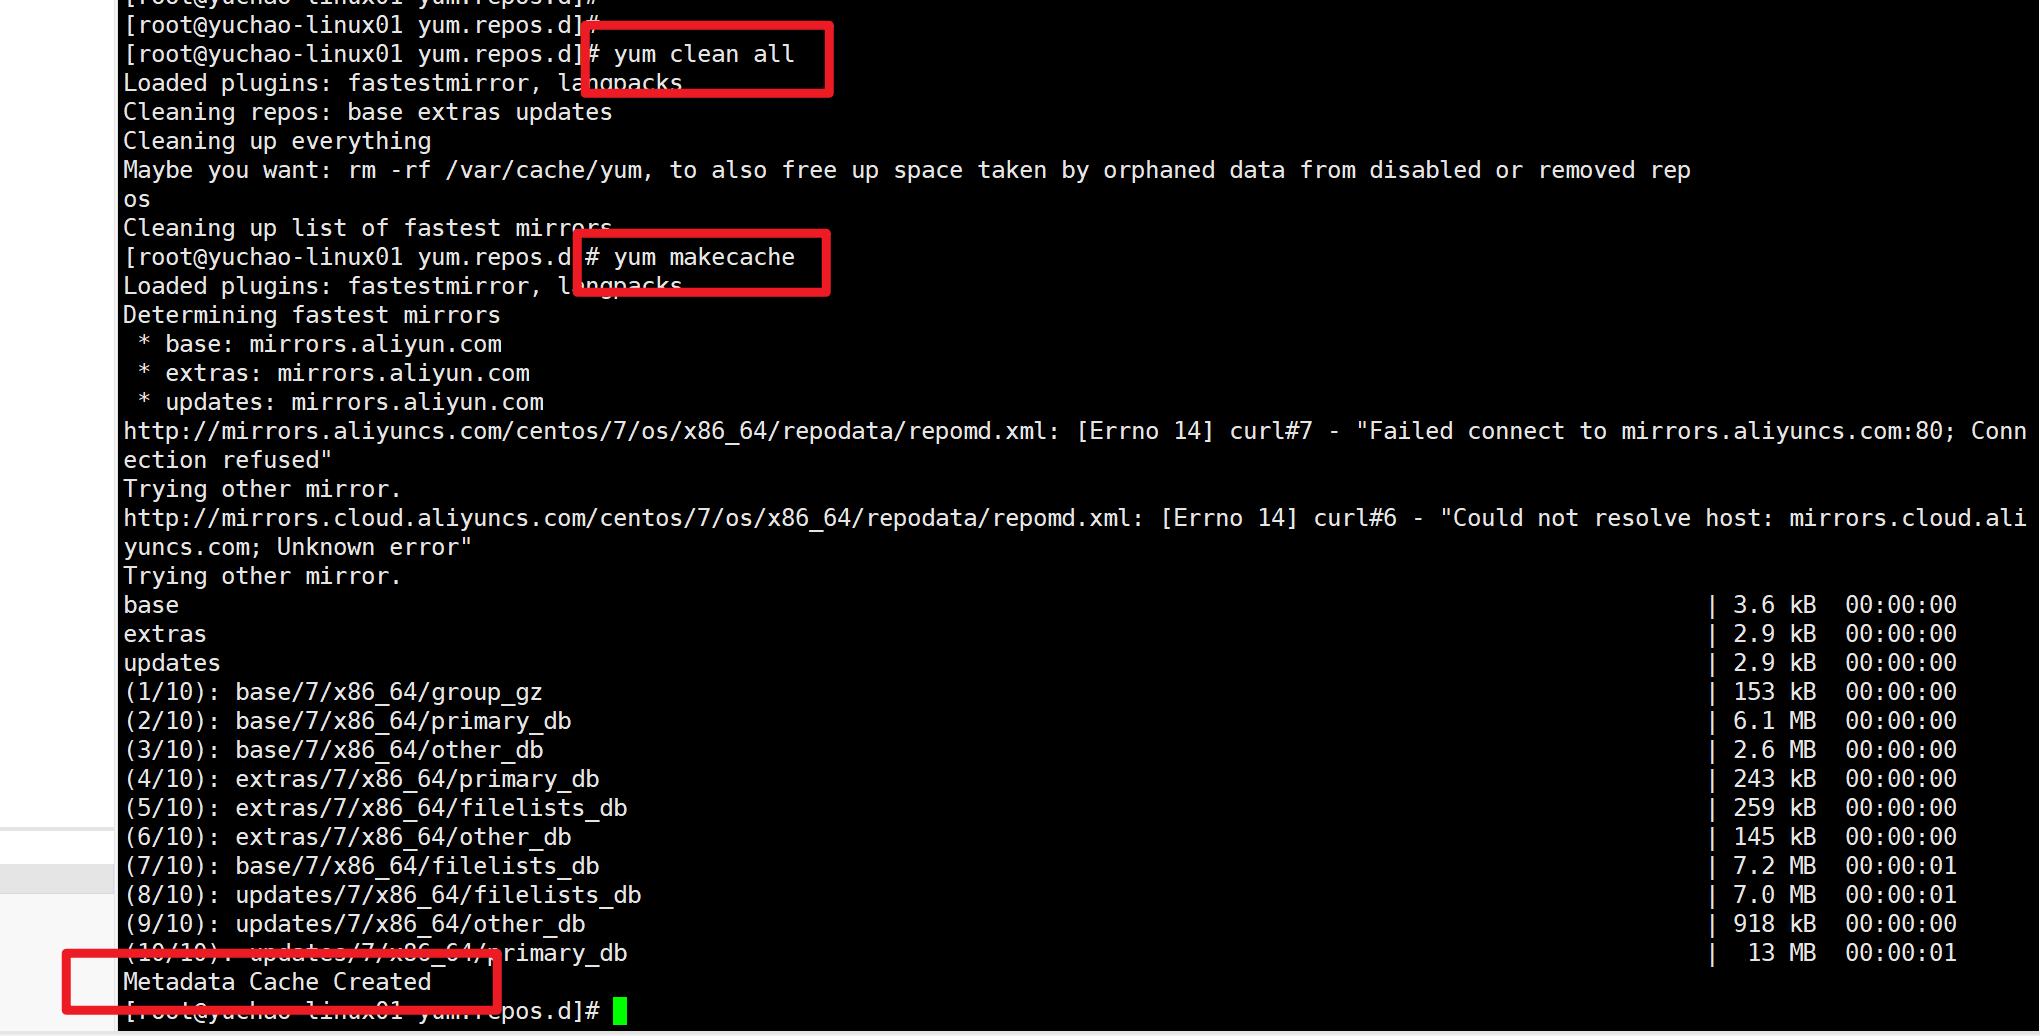
# 4.清空yum缓存
yum clean all
# 5.生成新缓存,便于yum install 加速下载,生成cache
yum makecache
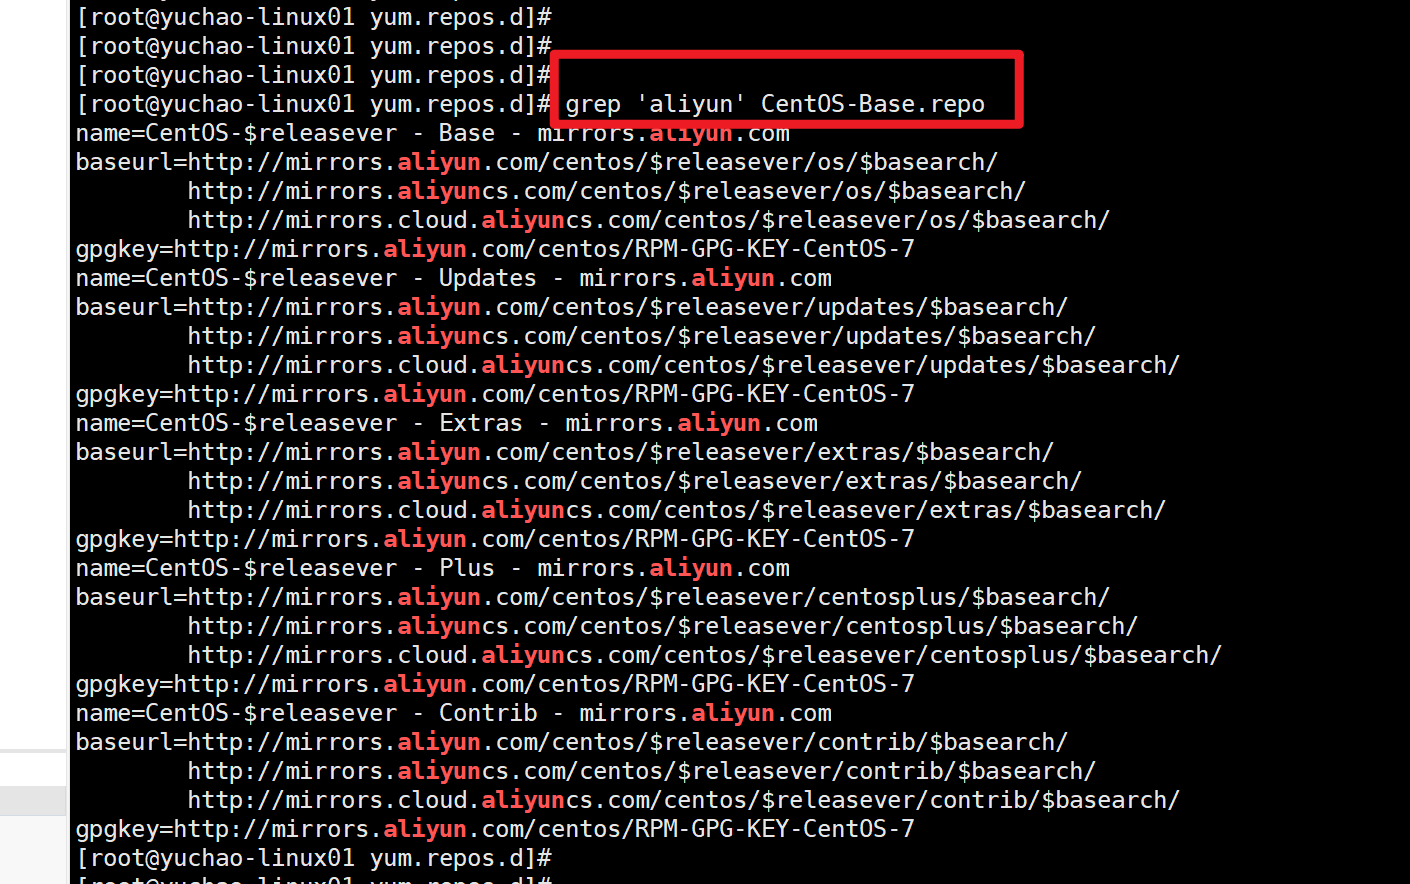
此时的网络yum源配置文件,已经是来自于阿里云的了。
生成缓存
4、yum命令
① 查询操作
语法:# yum search 关键词
linux下的软件搜索,你想装东西,就用yum
[root@yuchao-linux01 yum.repos.d]# yum search firefox
Loaded plugins: fastestmirror, langpacks
Loading mirror speeds from cached hostfile
 * base: mirrors.aliyun.com
 * extras: mirrors.aliyun.com
 * updates: mirrors.aliyun.com
========================================================= N/S matched: firefox =========================================================
firefox.x86_64 : Mozilla Firefox Web browser
firefox.i686 : Mozilla Firefox Web browser

  Name and summary matches only, use "search all" for everything.
[root@yuchao-linux01 yum.repos.d]#
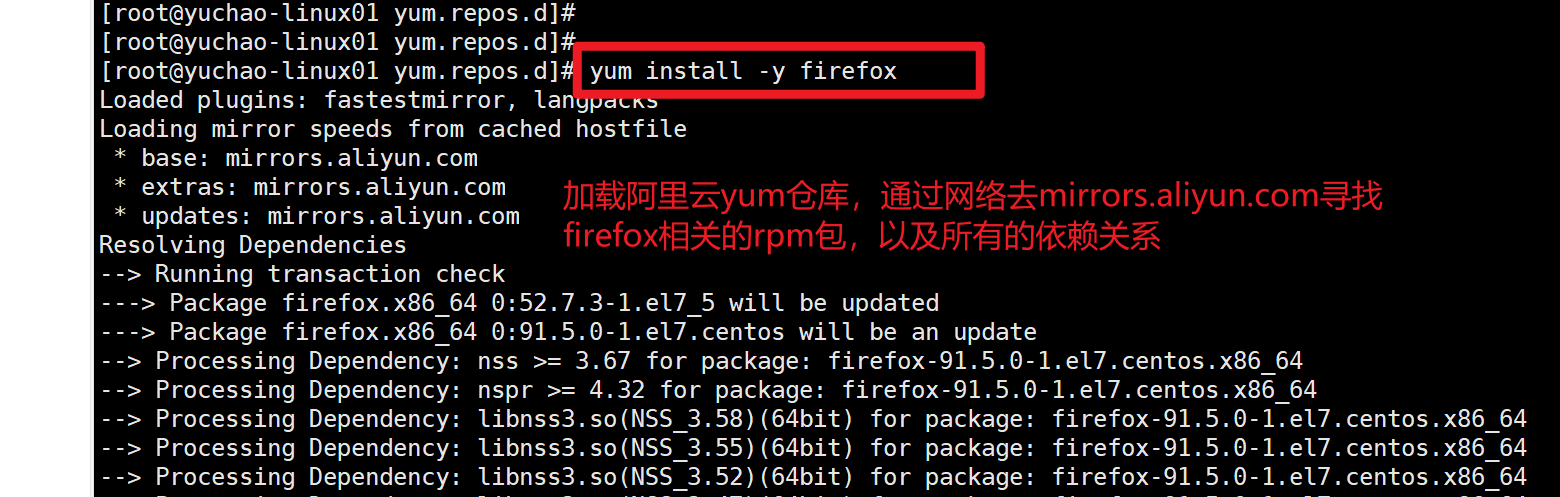
② 安装操作
语法:# yum [-y] install 关键词
[root@yuchao-linux01 yum.repos.d]# yum install -y firefox
确保安装完毕

确保浏览器可用了
③ 卸载操作
语法:# yum [-y] remove 关键词
如何删除火狐浏览器?
[root@yuchao-linux01 yum.repos.d]# yum remove -y firefox
④ 更新操作
语法:#yum [-y] update [包的关键词]
==特别注意:包的关键词如果不写,则表示更新整个系统(全局更新,也包含内核)==
==千万别直接执行yum update -y,升级是一个重大的事==
升级,代表着所有内容都会更新,牵一发而动全身,你很多软件可能会全面崩溃。
# 升级vim
[root@yuchao-linux01 yum.repos.d]# yum update -y vim

若是升级一个不存在的软件,则提示找不到
[root@yuchao-linux01 yum.repos.d]# yum update -y firefox
Loaded plugins: fastestmirror, langpacks
Loading mirror speeds from cached hostfile
 * base: mirrors.aliyun.com
 * extras: mirrors.aliyun.com
 * updates: mirrors.aliyun.com
Package(s) firefox available, but not installed.
No packages marked for update
⑤yum获取软件依赖
yum命令本身就可以用来下载一个RPM包,标准的yum命令提供了--downloadonly(只下载)的选项来达到这个目的。
==该功能主要用于,离线安装,提前获取好rpm,这是一个非常省事的办法==
[root@yuchao-linux01 opt]# yum install --downloadonly --downloaddir=. python3
[root@yuchao-linux01 opt]# ll
total 9488
-rw--w--w- 1 root root   71844 Nov 18  2020 python3-3.6.8-18.el7.x86_64.rpm
-rw--w--w- 1 root root 7286976 Nov 18  2020 python3-libs-3.6.8-18.el7.x86_64.rpm
-rw--w--w- 1 root root 1702324 Oct 15  2020 python3-pip-9.0.3-8.el7.noarch.rpm
-rw--w--w- 1 root root  644052 Aug 23  2019 python3-setuptools-39.2.0-10.el7.noarch.rpm
[root@yuchao-linux01 opt]#
[root@yuchao-linux01 opt]#

此时你就可以拷贝走这些rpm包,再进行安装即可
⑥扩展rpmdep工具
这个只做了解,用于练习linux命令操作,以及yum操作。
还有一个办法是使用rpmdep工具,rpmdep是一个命令行工具,可以显示已安装包的完整包依赖关系图。
该工具会分析RPM包的依赖性,从完整的排完序的拓扑图中摘取部分包的信息,形成列表展示给用户。
该工具的输出结果可以直接使用到Dotty(可视化展示工具)中去。
1.获取工具
[root@yuchao-linux01 yum.repos.d]# wget http://downloads.sourceforge.net/project/rpmorphan/rpmorphan/1.14/rpmorphan-1.14-1.noarch.rpm

2.安装工具
[root@yuchao-linux01 yum.repos.d]# rpm -ivh rpmorphan-1.14-1.noarch.rpm

3.安装绘图工具graphviz
[root@yuchao-linux01 yum.repos.d]#  yum install graphviz -y

4.生成软件依赖关系图片
[root@yuchao-linux01 opt]# rpmdep.pl -dot gzip.dot gzip
gzip depends upon basesystem,bash,ca-certificates,centos-release,chkconfig,coreutils,filesystem,gawk,glibc,glibc-common,gmp,grep,info,keyutils-libs,krb5-libs,libacl,libattr,libcap,libcom_err,libffi,libgcc,libselinux,libsepol,libstdc++,libtasn1,libverto,ncurses,ncurses-base,ncurses-libs,nspr,nss-softokn-freebl,nss-util,openssl-libs,p11-kit,p11-kit-trust,pcre,popt,sed,setup,tzdata,zlib
[root@yuchao-linux01 opt]#
[root@yuchao-linux01 opt]#
[root@yuchao-linux01 opt]# dot
dot      dot2gxl  dotty
[root@yuchao-linux01 opt]# dot -Tpng -o output.png gzip.dot
[root@yuchao-linux01 opt]# ls
gzip.dot  output.png  tcpdump-4.9.2-4.el7_7.1.x86_64.rpm

5.在图形化下查看png图片
同理,也可以查看firefox浏览器的安装,底层牵扯了哪些依赖,如果没有yum都得你自己去处理
# firefox
[root@yuchao-linux01 opt]# rpmdep.pl -dot firefox.dot firefox
[root@yuchao-linux01 opt]# dot -Tpng -ofirefox.png firefox.dot

# python
[root@yuchao-linux01 opt]# rpmdep.pl -dot python.dot python
二、抖音云部署discuz论坛
https://www.volcengine.com/

https://www.volcengine.com/activity/new
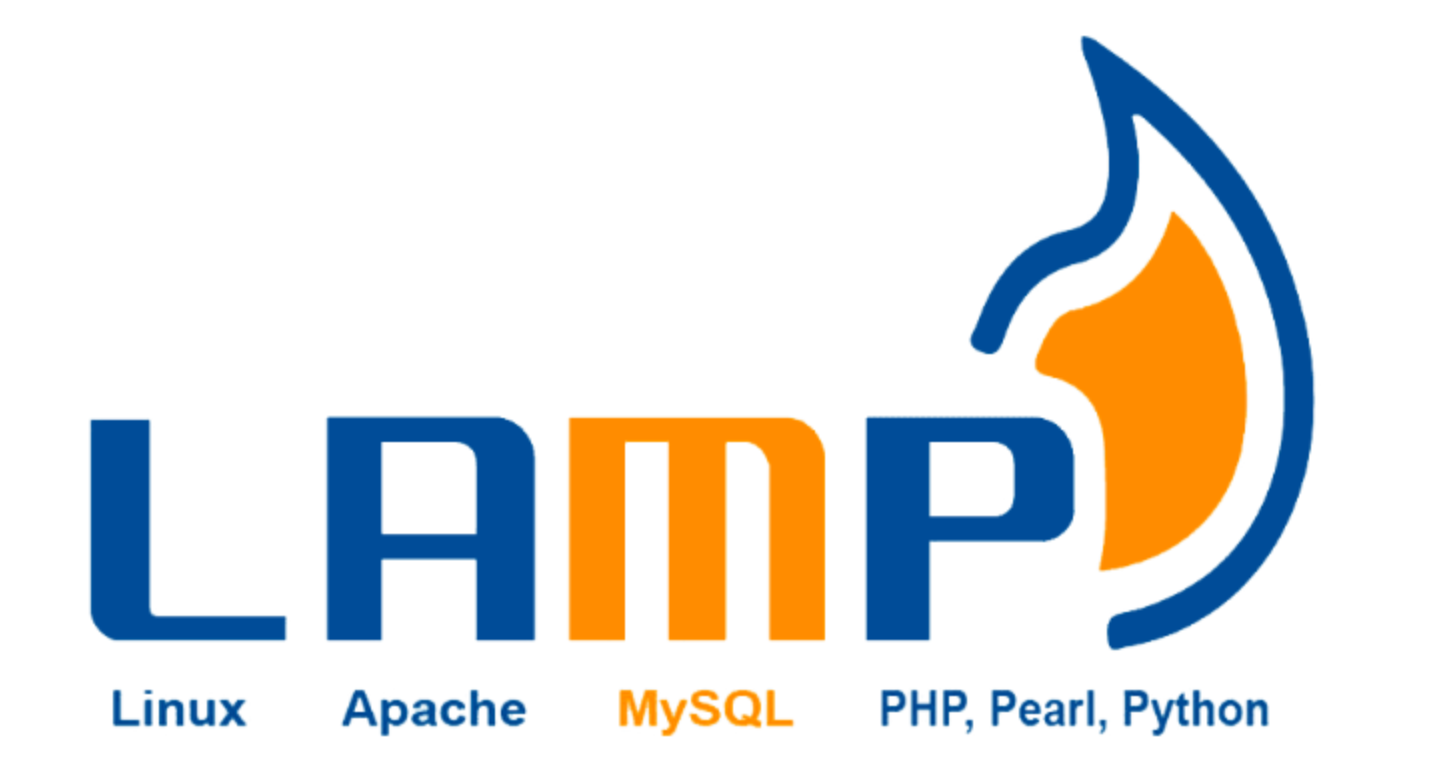
1、什么是LAMP,基于云服务部署案例
LAMP是公认的最常见、最古老的黄金Web技术栈、
其实就是

Linux 操作系统
Apache/Nginx    web服务器
Mysql/Mariadb
Perl/Php/Python
jd/taobao/ 前端(vue/react) 前后端分离运维架构
LAMP:==L==inux + ==A==pache + ==M==ySQL + ==P==HP LAMP 架构(组合)
LNMP:Linux + Nginx + MySQL + php-fpm LNMP 架构(组合)
lamp
lnmp

Linux
Linux到底好在哪?用Linus本人的话说就是,普通老百姓用户,压根别说你是在使用操作系统,你需要的只是应用程序,而不是操作系统。
操作系统主要是提供给程序员API,用于构建和运行应用的一个平台。
如果来说,你常用的应用在Linux下运行的更好,更方便,那没问题。
但是如果你平时用的软件,都和Linux没什么关系,那你没必要选择Linux。
那当然作为运维人员,你可以一手使用windows、一手使用Linux,毕竟你的服务器运维工作,几乎都是Linux环境了。
Linux系统主要是以开发者为中心,Windows主要以消费者为中心这是本质的区别。
Linux的特点是几乎所有的开发任务相关工具,都有很完善的支持,从底层的编译器,make编译工具,到bash脚本,git代码管理,vim编辑器,依赖管理工具等等都很齐全。
然而Windows/Mac的操作系统很少能完善这些开发工具的,Linux则是默认预装的开发环境。
WIndows几乎都是图形化接口,而Linux几乎都是现有命令行,再由图形化操作接口,更容易实现自动化。

apache
Apache Web Server虽然称之为web服务器,但是不是意味着他是一个物理服务器,它只是电脑软件中的一个软件而已,Web服务器的作用是将HTTP请求从前端转发到后端应用上。
必须用web server的目的
- 反向代理
- 负载均衡
- 日志
- 限流
php
PHP是一门服务端脚本编程语言,主要用于web开发,常用PHP脚本嵌入HTML源码中执行。
PHP是全球知名的编程语言之一,程序员可以免费试用,PHP支持多种操作系统,开发效率高,支持多种数据库操作。
国内众多网站,百度、雅虎、新浪都在大量使用PHP语言进行开发,知名的论坛软件Discuz也是由PHP开发且占据了80%的论坛软件市场。电商,互联网,php爆火,百度还在用,大公司也在用,边角业务。
==世界上最好的语言(梗)==
MySQL
Mysql是一款数据库管理系统,也就是一个存储数据的工具,用户可以自行对数据库进行增加、删除、修改、查询等操作。
MySQL是数据库管理系统中的一款软件,被业界广泛使用,例如新浪、QQ、淘宝、都在大量使用MySQL数据库。
腾讯QQ使用Linux与MySQL数据库,存储注册用户2.8亿的信息,活跃人数9000万,凭借万台服务器搭建的数据库集群,腾讯QQ同时在线人数也达到了千万,这证明了MySQL数据库的大容量、快速响应特点。
MySQL是一款关系型数据库,尤其适合Web应用,特别是电商领域,MySQL遍布各种行业、移动、爱立信、惠普、银行、思科、摩托萝拉、等等。
excel数据表,10W张表
SQL能力
LAMP图解
LAMP(Linux-Apache-MySQL-PHP)网站架构是目前国际流行的Web框架,该框架包括:Linux操作系统,Apache网络服务器,MySQL数据库,Perl、PHP或者Python编程语言
所有组成产品均是开源软件,是国际上成熟的架构框架,很多流行的商业应用都是采取这个架构
LAMP具有通用、跨平台、高性能、低价格的优势,因此LAMP无论是性能、质量还是价格都是企业搭建网站的首选平台。
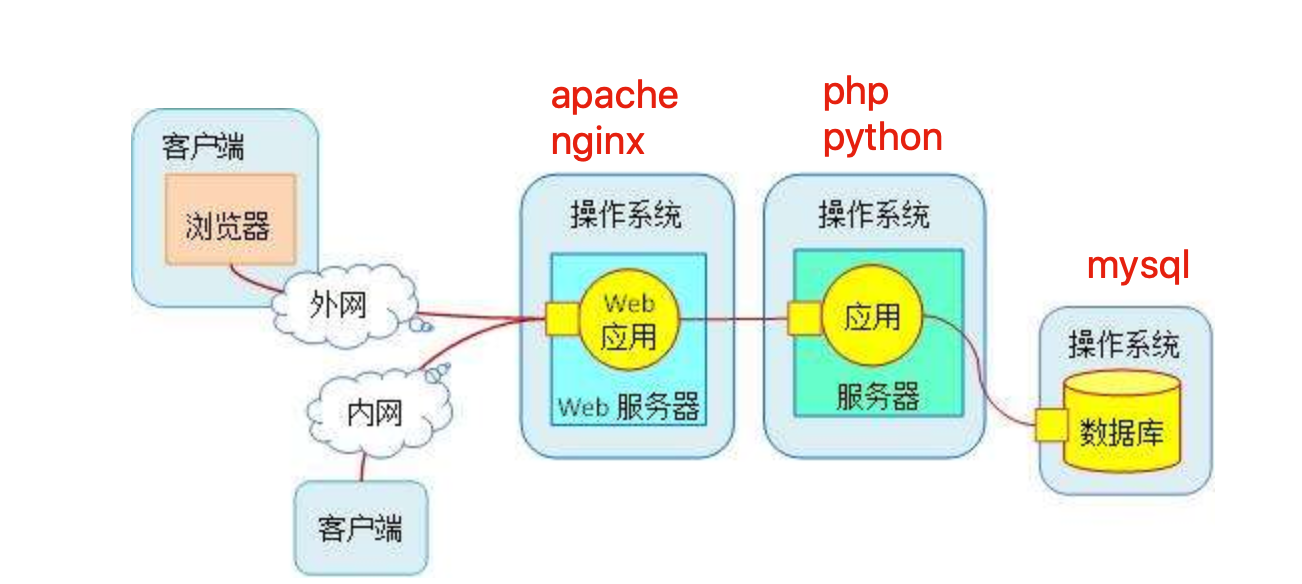
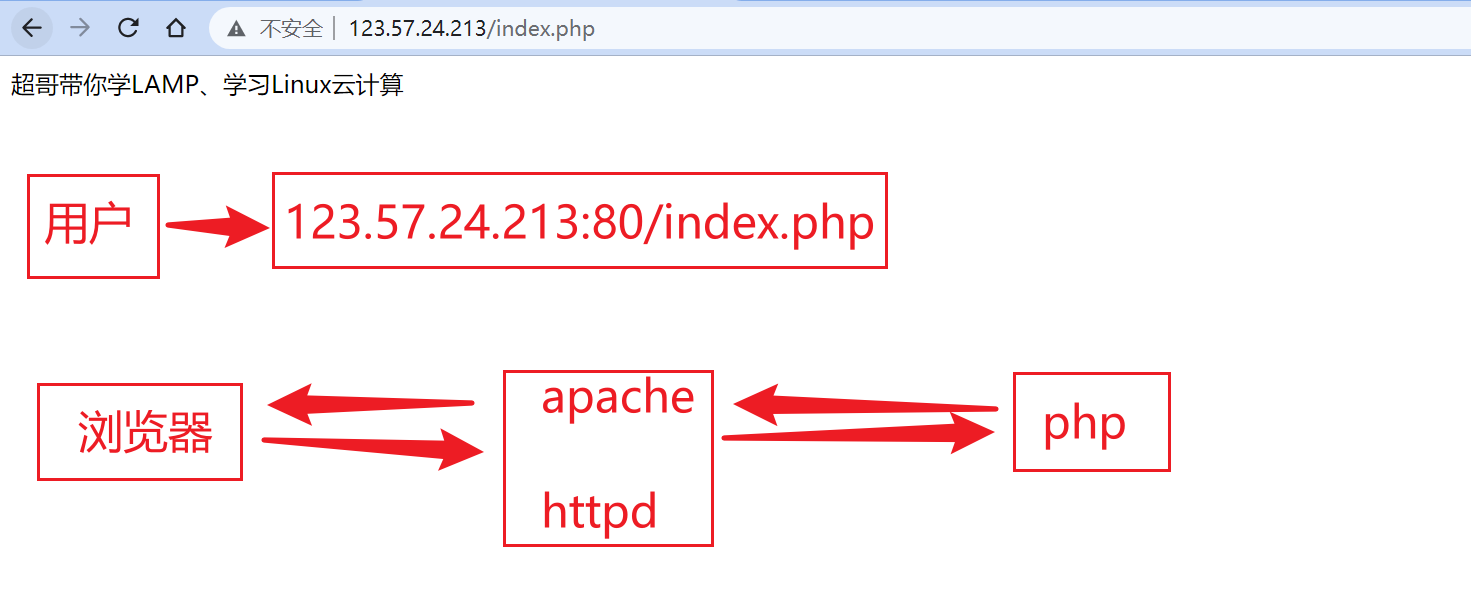
我们是怎么访问网站的。

三、LAMP环境准备(阿里云)
这一节,我们就要进行搭建一个论坛,并且放入到互联网中,体验下,一个网站,从零到可以在浏览器访问到,是什么过程。
需要你掌握超哥前面讲的知识
1.linux基础命令,文件操作,ssh登录,解压缩等
2.linux软件安装,管理
3.理解一整套,运维部署的流程,做好清晰的部署笔记。
4.理解阿里云服务器的购买、使用流程。
要想部署一个互联网上可以访问到的环境,必须先具备以下内容 :
服务器(IP、帐号密码、终端)、相应的软件、域名(备案、解析)、代码等。
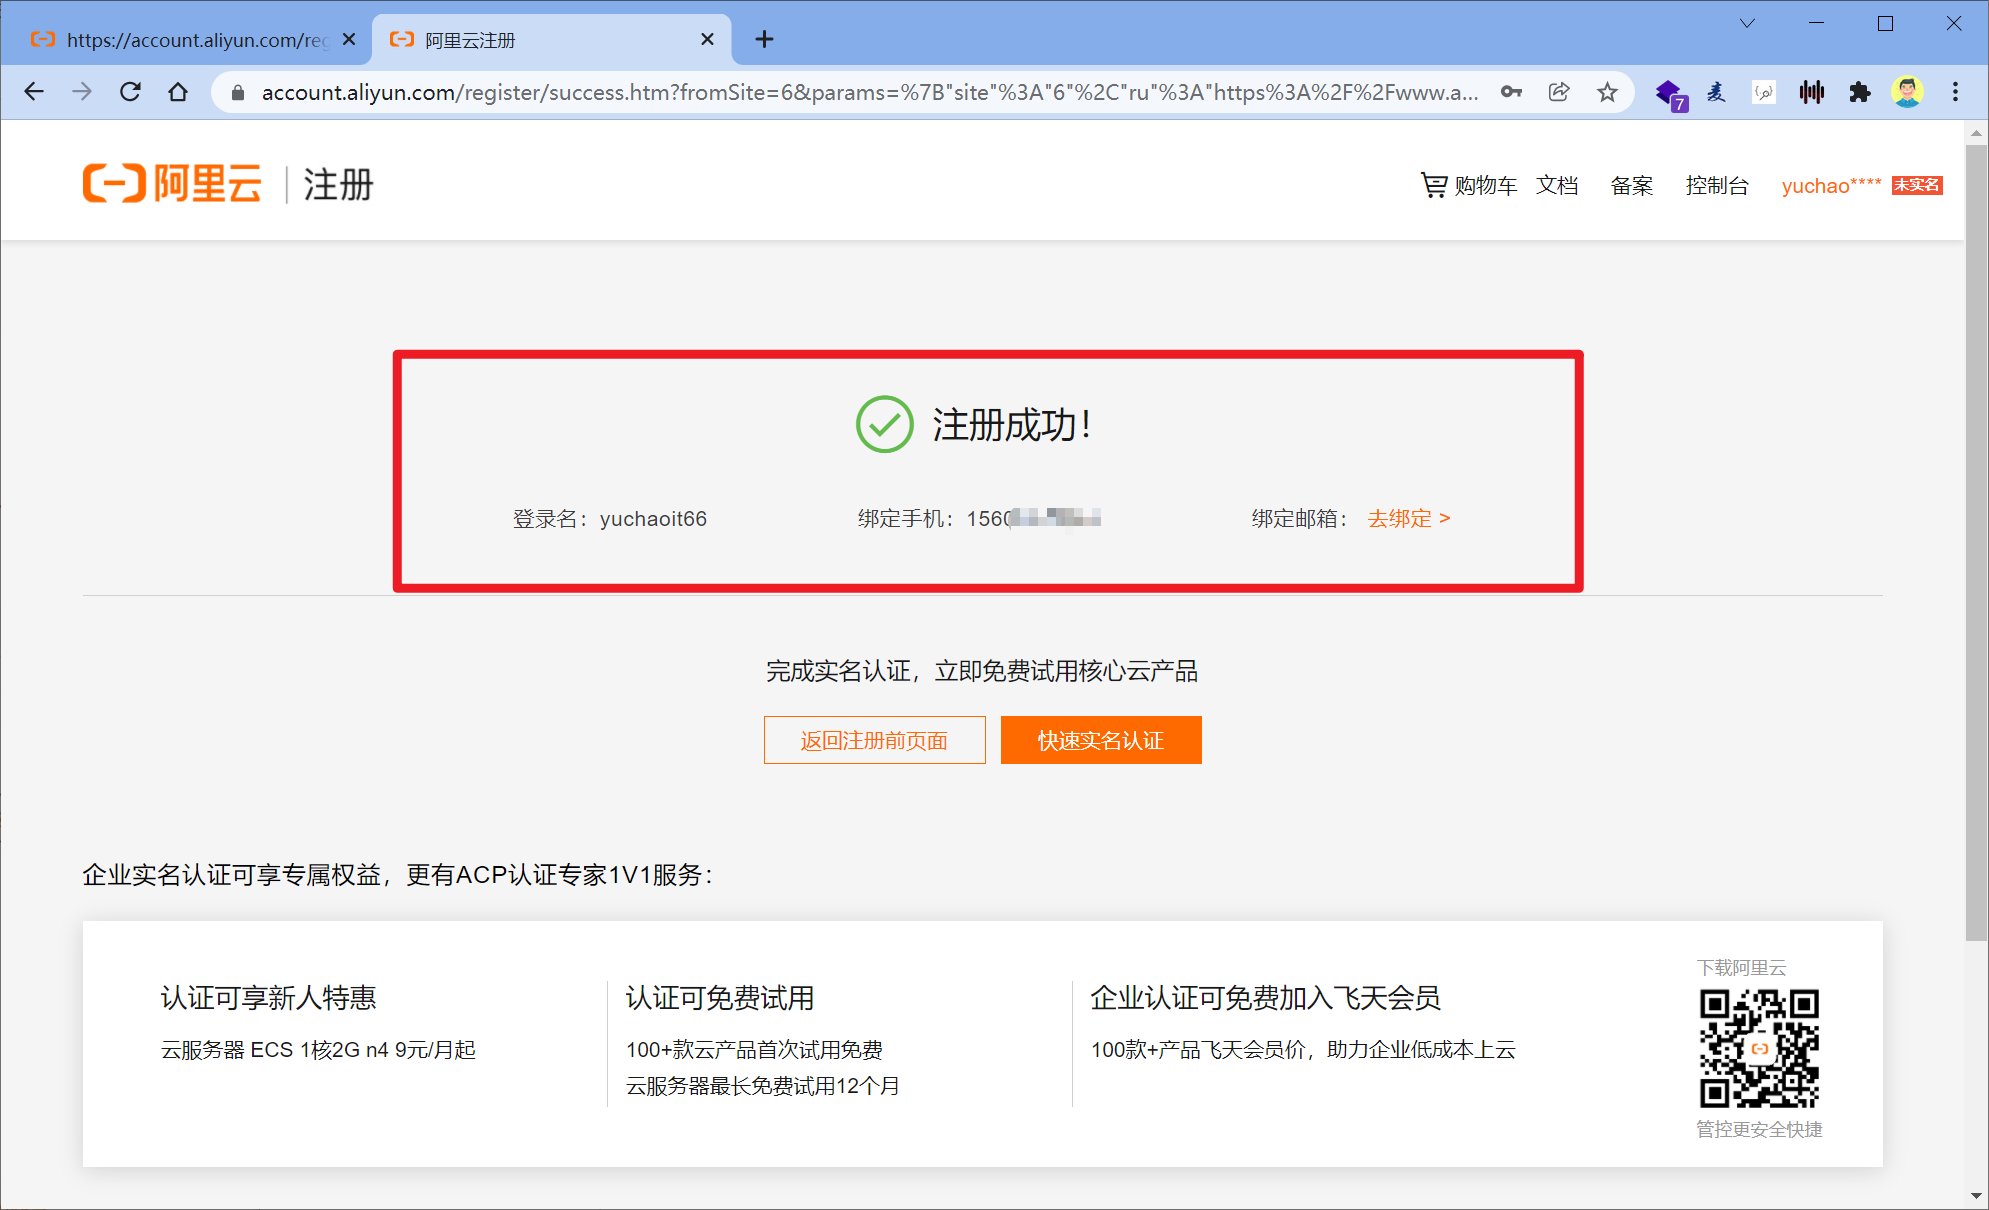
1、注册阿里云账号
阿里云官网:https://www.aliyun.com/
立即注册

账户密码注册
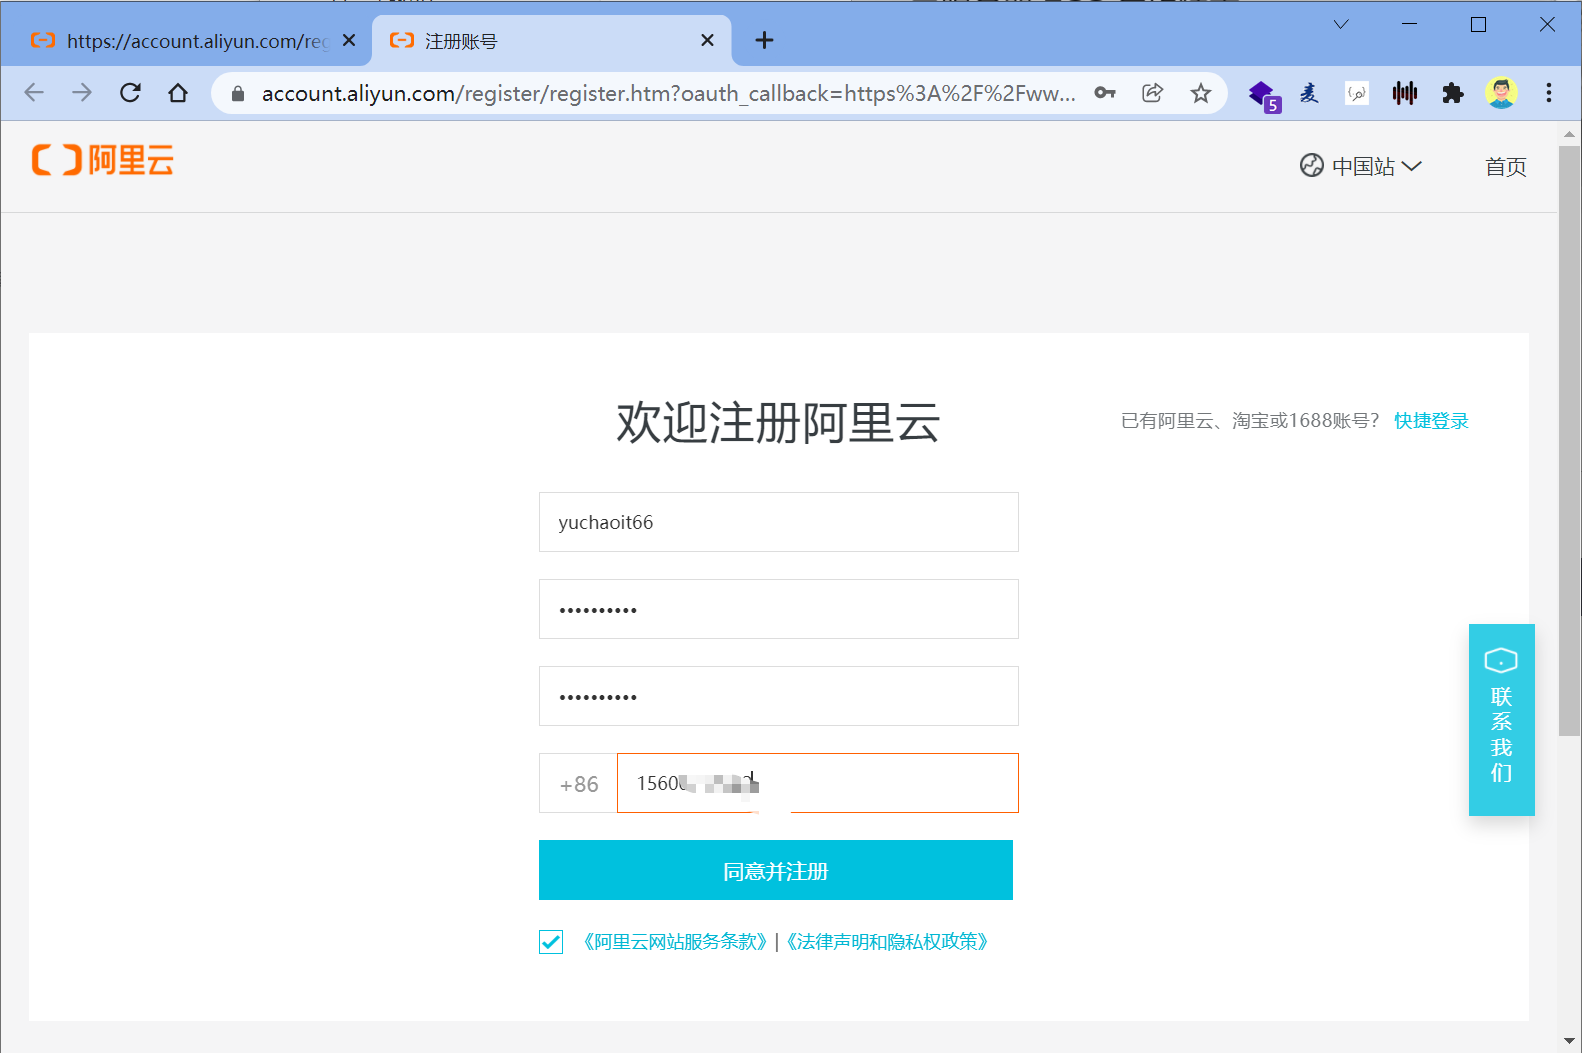
填入验证码注册
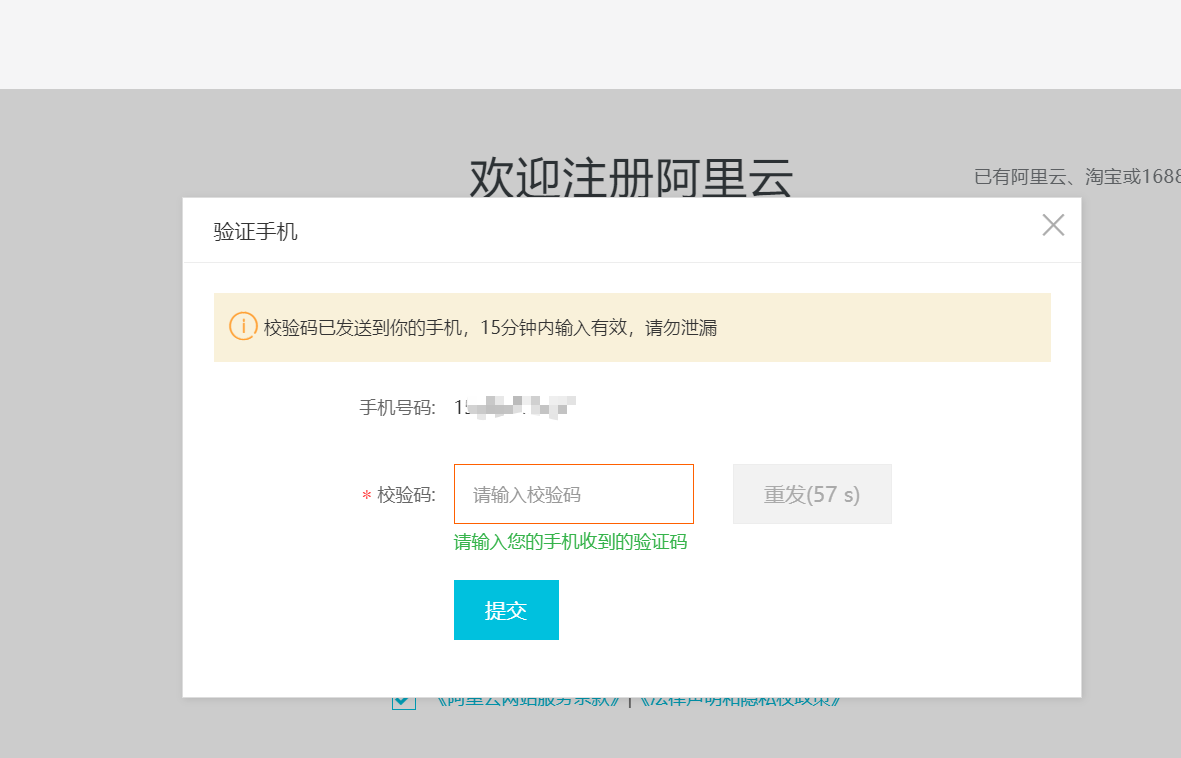
注册成功
2、实名认证
购买服务器要进行实名认证,用于后面的域名购买,域名备案。
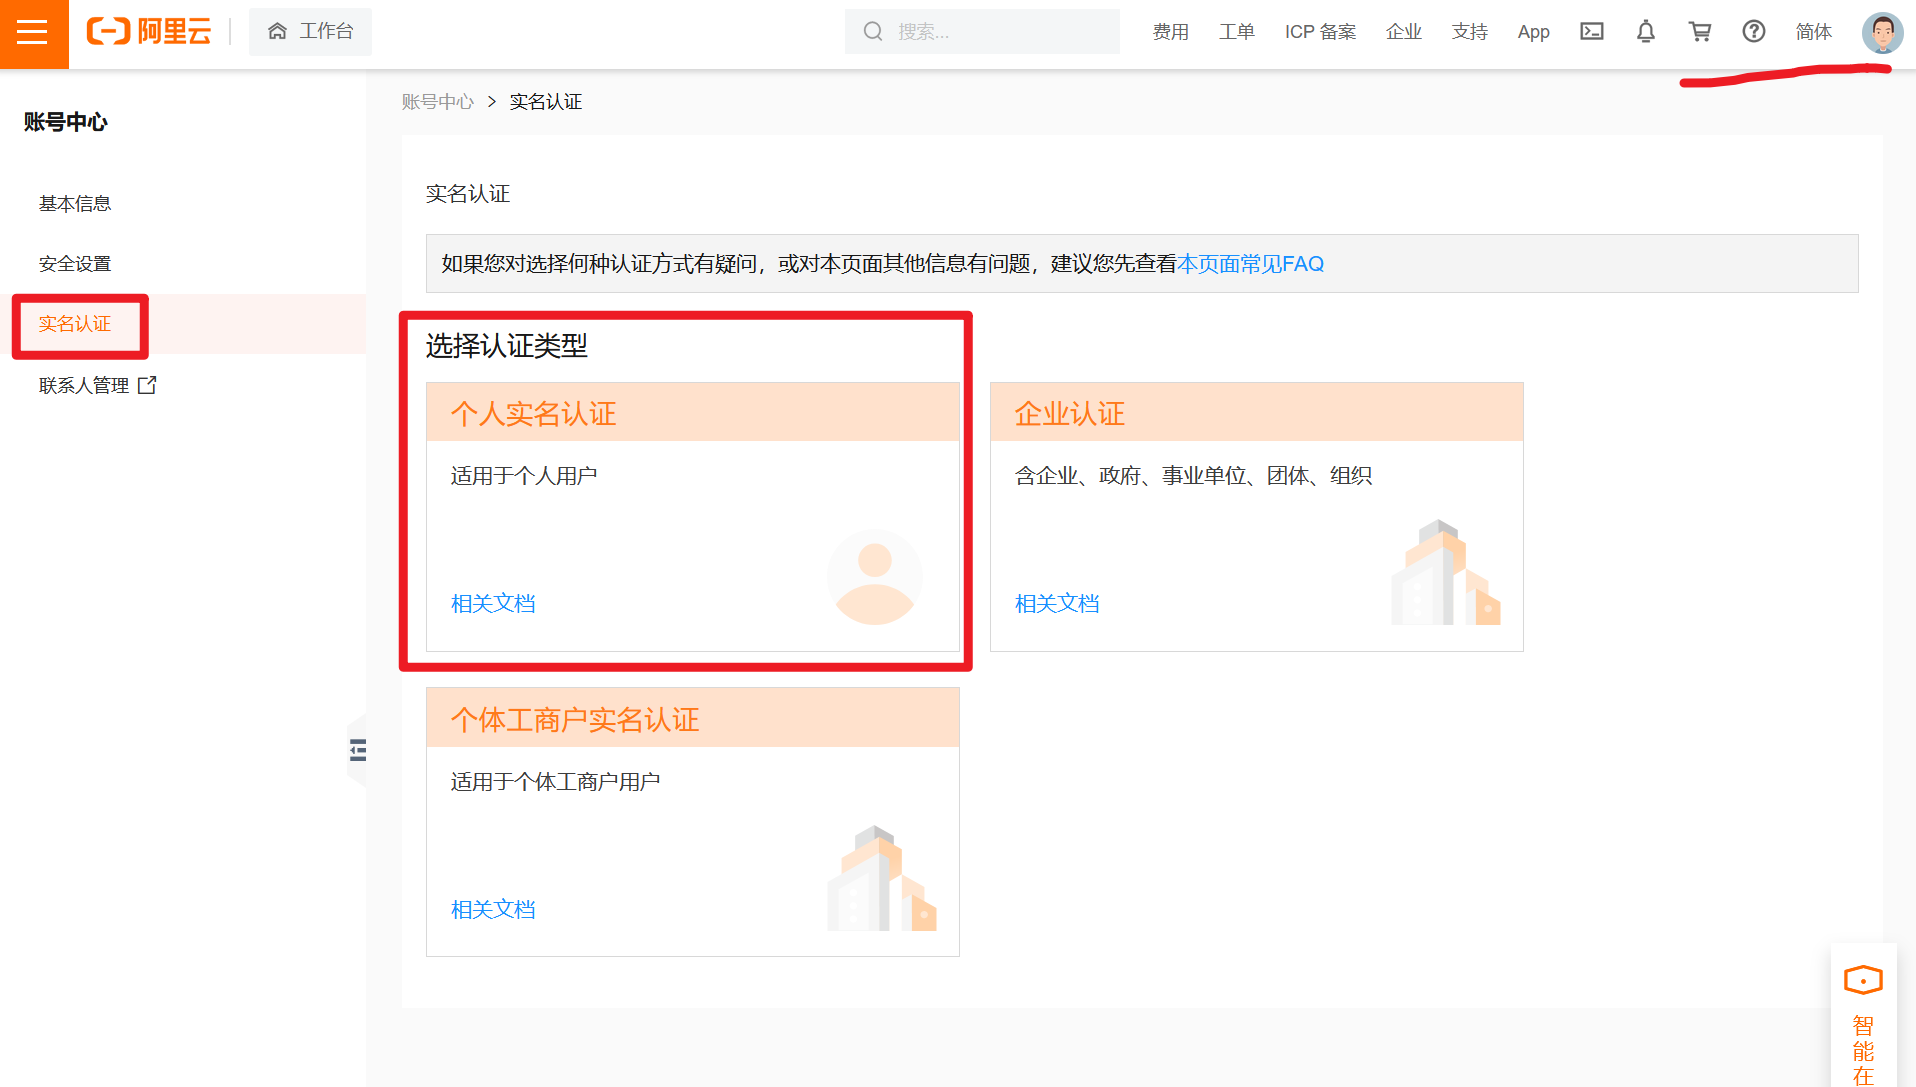
进行个人实名认证

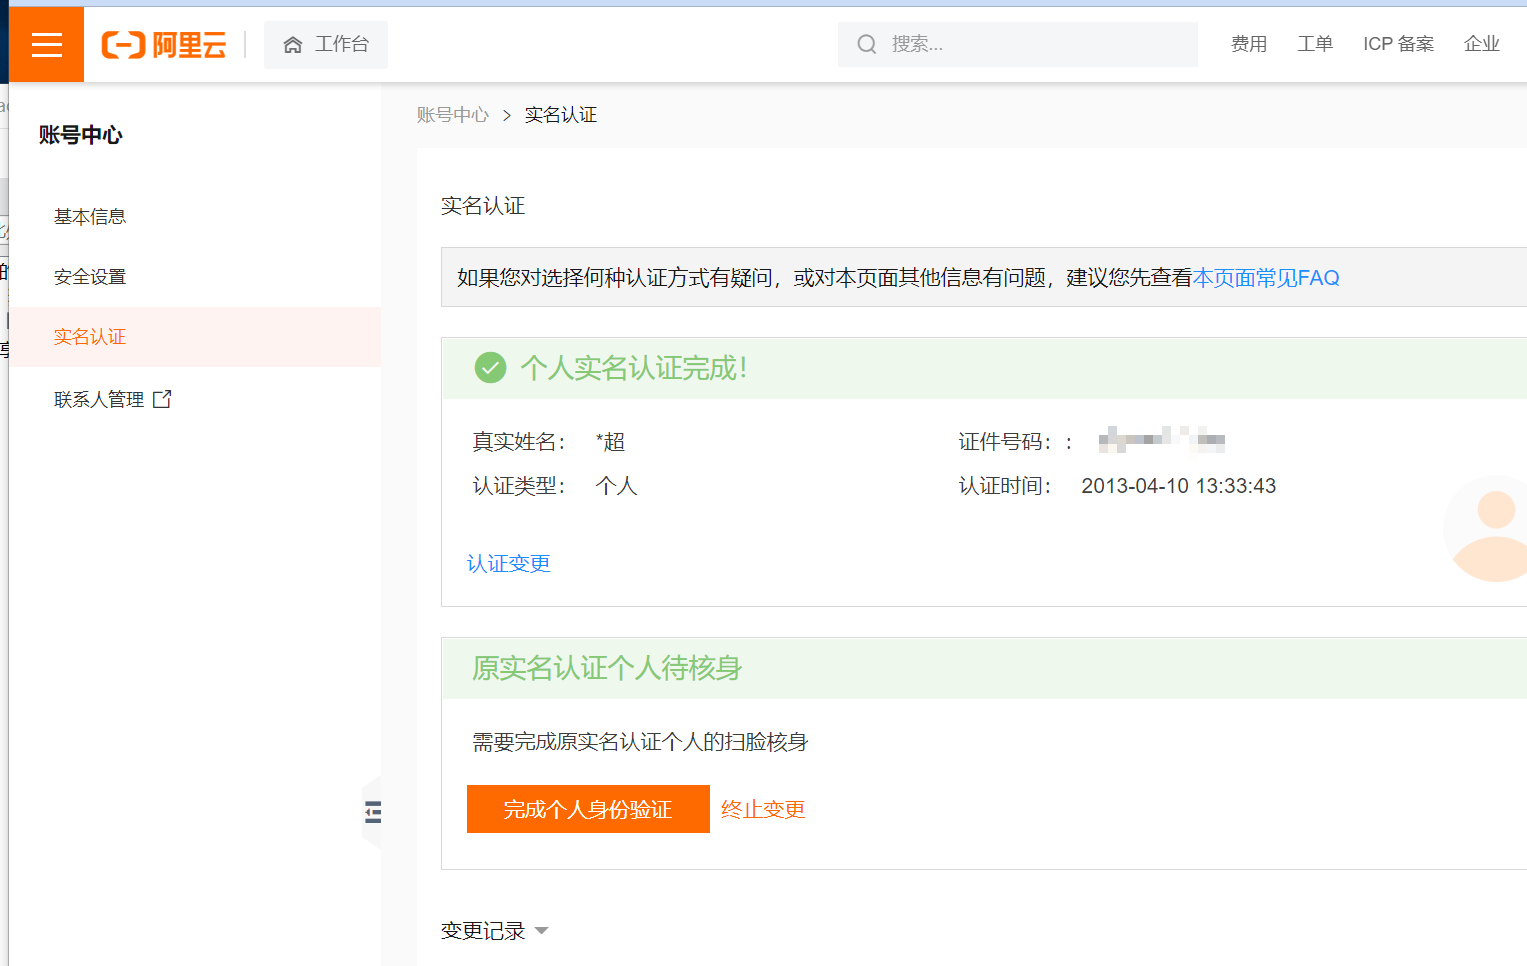
快捷使用支付宝实名认证

后续填写信息后,完整实名认证。
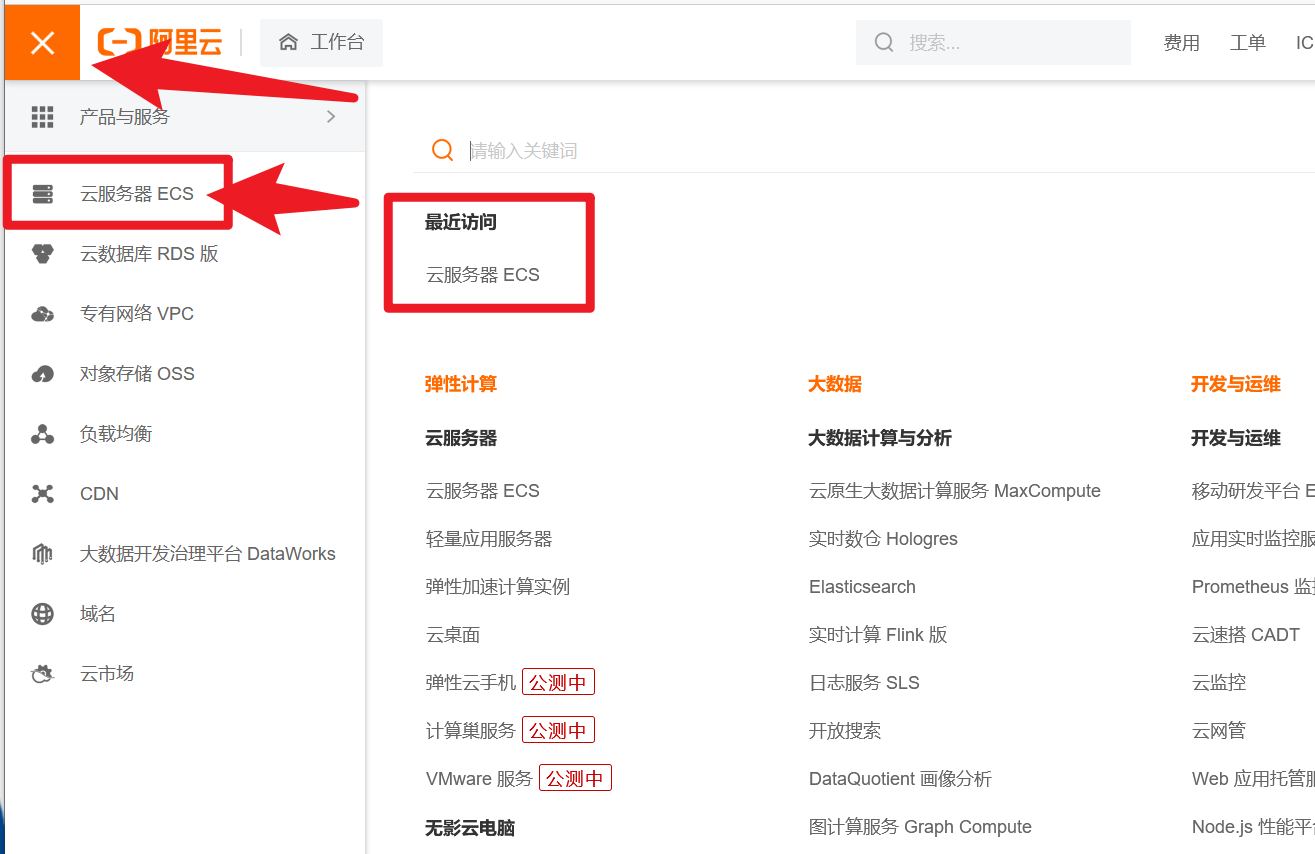
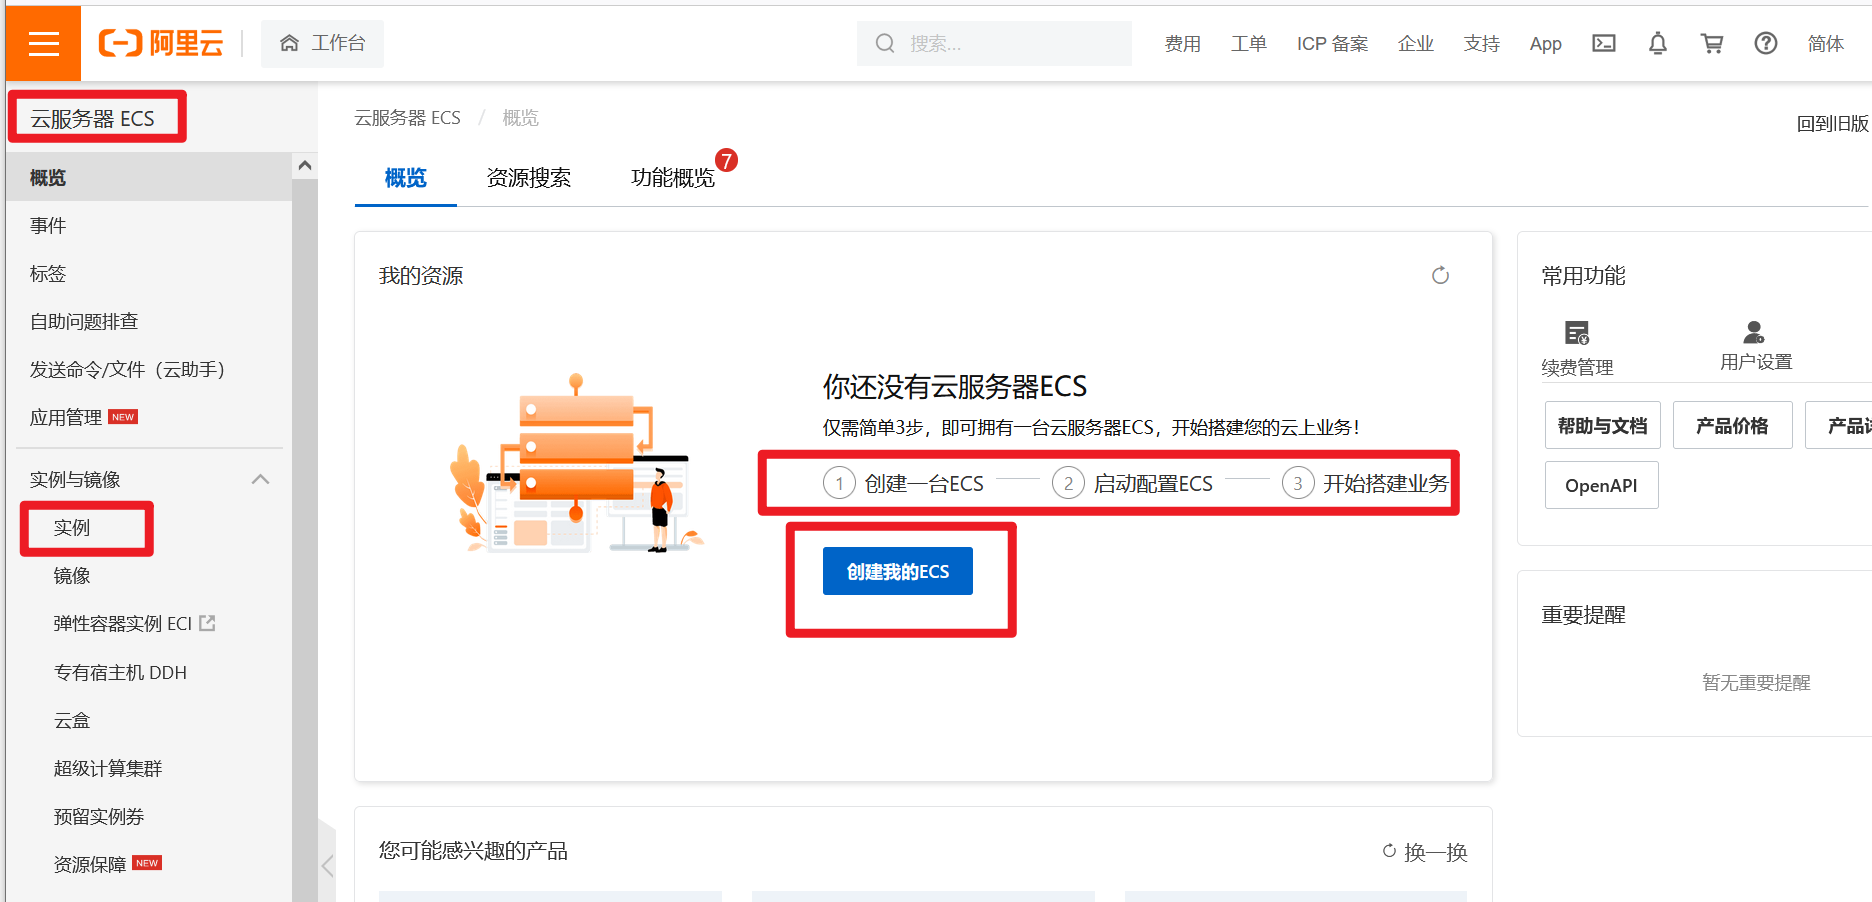
3、进入管理控制台
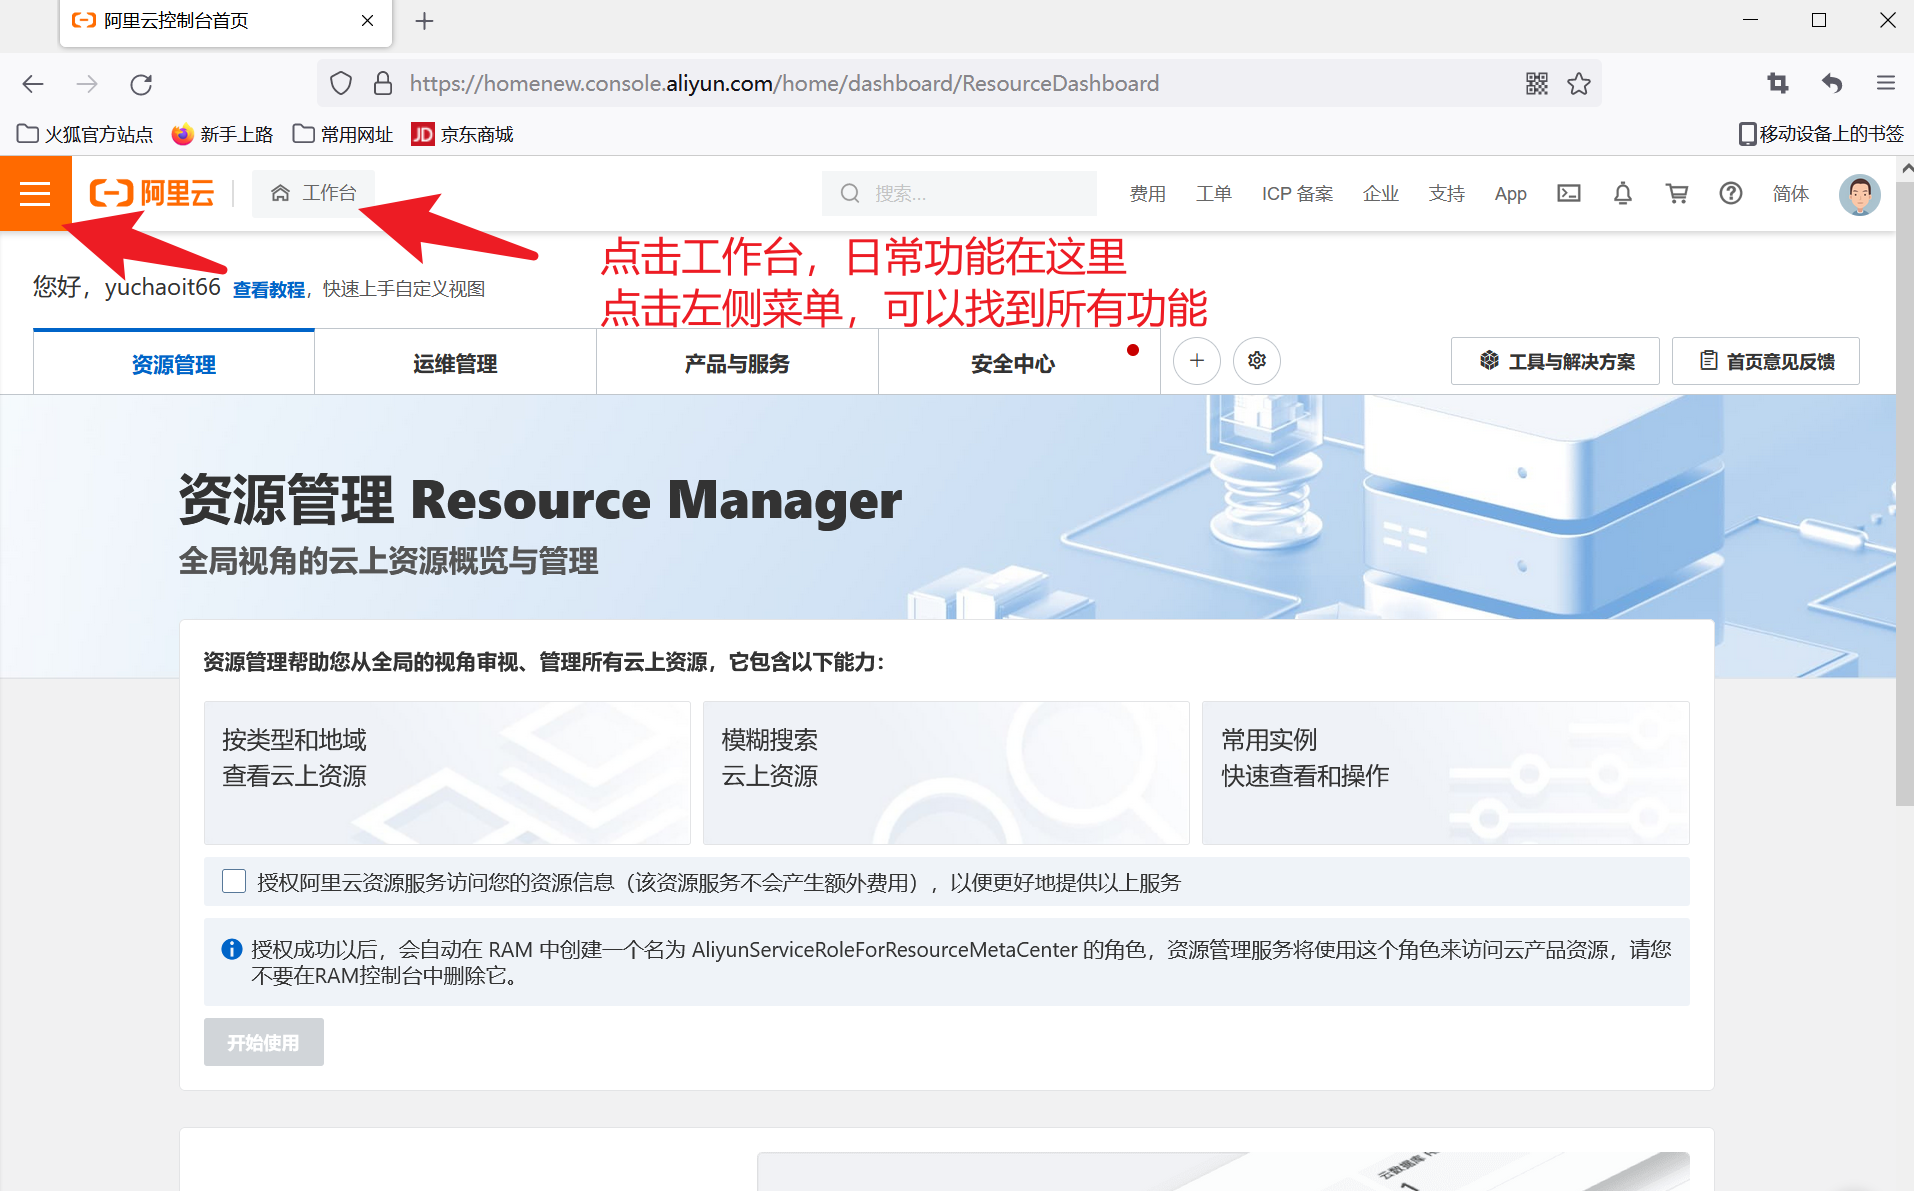
找到阿里云服务器ECS功能
体验阿里云服务器

了解一下阿里云是什么ECS
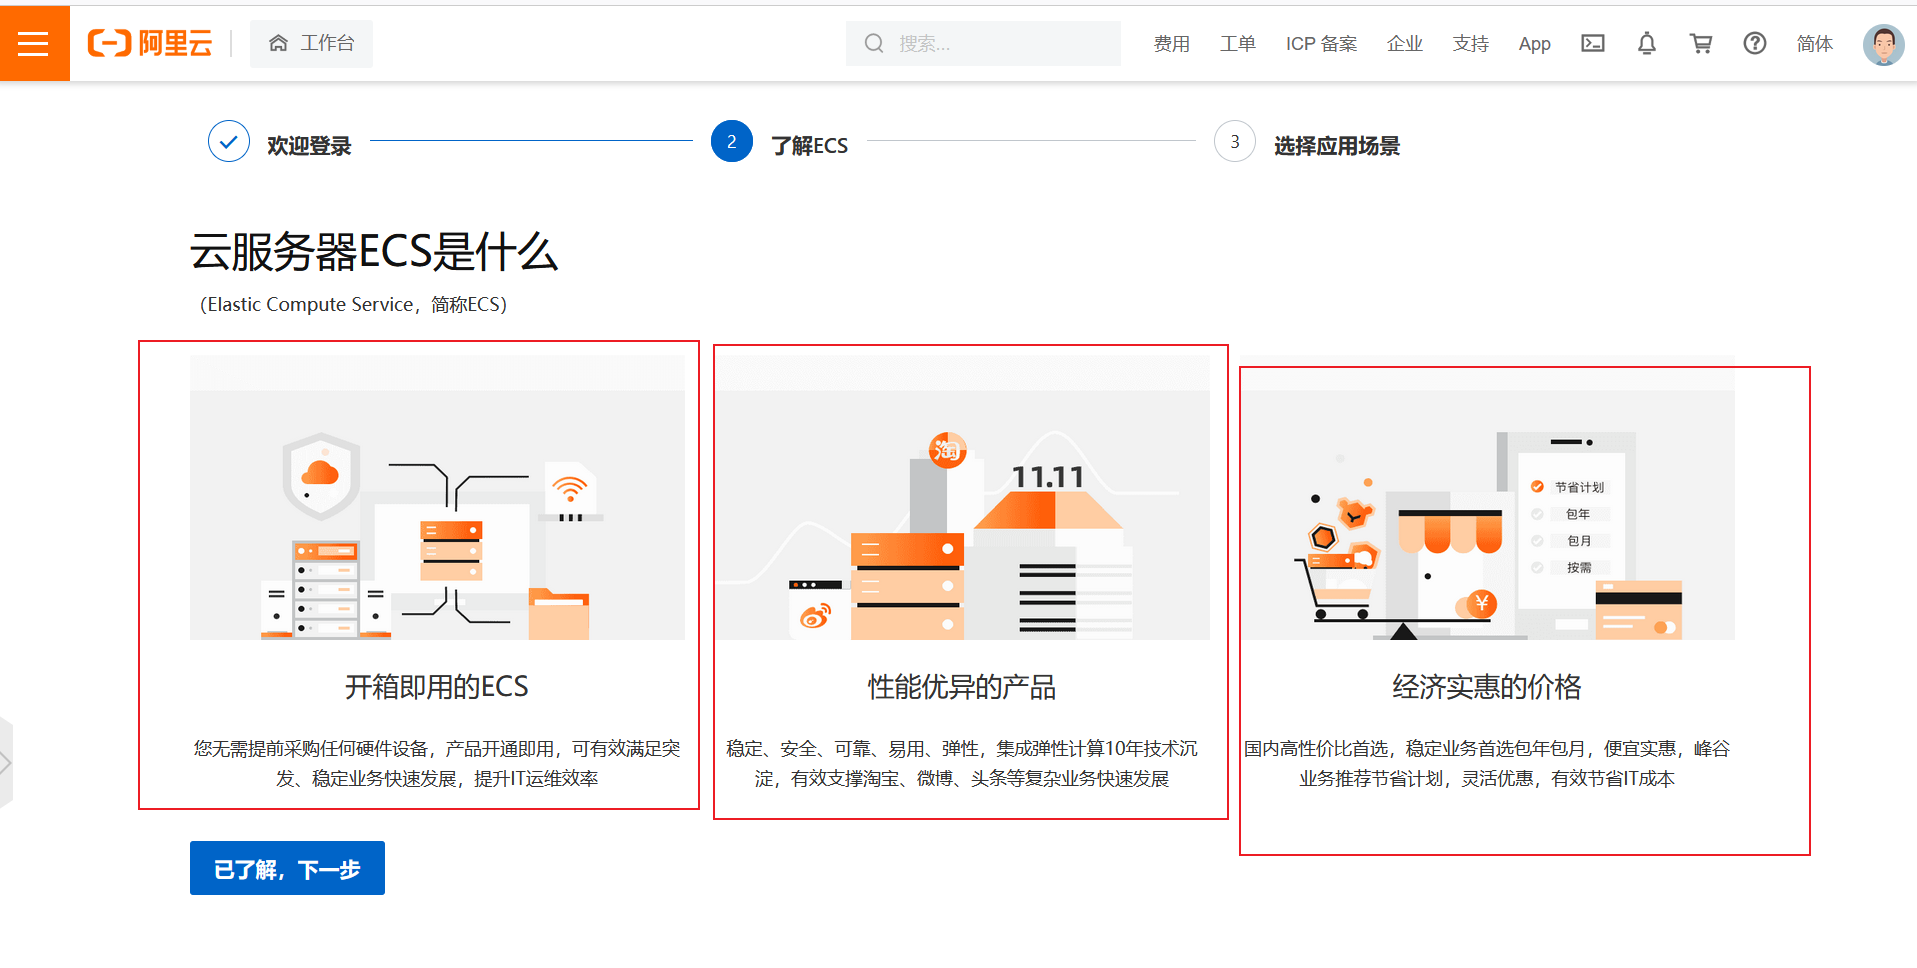
进入ECS
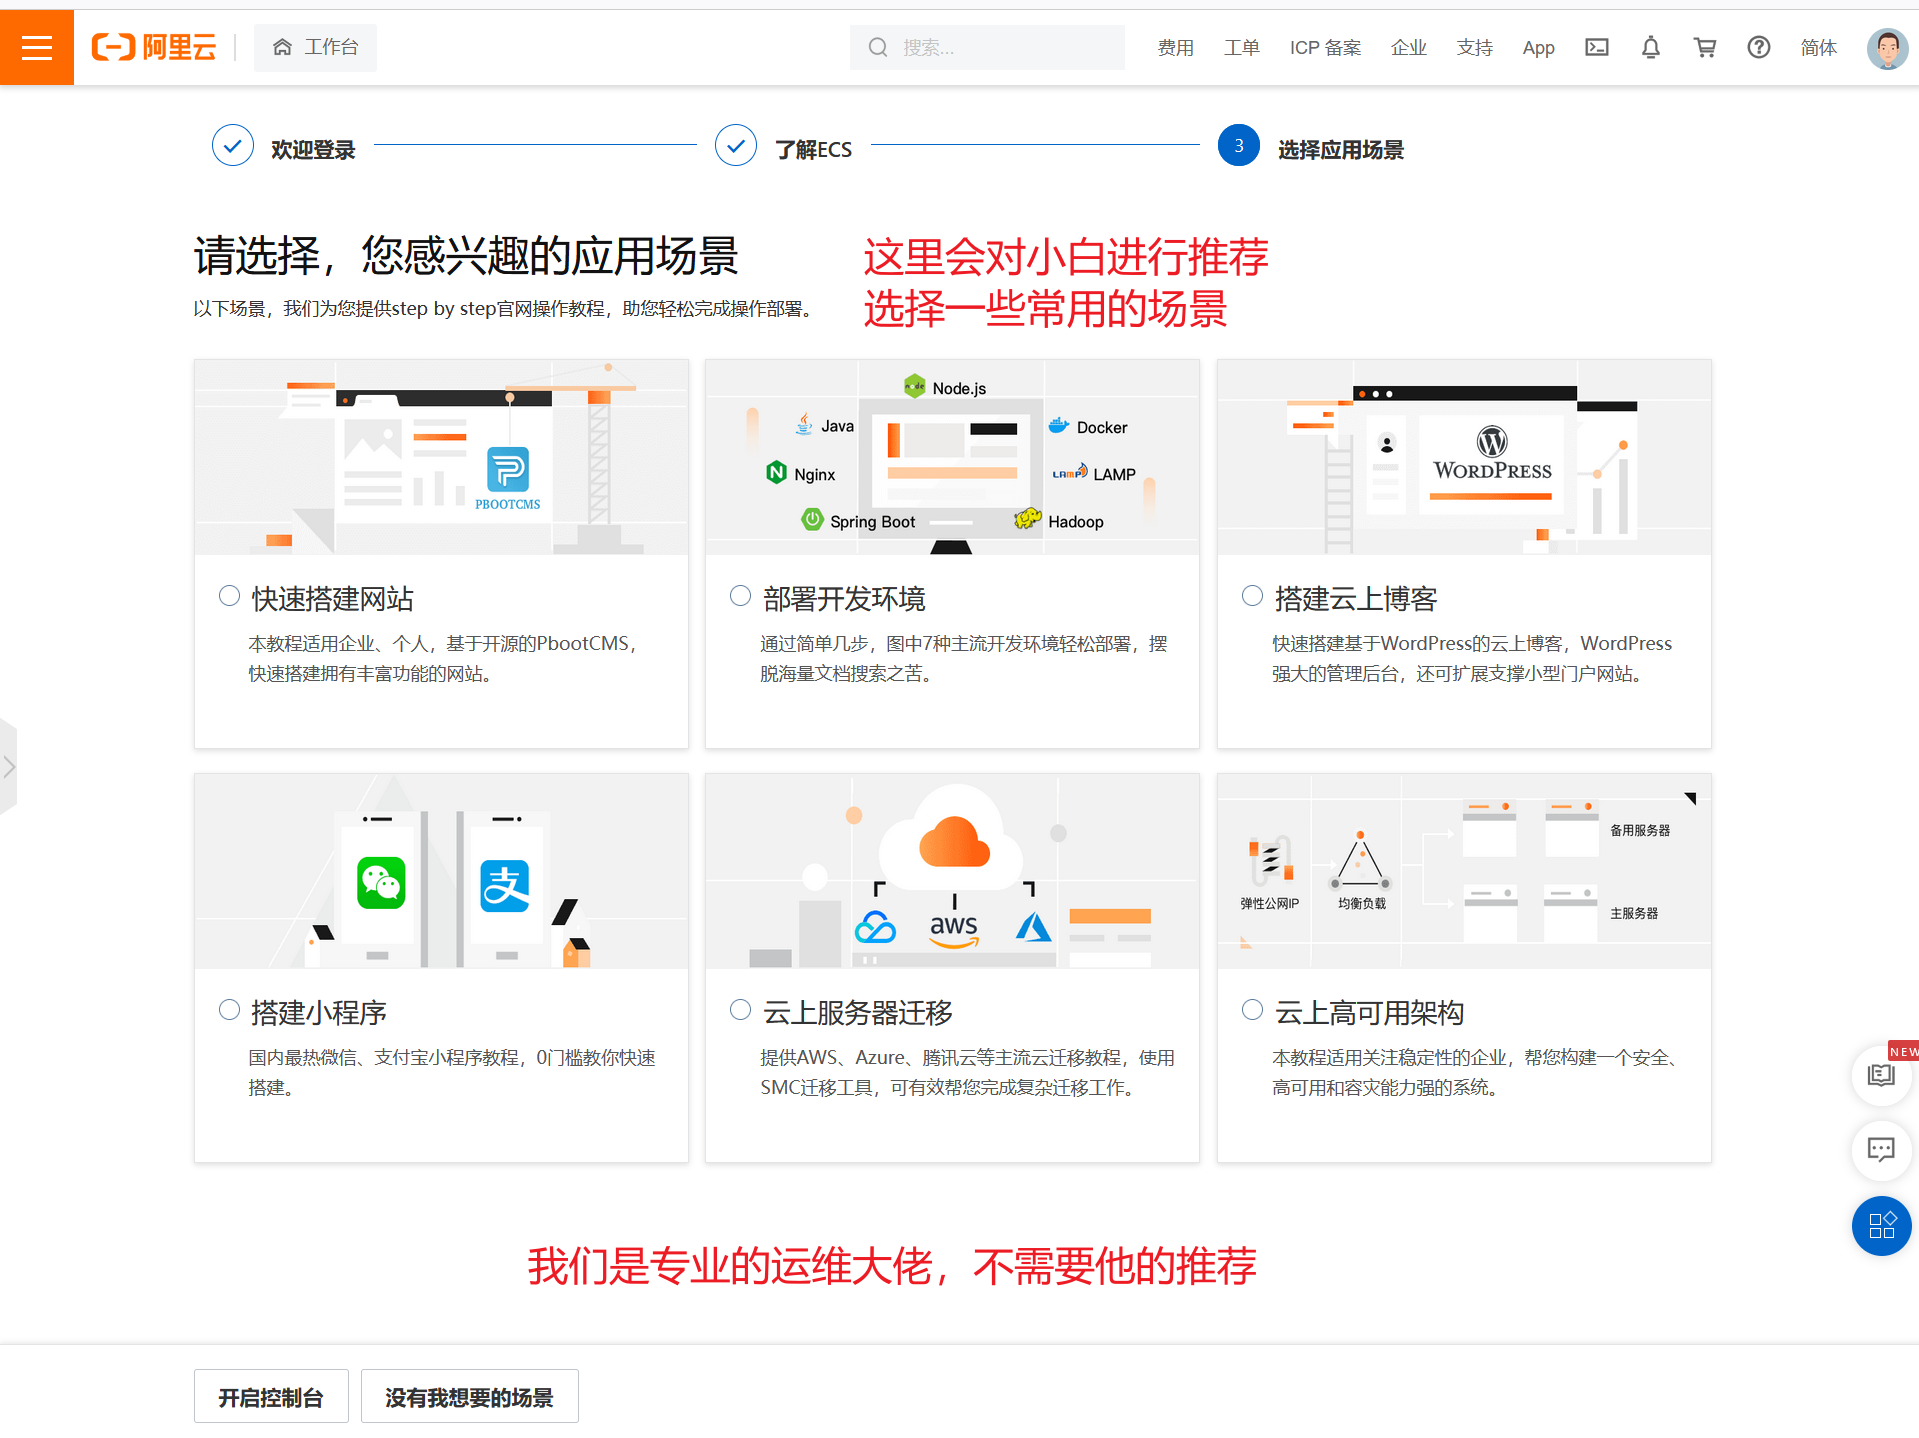
阿里云会提供一些教程,帮助小白,来部署不同的应用。
比如你是想
- 搭建网站
- 搭建小程序
- 部署个人博客
- 公司网站上线
4、购买ECS
目前有活动、实名认证后,可以免费试用一个月。
机器配置选择
现在就等同于你在逛淘宝,选择机器的配置,内存,磁盘,CPU,以及既然是云服务器,要选择网络带宽(家里电脑要上网,要去装个电信网。)
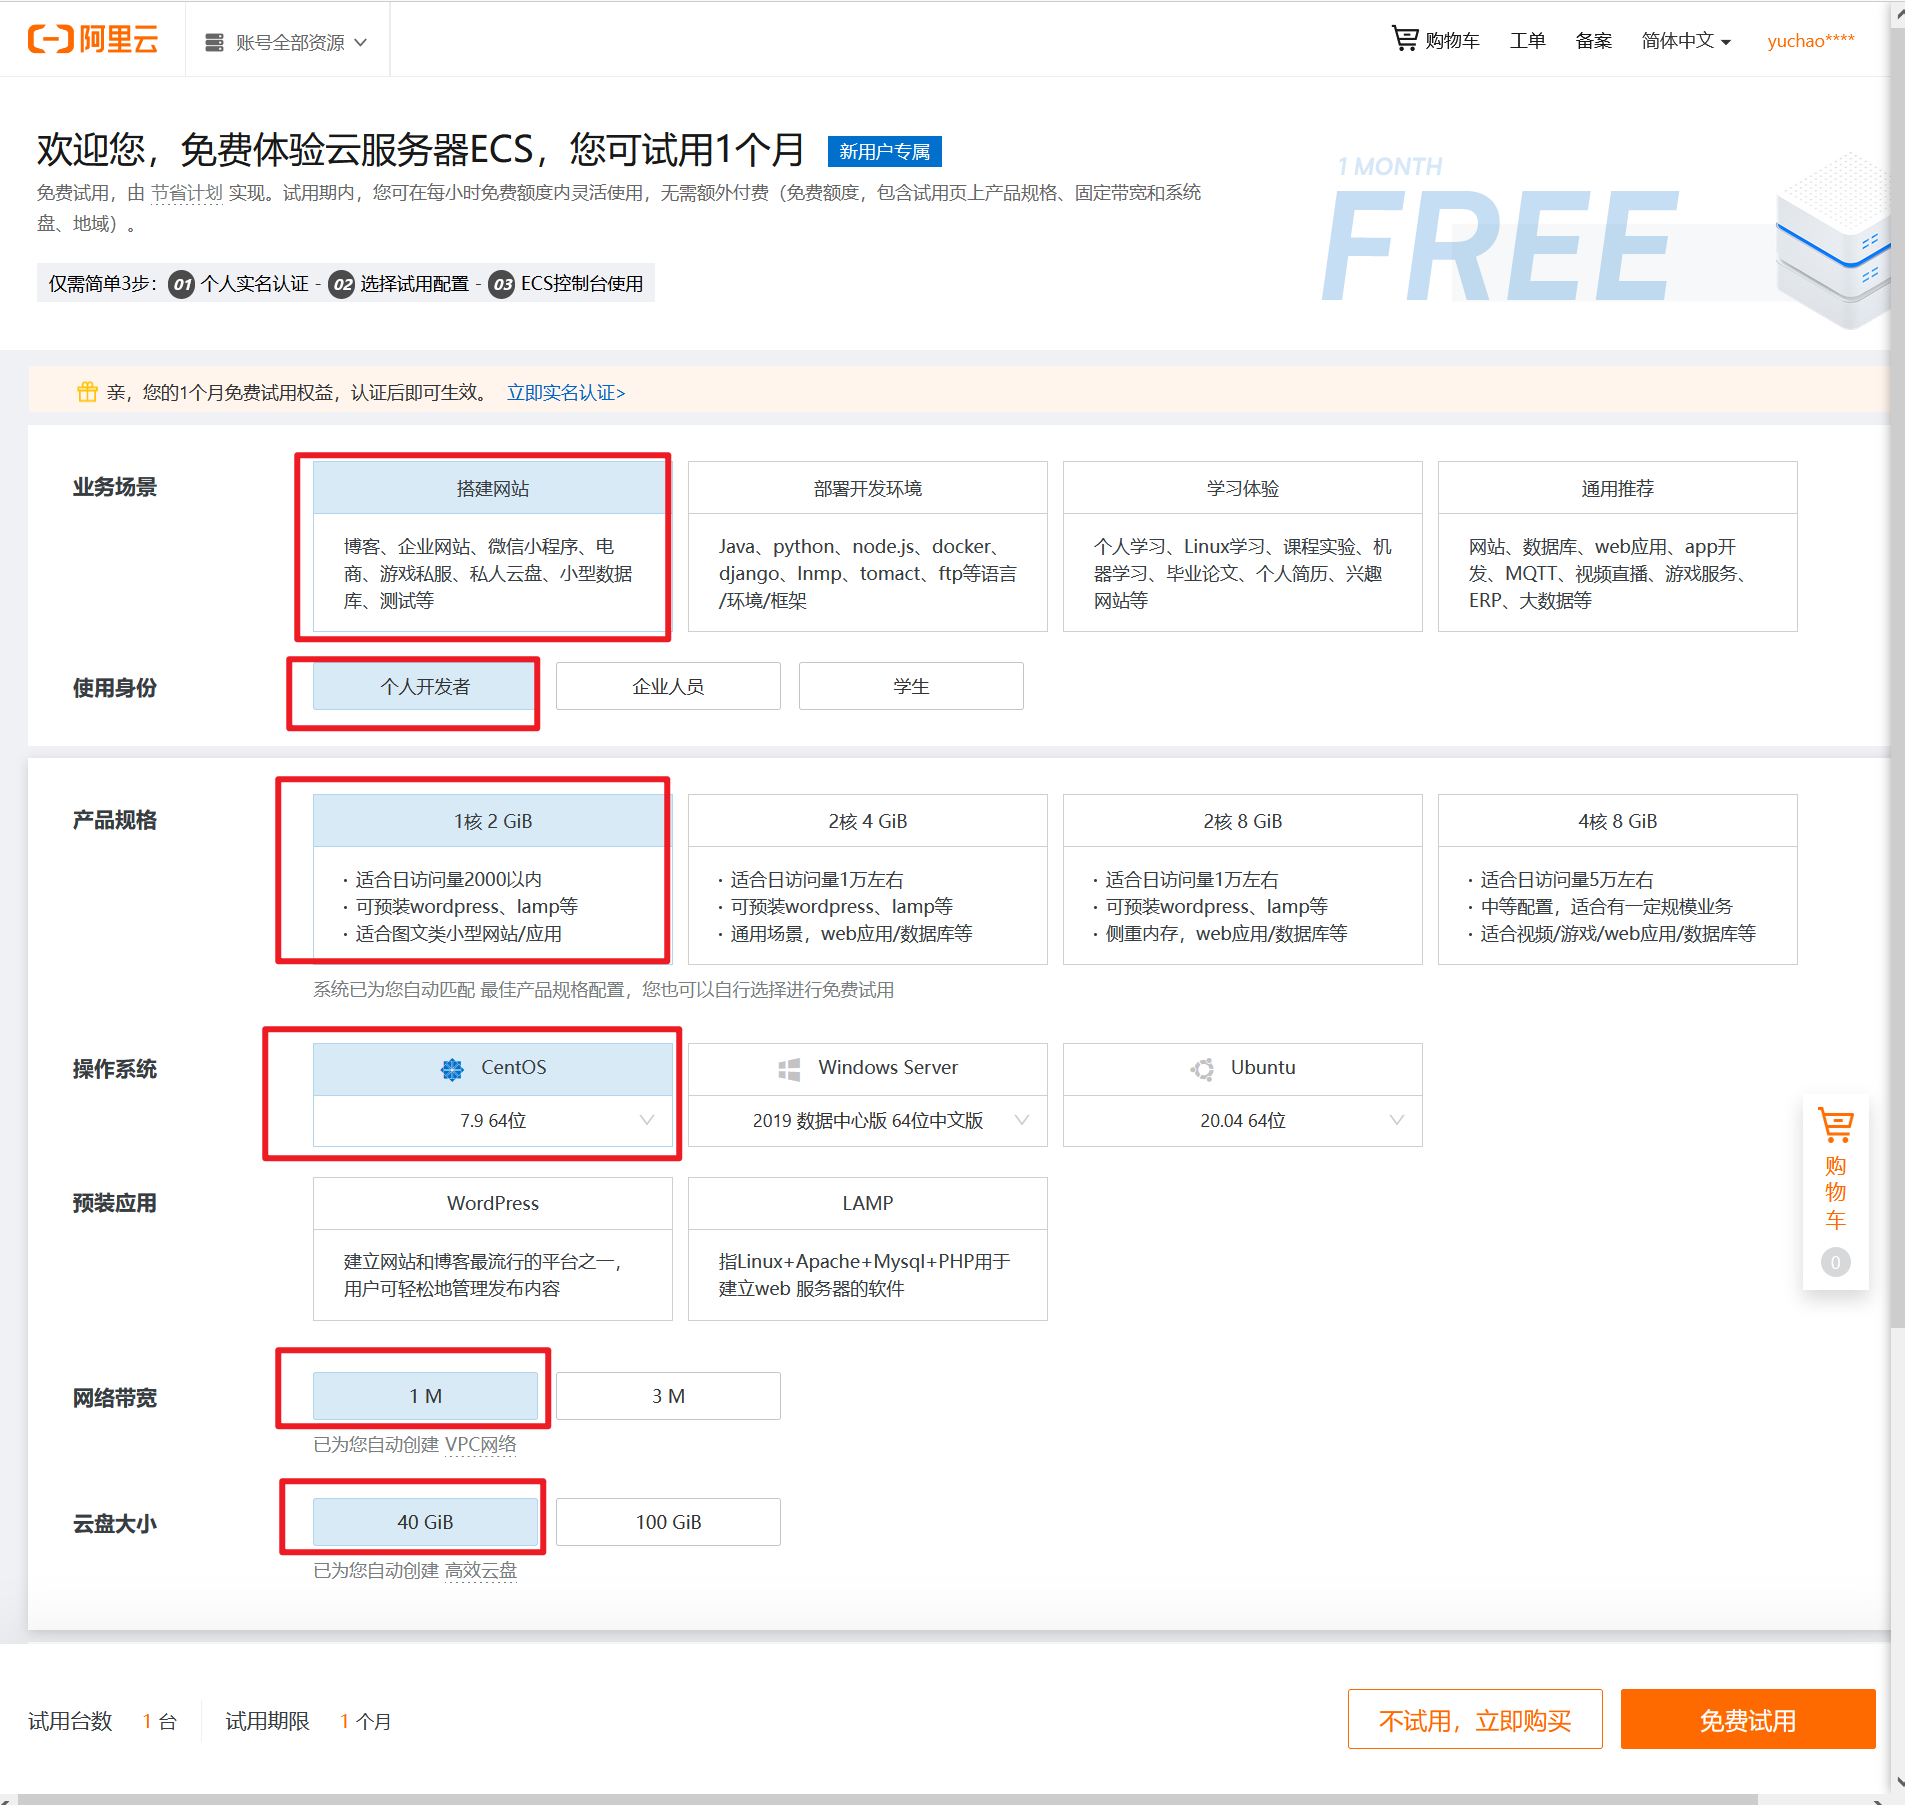
准备创建
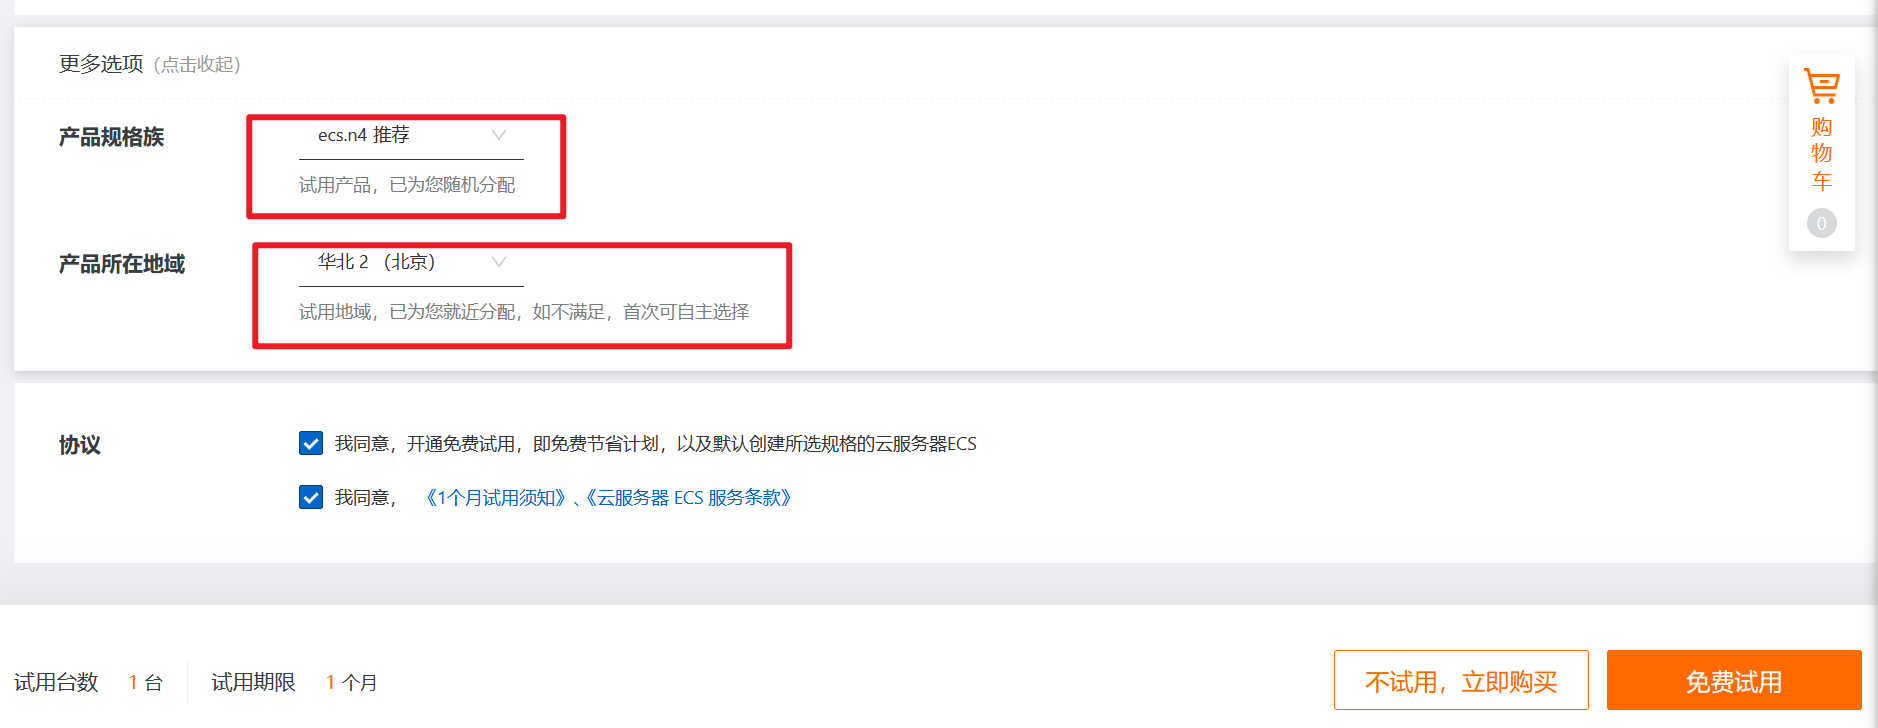
选择centos7.9版本
配置是1核、2G内存、40G云盘、带宽是1M
创建成功
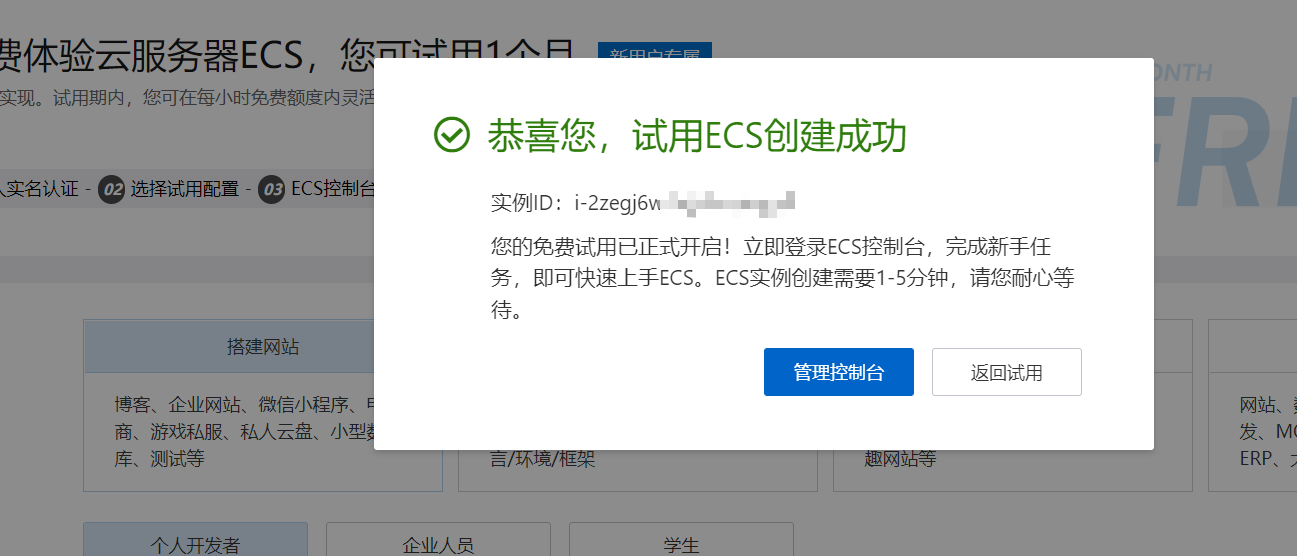
查看机器信息
找到你的公网IP地址
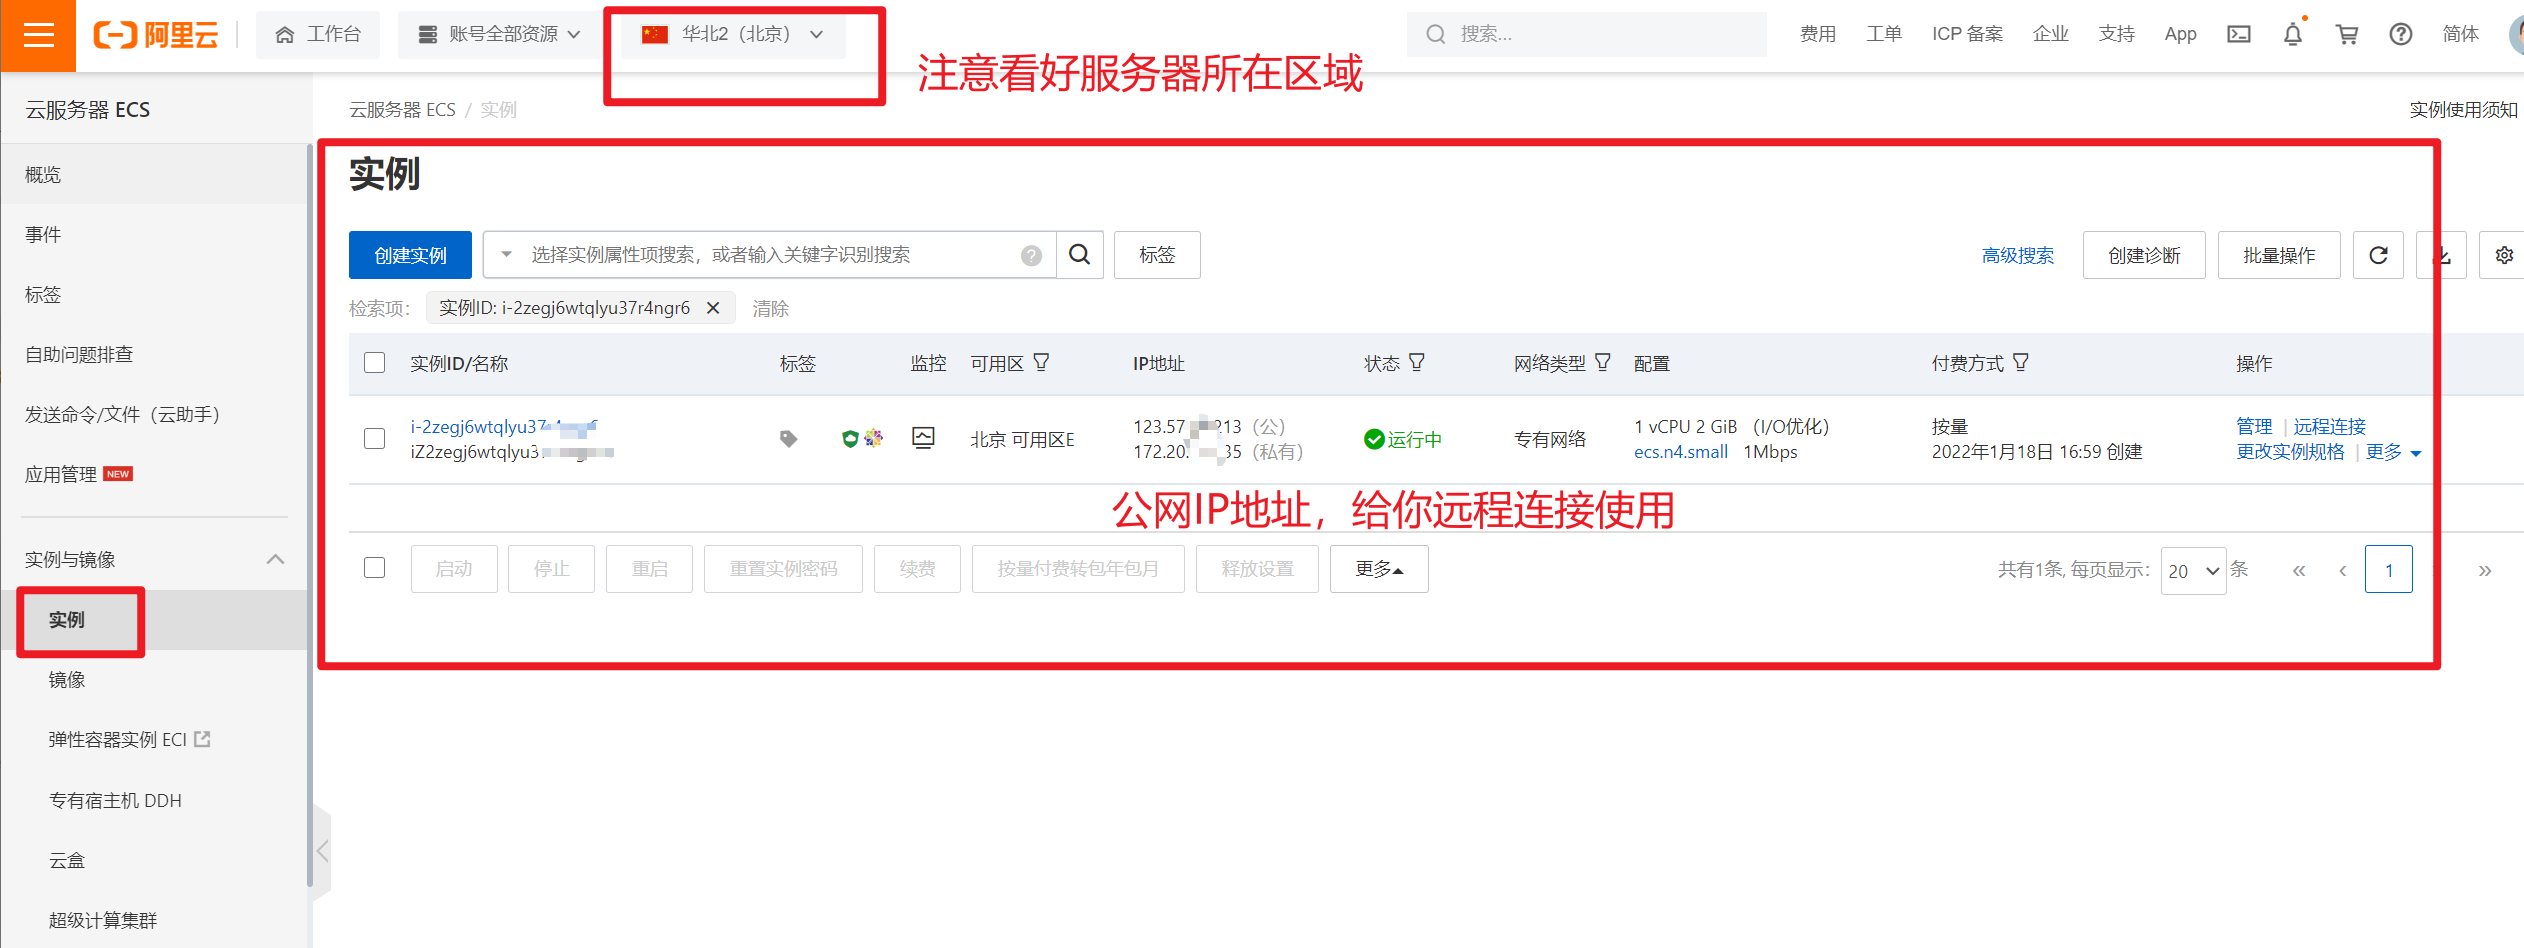
设置服务器连接密码
账户root
密码设置的难一点,保护你的公网服务器。
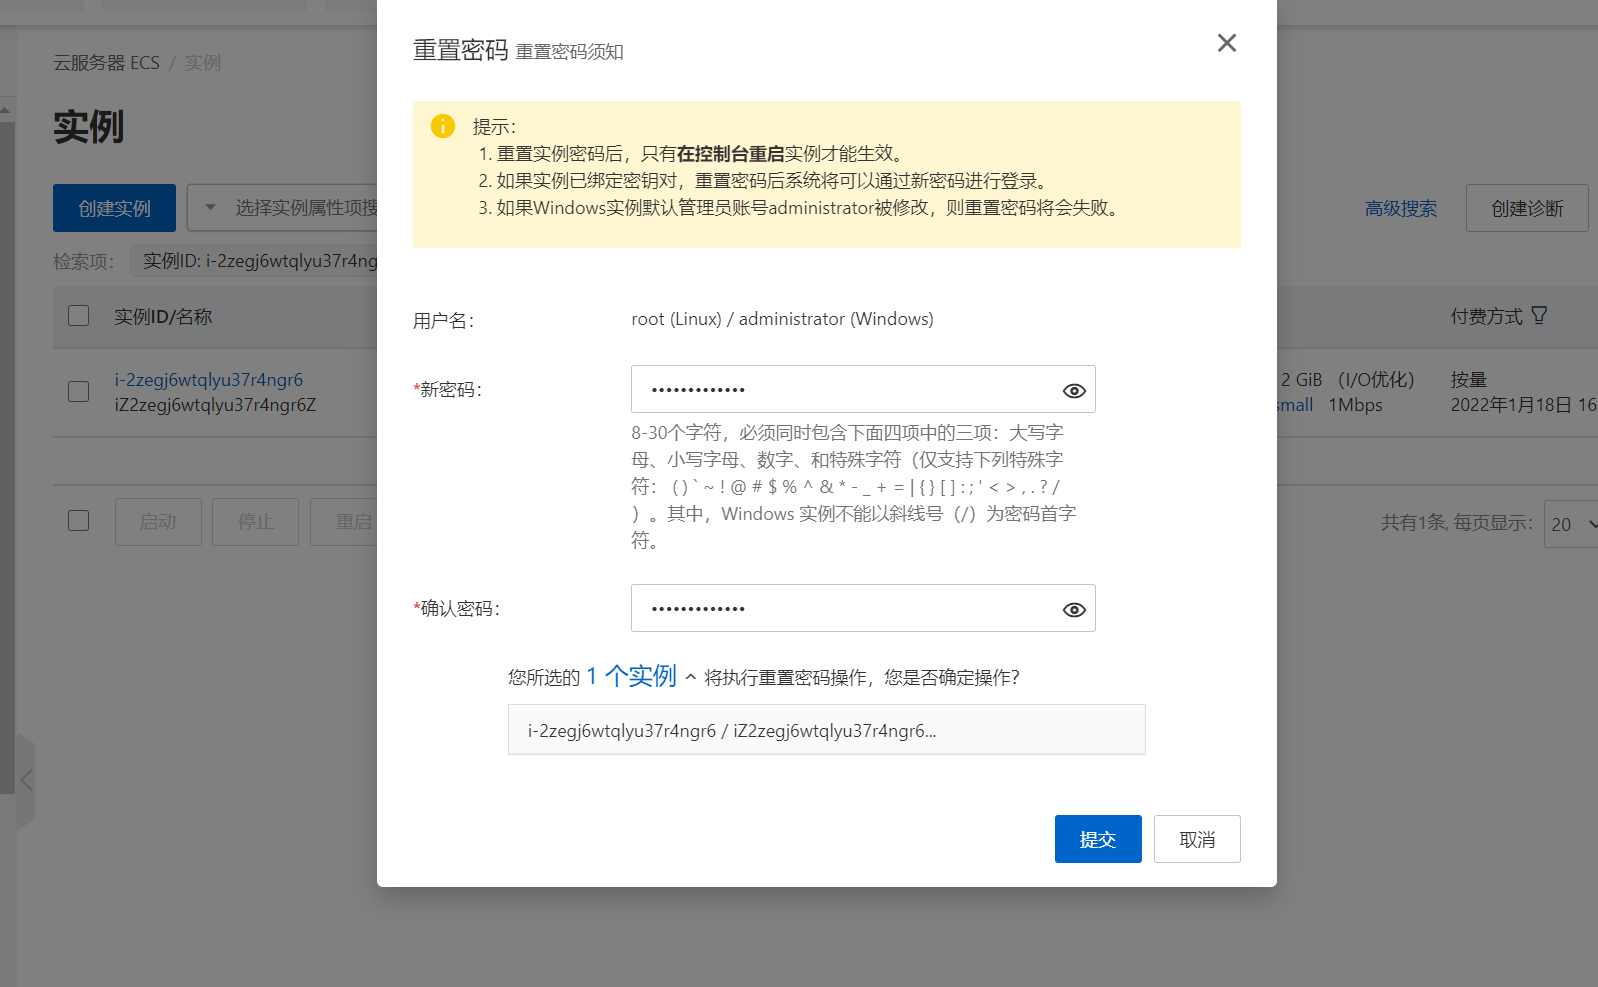
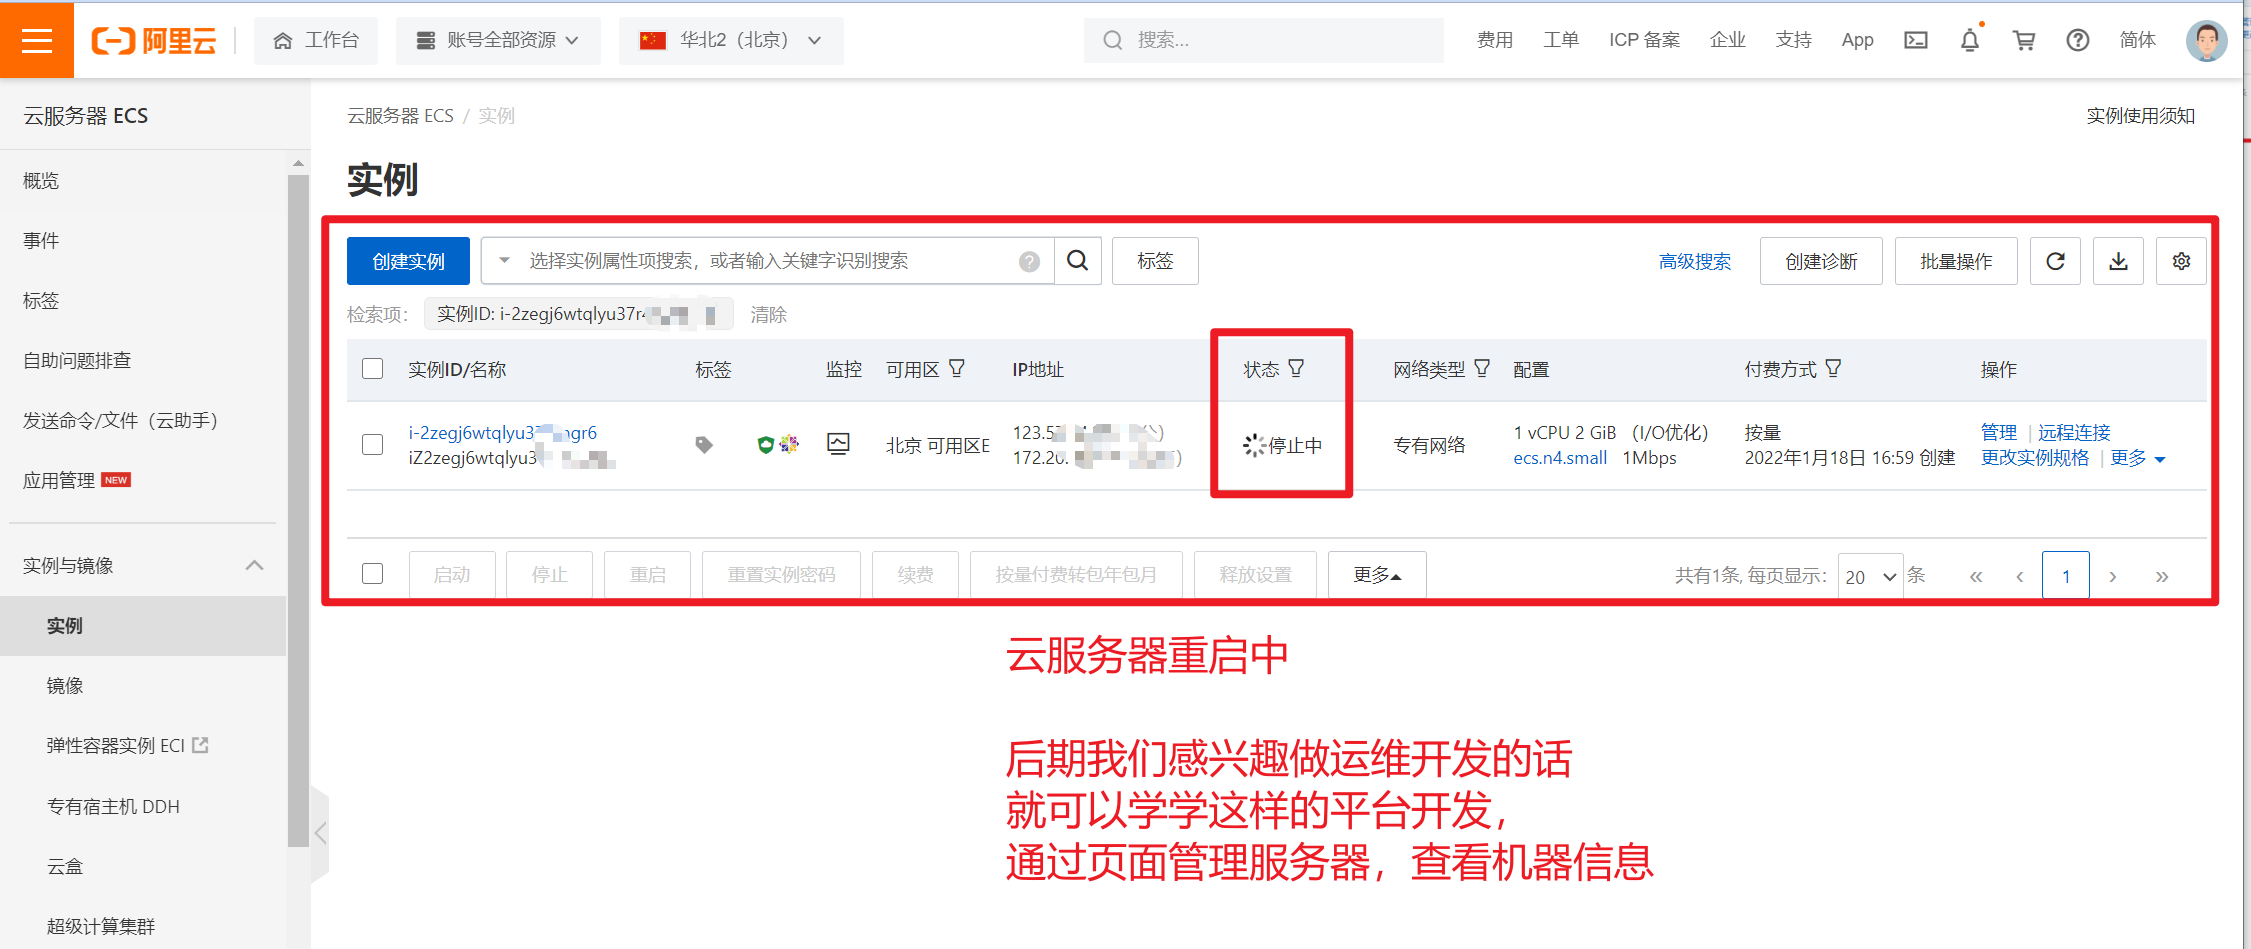
重启中,修改密码后,需要重启服务器生效。
四、部署LAMP环境
1、登录阿里云服务器
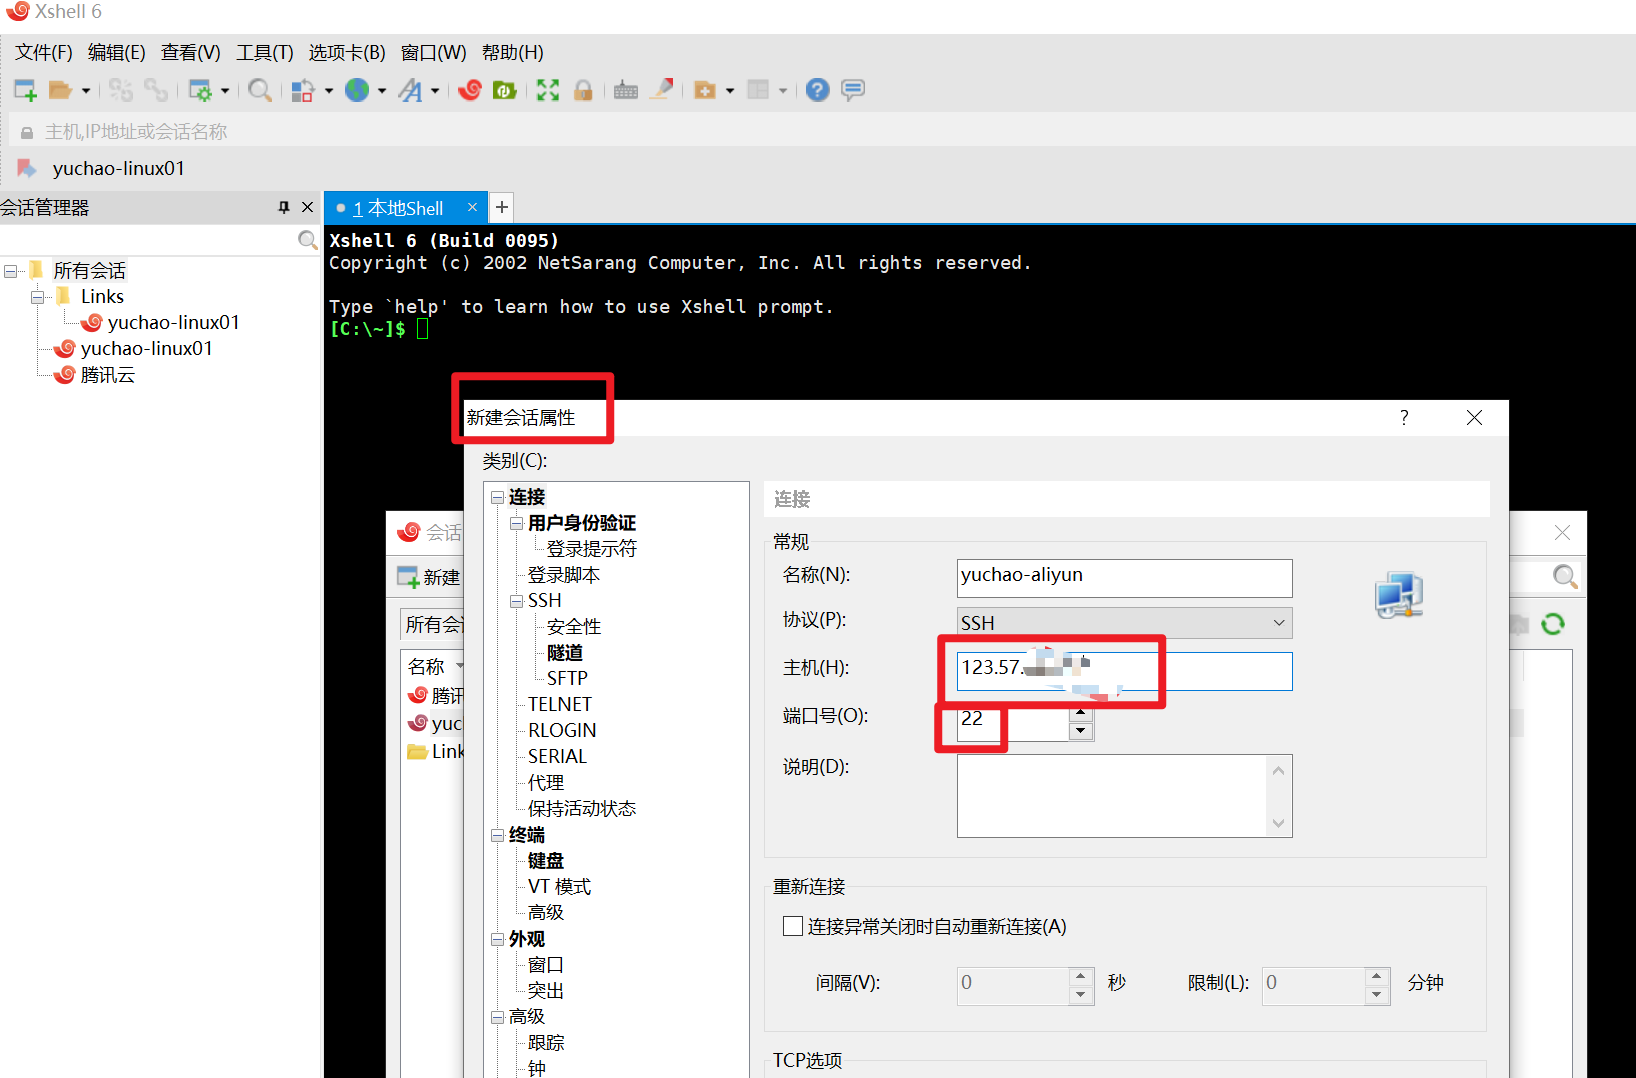
创建连接
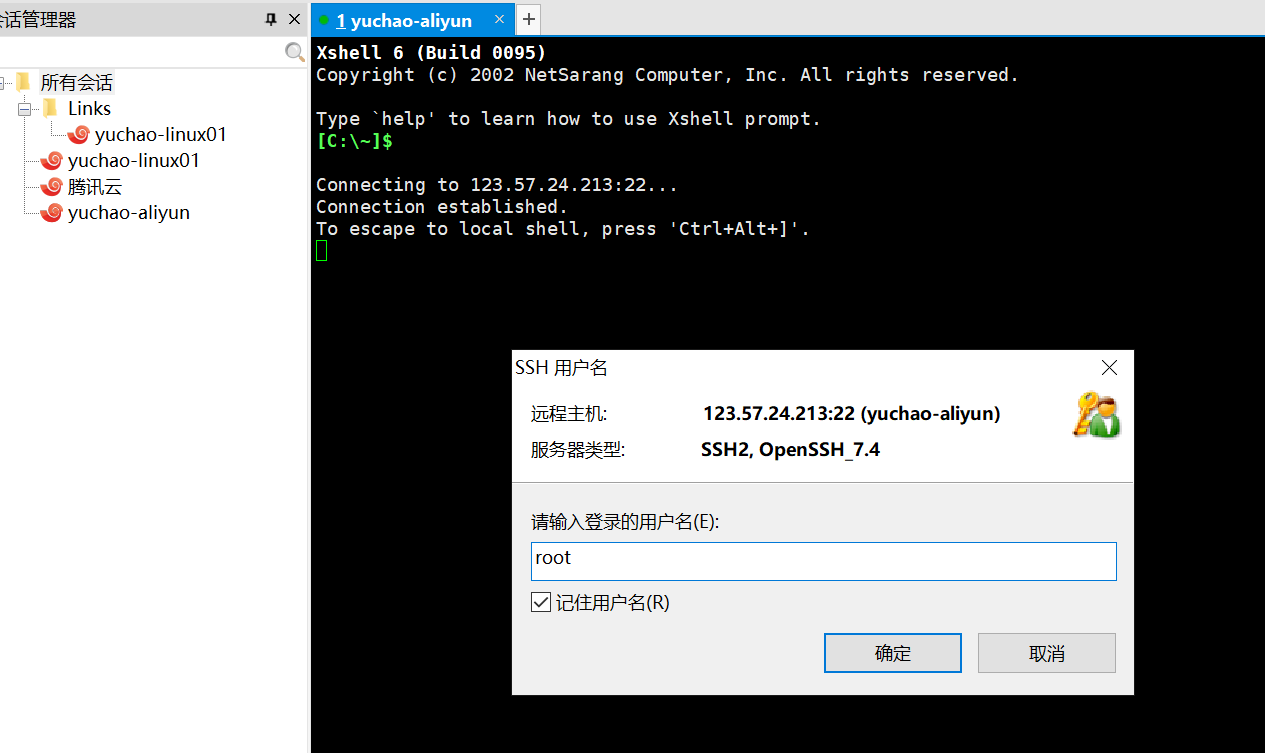
连接后,查看服务器基本信息
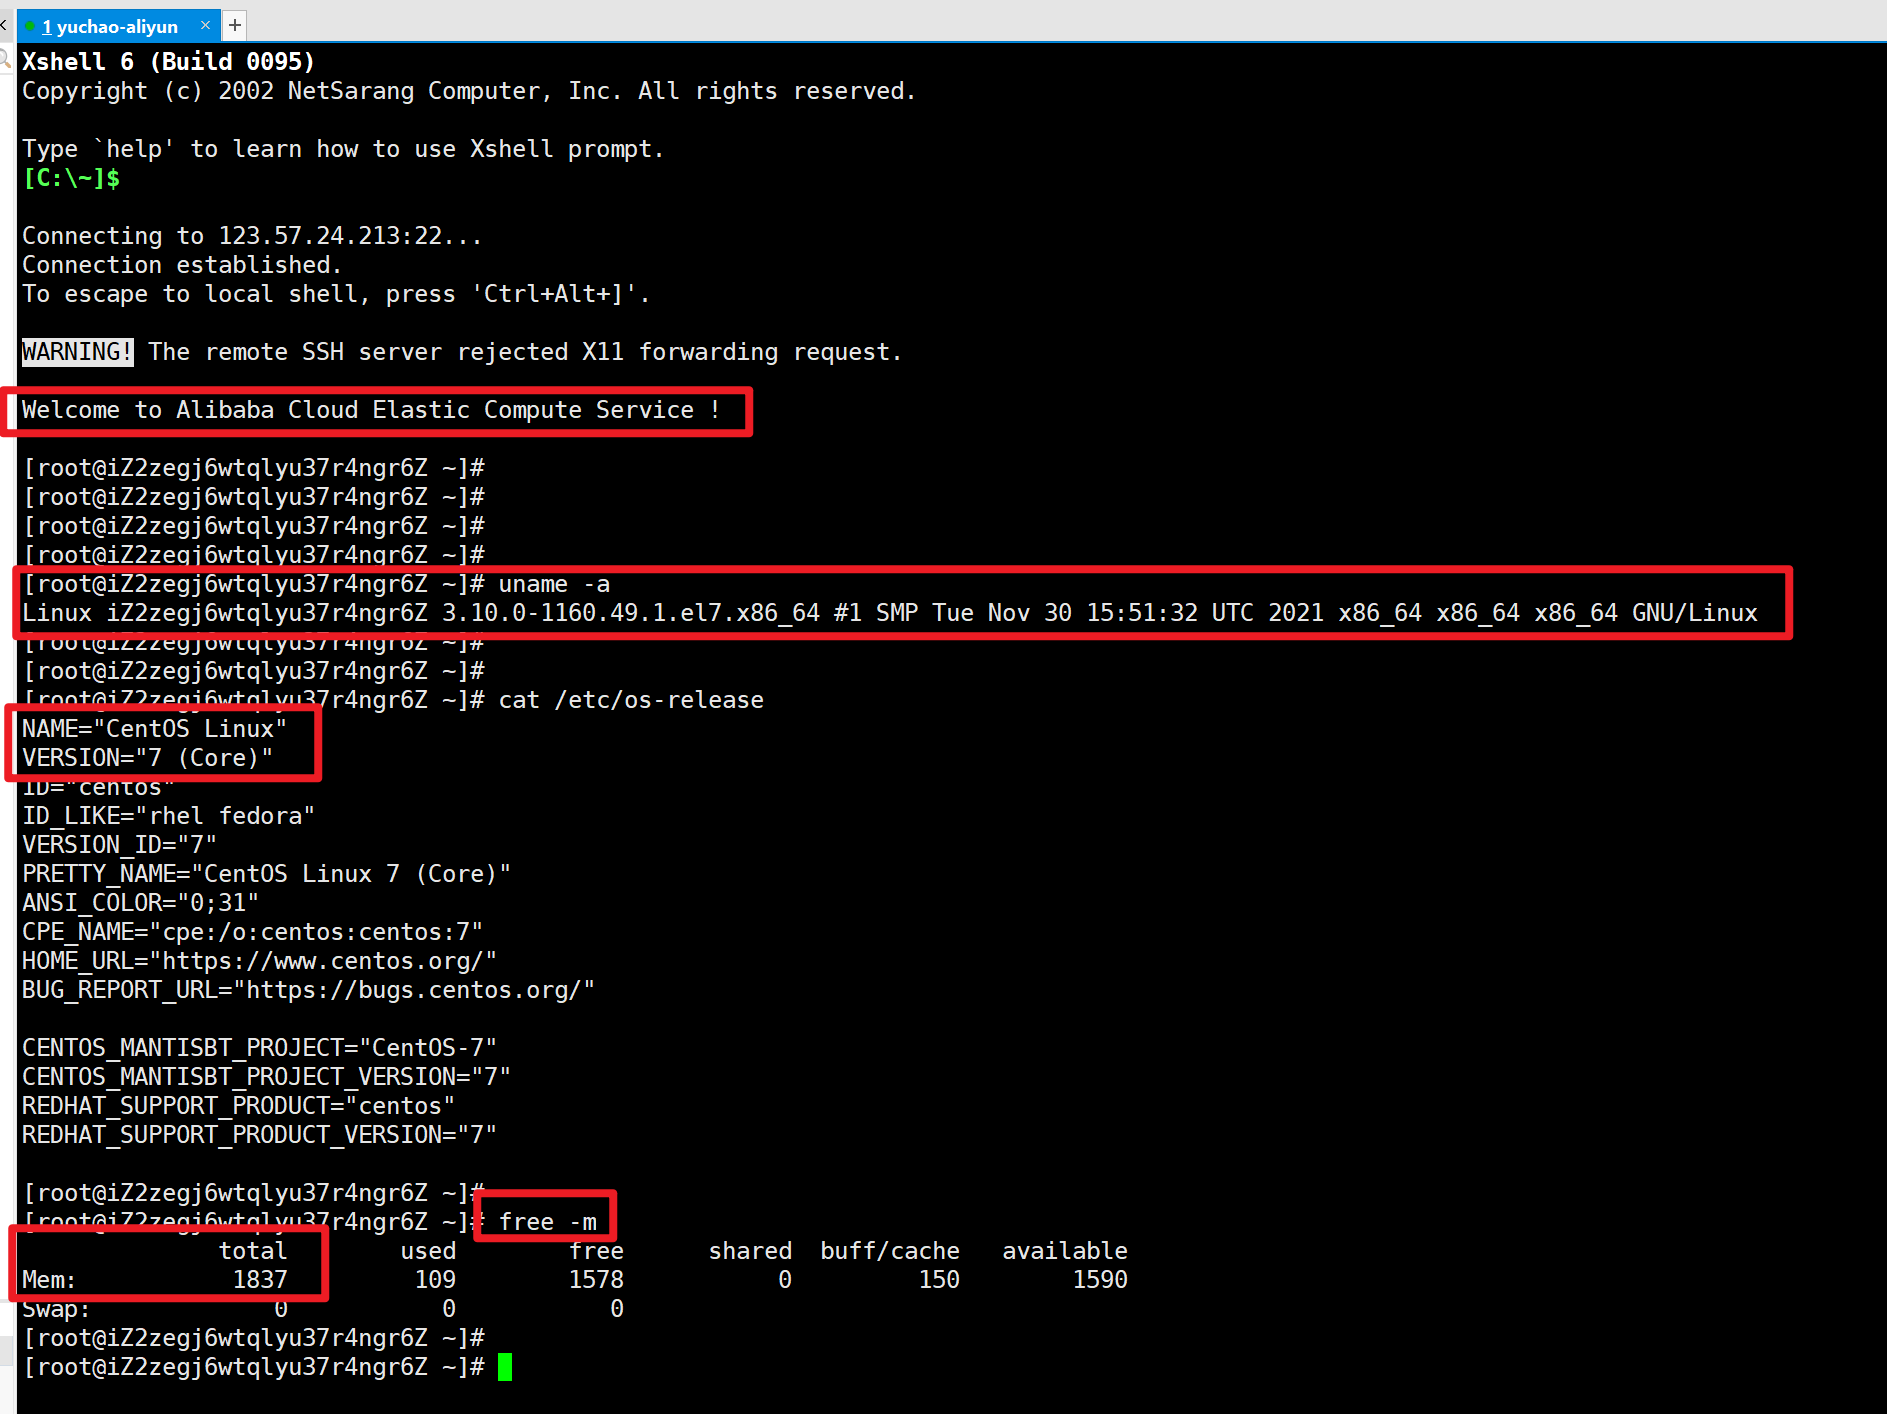
修改主机名
[root@iZ2zegj6wtqlyu37r4ngr6Z ~]# hostnamectl set-hostname yuchao-aliyun
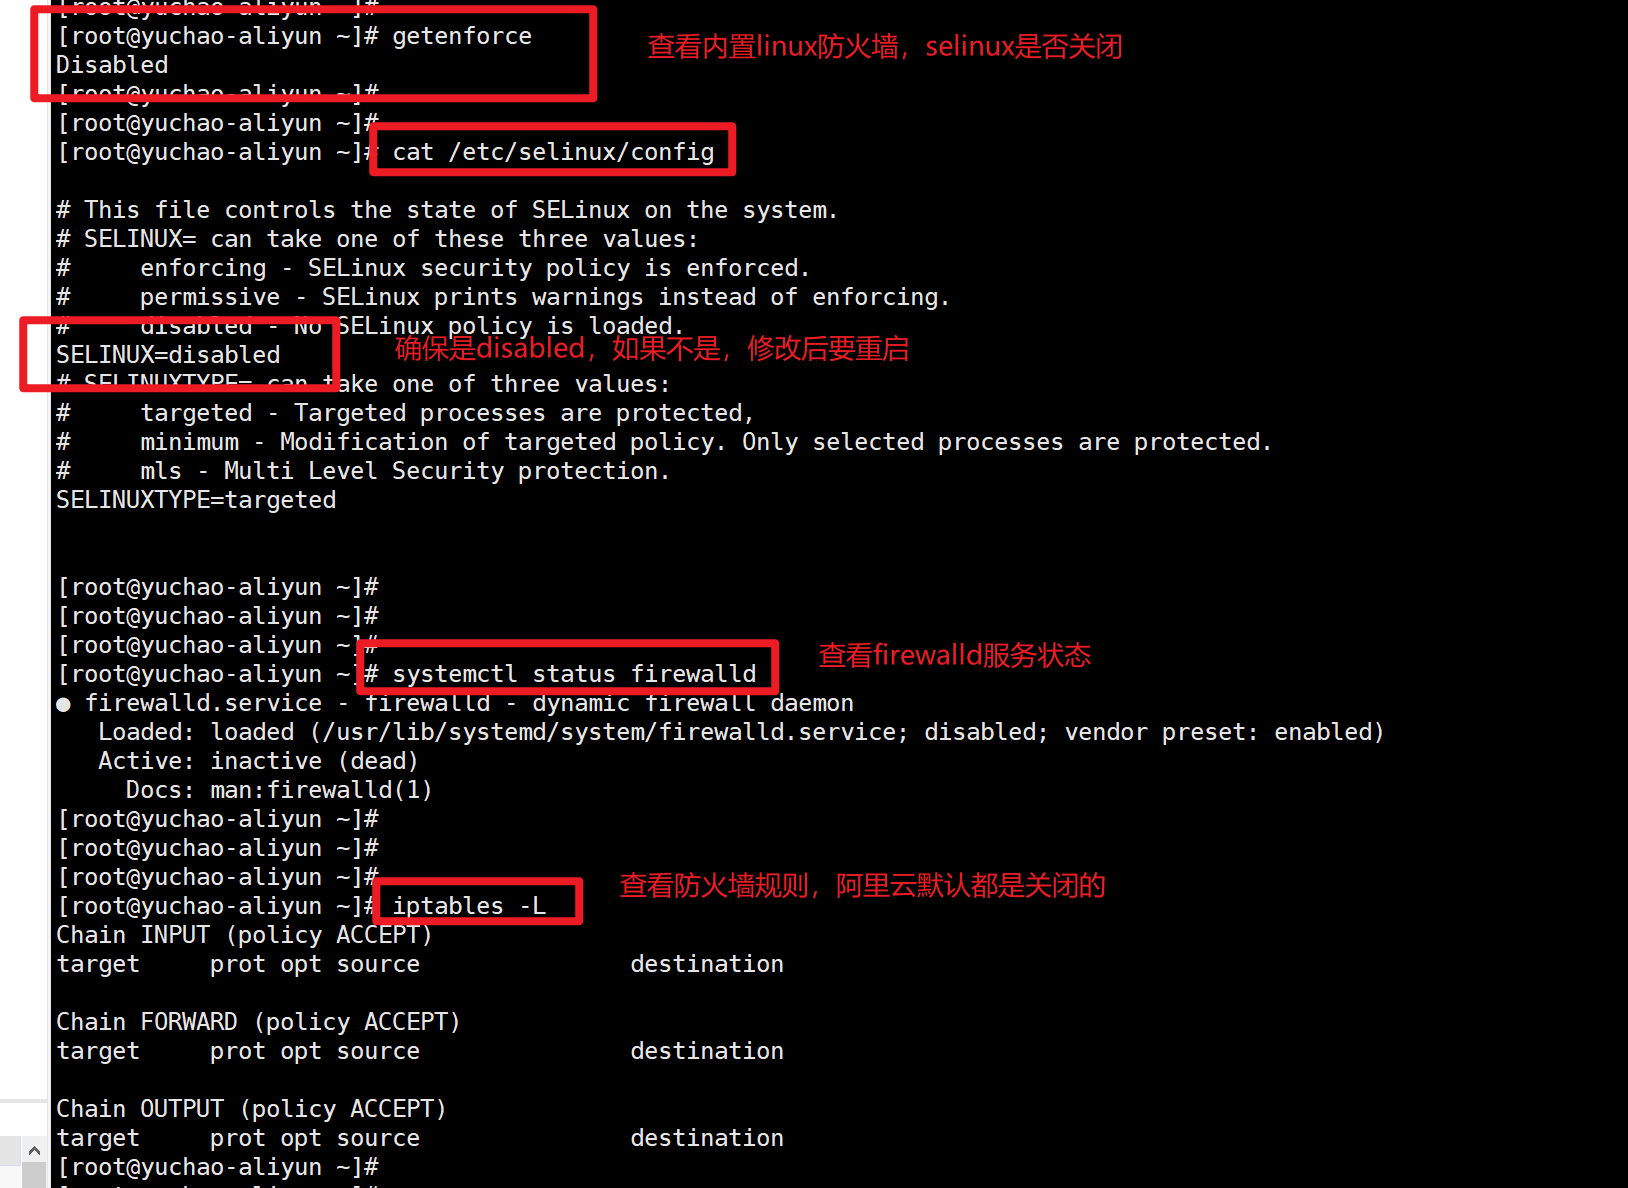
2、关闭内置防火墙
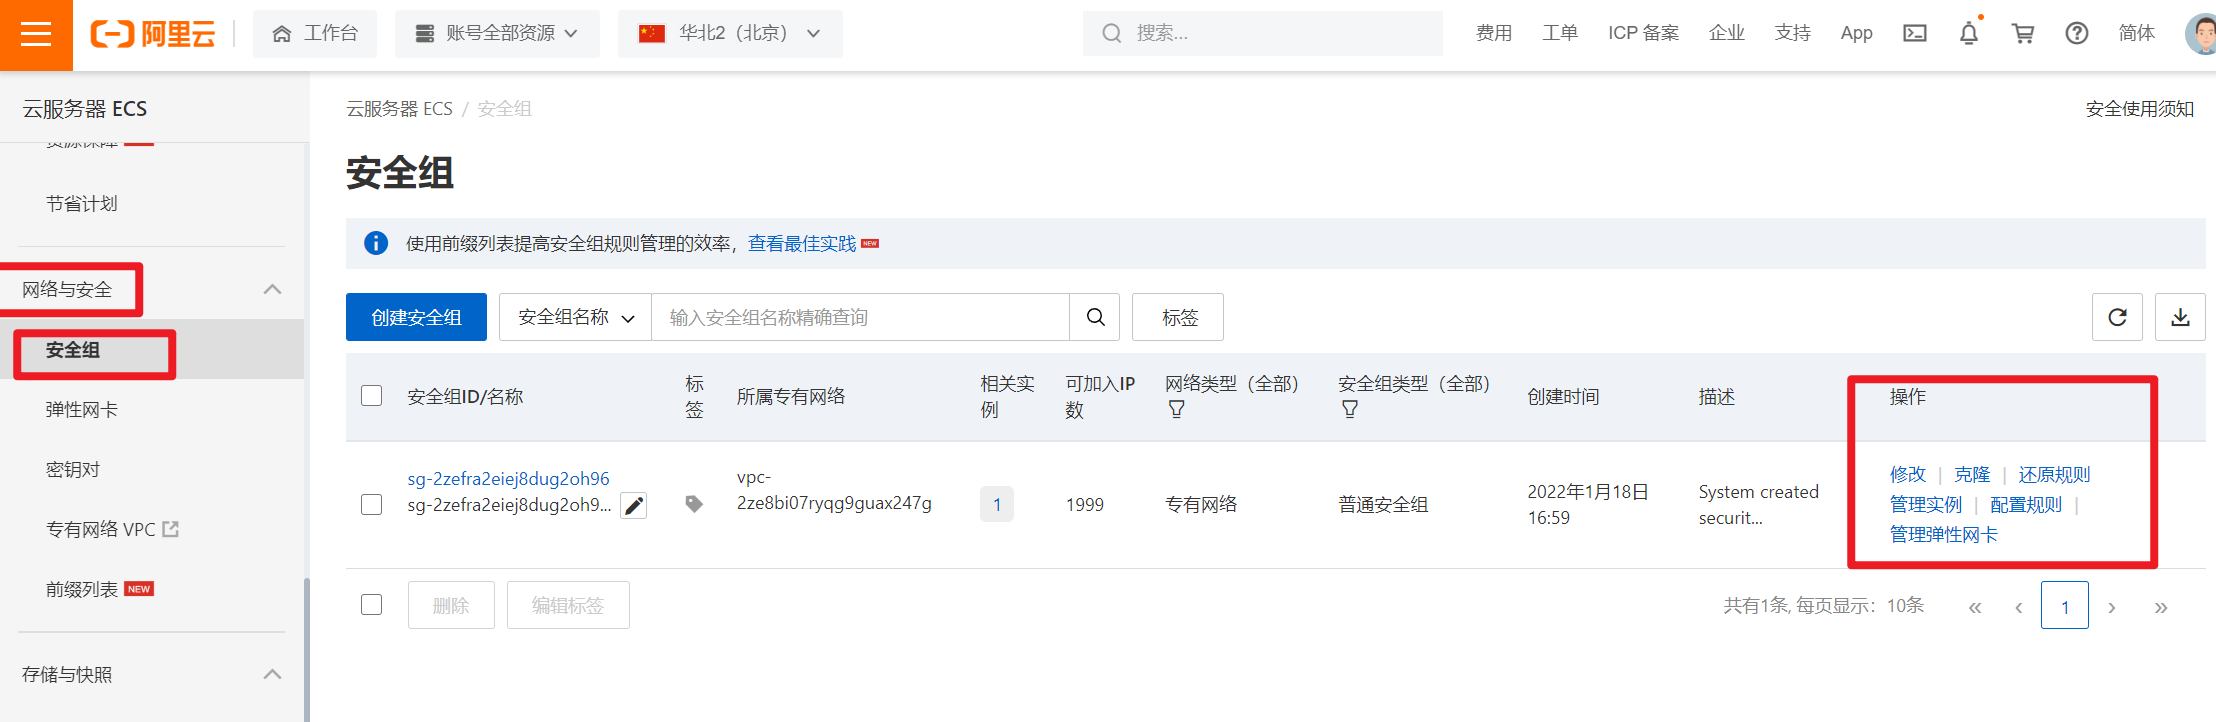
阿里云有提供公网防火墙(安全组)
在实验阶段,我们先临时关闭防火墙,我们会在后面网络安全篇,着重讲解防火墙规则
添加规则,是对服务器流量,以及各种应用程序进行把控,只有在你学习了各种linux程序部署、搭建、使用后。
才有了知识铺垫,然后进行安全流量控制。
3、查看是否安装apache
[root@yuchao-aliyun ~]#
[root@yuchao-aliyun ~]# rpm -qa httpd
[root@yuchao-aliyun ~]#

# ubuntu下的apache如何装
# 一步到位,启动了,机器上 没有80端口
apt install apache2 -y
[root@www.yuchaoit.cn ~]$systemctl status apache2
# 66
没有结果,表示未安装httpd服务,也就是没装apache这个web服务器。
报错,端口冲突
因为于超老师,云机器,安装了1panel服务器运维管理面板,去搭建网站了。

# 部署web 服务器 apache2
apt install apache2 -y

# 2.看是否启动
[root@www.yuchaoit.cn html]$systemctl status apache2
● apache2.service - The Apache HTTP Server
     Loaded: loaded (/lib/systemd/system/apache2.service; enabled; vendor preset: enabled)
     Active: active (running) since Fri 2024-12-27 12:44:38 CST; 3min 48s ago
       Docs: https://httpd.apache.org/docs/2.4/
    Process: 1039127 ExecStart=/usr/sbin/apachectl start (code=exited, status=0/SUCCESS)
   Main PID: 1039131 (apache2)
      Tasks: 55 (limit: 4563)
     Memory: 12.1M
        CPU: 106ms
     CGroup: /system.slice/apache2.service
             ├─1039131 /usr/sbin/apache2 -k start
             ├─1039132 /usr/sbin/apache2 -k start
             └─1039133 /usr/sbin/apache2 -k start

Dec 27 12:44:38 www.yuchaoit.cn systemd[1]: Starting The Apache HTTP Server...
Dec 27 12:44:38 www.yuchaoit.cn apachectl[1039130]: AH00558: apache2: Could not reliably determine the server's fully qualified domain nam>
Dec 27 12:44:38 www.yuchaoit.cn systemd[1]: Started The Apache HTTP Server.
lines 1-17/17 (END)


# 3.看进程端口
[root@www.yuchaoit.cn html]$netstat -tunlp|grep apache
tcp6       0      0 :::80                   :::*                    LISTEN      1039131/apache2
[root@www.yuchaoit.cn html]$ps -ef |grep apache
www-data 1038353       1  0 12:40 ?        00:00:00 /usr/bin/htcacheclean -d 120 -p /var/cache/apache2/mod_cache_disk -l 300M -n
root     1039131       1  0 12:44 ?        00:00:00 /usr/sbin/apache2 -k start
www-data 1039132 1039131  0 12:44 ?        00:00:00 /usr/sbin/apache2 -k start
www-data 1039133 1039131  0 12:44 ?        00:00:00 /usr/sbin/apache2 -k start
root     1039773 1037572  0 12:48 pts/1    00:00:00 grep --color=auto apache

# 4.查看apache默认首页内容
[root@www.yuchaoit.cn html]$dpkg -L apache2 |grep html
/etc/apache2/mods-available/proxy_html.conf
/etc/apache2/mods-available/proxy_html.load
/var/www/html  # 网站根目录,存放网站数据

# 5.看配置文件,网站默认首页在哪定义的,软件,功能,用户,运维去定义
[root@www.yuchaoit.cn html]$vim /etc/apache2/apache2.conf

224 # Include the virtual host configurations:
225 IncludeOptional sites-enabled/*.conf

[root@www.yuchaoit.cn html]$cd /etc/apache2/sites-enabled/
[root@www.yuchaoit.cn sites-enabled]$ls
000-default.conf

# 看到如下配置即可
[root@www.yuchaoit.cn sites-enabled]$vim 000-default.conf
     ServerAdmin webmaster@localhost
        DocumentRoot /var/www/html

# 6.进入网站代码目录,修改页面内容
[root@www.yuchaoit.cn sites-enabled]$cd /var/www/html/
[root@www.yuchaoit.cn html]$
[root@www.yuchaoit.cn html]$
[root@www.yuchaoit.cn html]$ls
index.html
[root@www.yuchaoit.cn html]$
[root@www.yuchaoit.cn html]$cat index.html
hello,wolrd

# 7.访问网站首页,搭建了apache的服务器的ip
http://101.126.78.228/
http://101.126.78.228:80/index.html 浏览器自动校验,添加的


[root@www.yuchaoit.cn html]$cat index.html
<meta charset=utf-8>
于超老师带你学linux sre ,冲月薪2w
hello,wolrd
4、是否安装MySQL
[root@yuchao-aliyun ~]# rpm -qa mysql

[root@www.yuchaoit.cn ~]$dpkg -l |grep mysql
ii  libdbd-mysql-perl:amd64               4.050-5ubuntu0.22.04.1                  amd64        Perl5 database interface to the MariaDB/MySQL database
ii  libmysqlclient21:amd64                8.0.39-0ubuntu0.22.04.1                 amd64        MySQL database client library
ii  mysql-common                          5.8+1.0.8                               all          MySQL database common files, e.g. /etc/mysql/my.cnf
rc  mysql-server-8.0                      8.0.39-0ubuntu0.22.04.1                 amd64        MySQL database server binaries and system database setup
[root@www.yuchaoit.cn ~]$

[root@www.yuchaoit.cn ~]$apt install mysql-server mysql-client -y
5、是否安装php
[root@yuchao-aliyun ~]# rpm -qa php
[root@www.yuchaoit.cn ~]$dpkg -l |grep php
为什么检查,因为如果机器安装过这些软件,或者安装后,卸载了,但是没有卸载干净,导致一些依赖软件的残留。
我们再进行安装的时候,就会碰到依赖冲突的错误。
建议新手用新机器操作。
6、LAMP环境之Apache安装
① 使用yum命令安装httpd软件包
apache这个软件,在linux中软件包的名字,是叫做httpd,因此得通过yum安装这个httpd
由于是阿里云服务器,默认用的也是阿里云yum源了。
[root@yuchao-aliyun ~]# yum install httpd -y
② 配置/etc/httpd/conf/httpd.conf文件
linux中安装、使用软件,流程就是
1.下载安装
2.修改配置文件
3.启动、使用
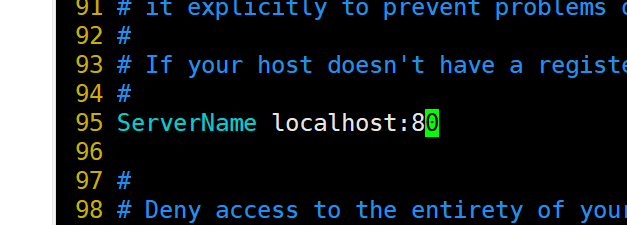
[root@yuchao-aliyun ~]# vim /etc/httpd/conf/httpd.conf


[root@www.yuchaoit.cn ~]$vim /etc/apache2/apache2.conf

修改本行配置
一般填入网站的域名,如果没有可以写入IP地址
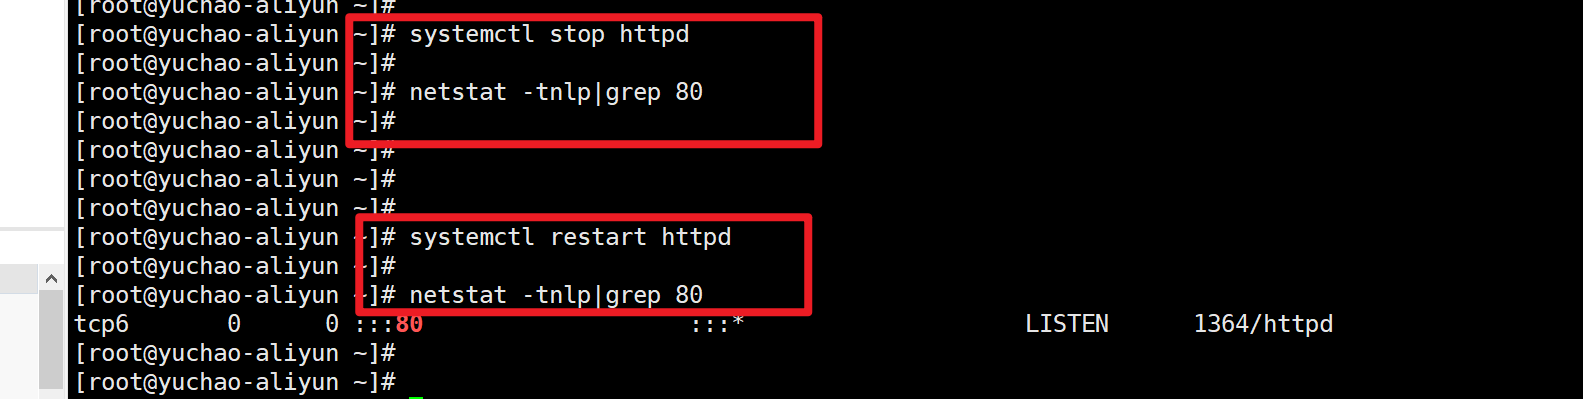
③ 使用systemctl命令重启httpd服务,使用netstat -ntlp命令,查看是否有80端口监听
[root@yuchao-aliyun ~]# systemctl restart httpd
[root@yuchao-aliyun ~]#
[root@yuchao-aliyun ~]#
[root@yuchao-aliyun ~]# netstat -tnlp|grep 80
tcp6       0      0 :::80                   :::*                    LISTEN      1334/httpd
有80端口存在,并且该httpd服务,网络连接状态已经是LISTEN,监听中了。
好比银行的一个窗口,开始营业,对外服务了,你可以去窗口办理业务,获取数据了!
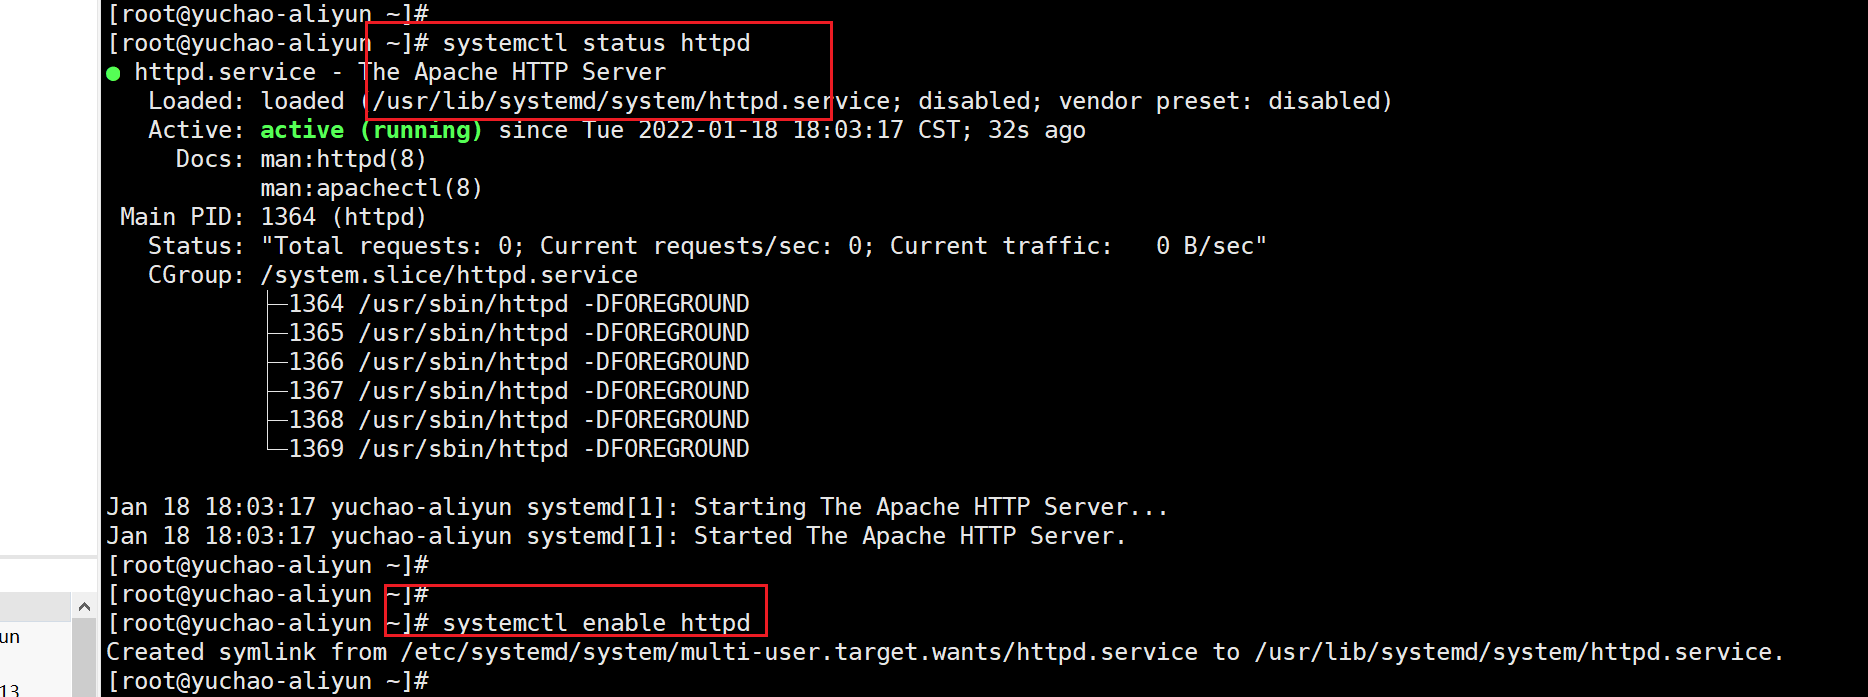
④ 设置httpd服务开机启动
⑤ 查看本机的IP地址,阿里云服务器从控制台可以看到

阿里云可以看到公网IP地址
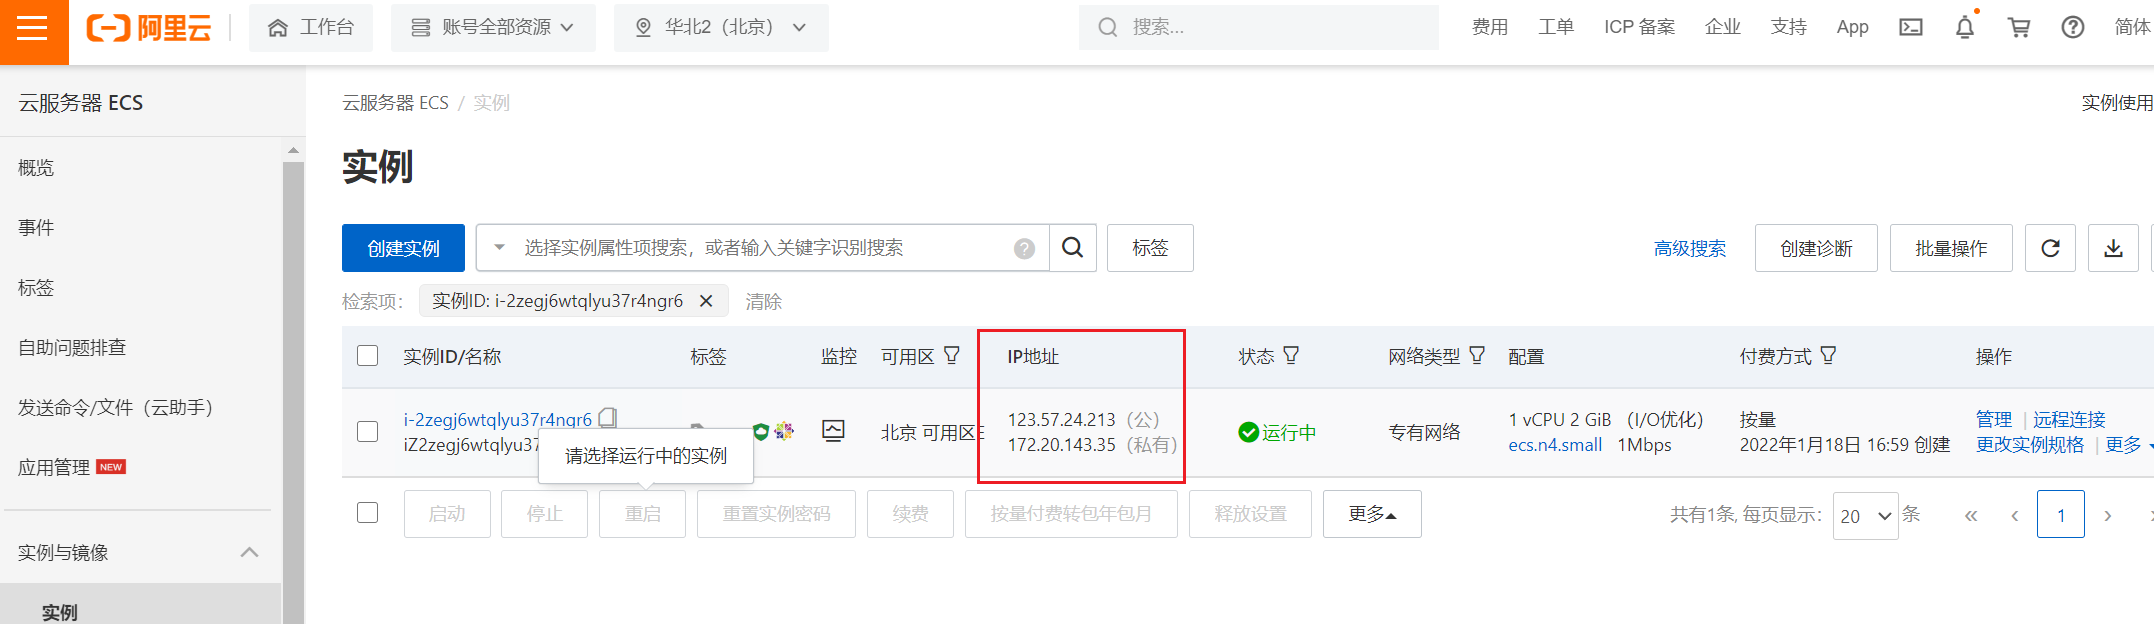
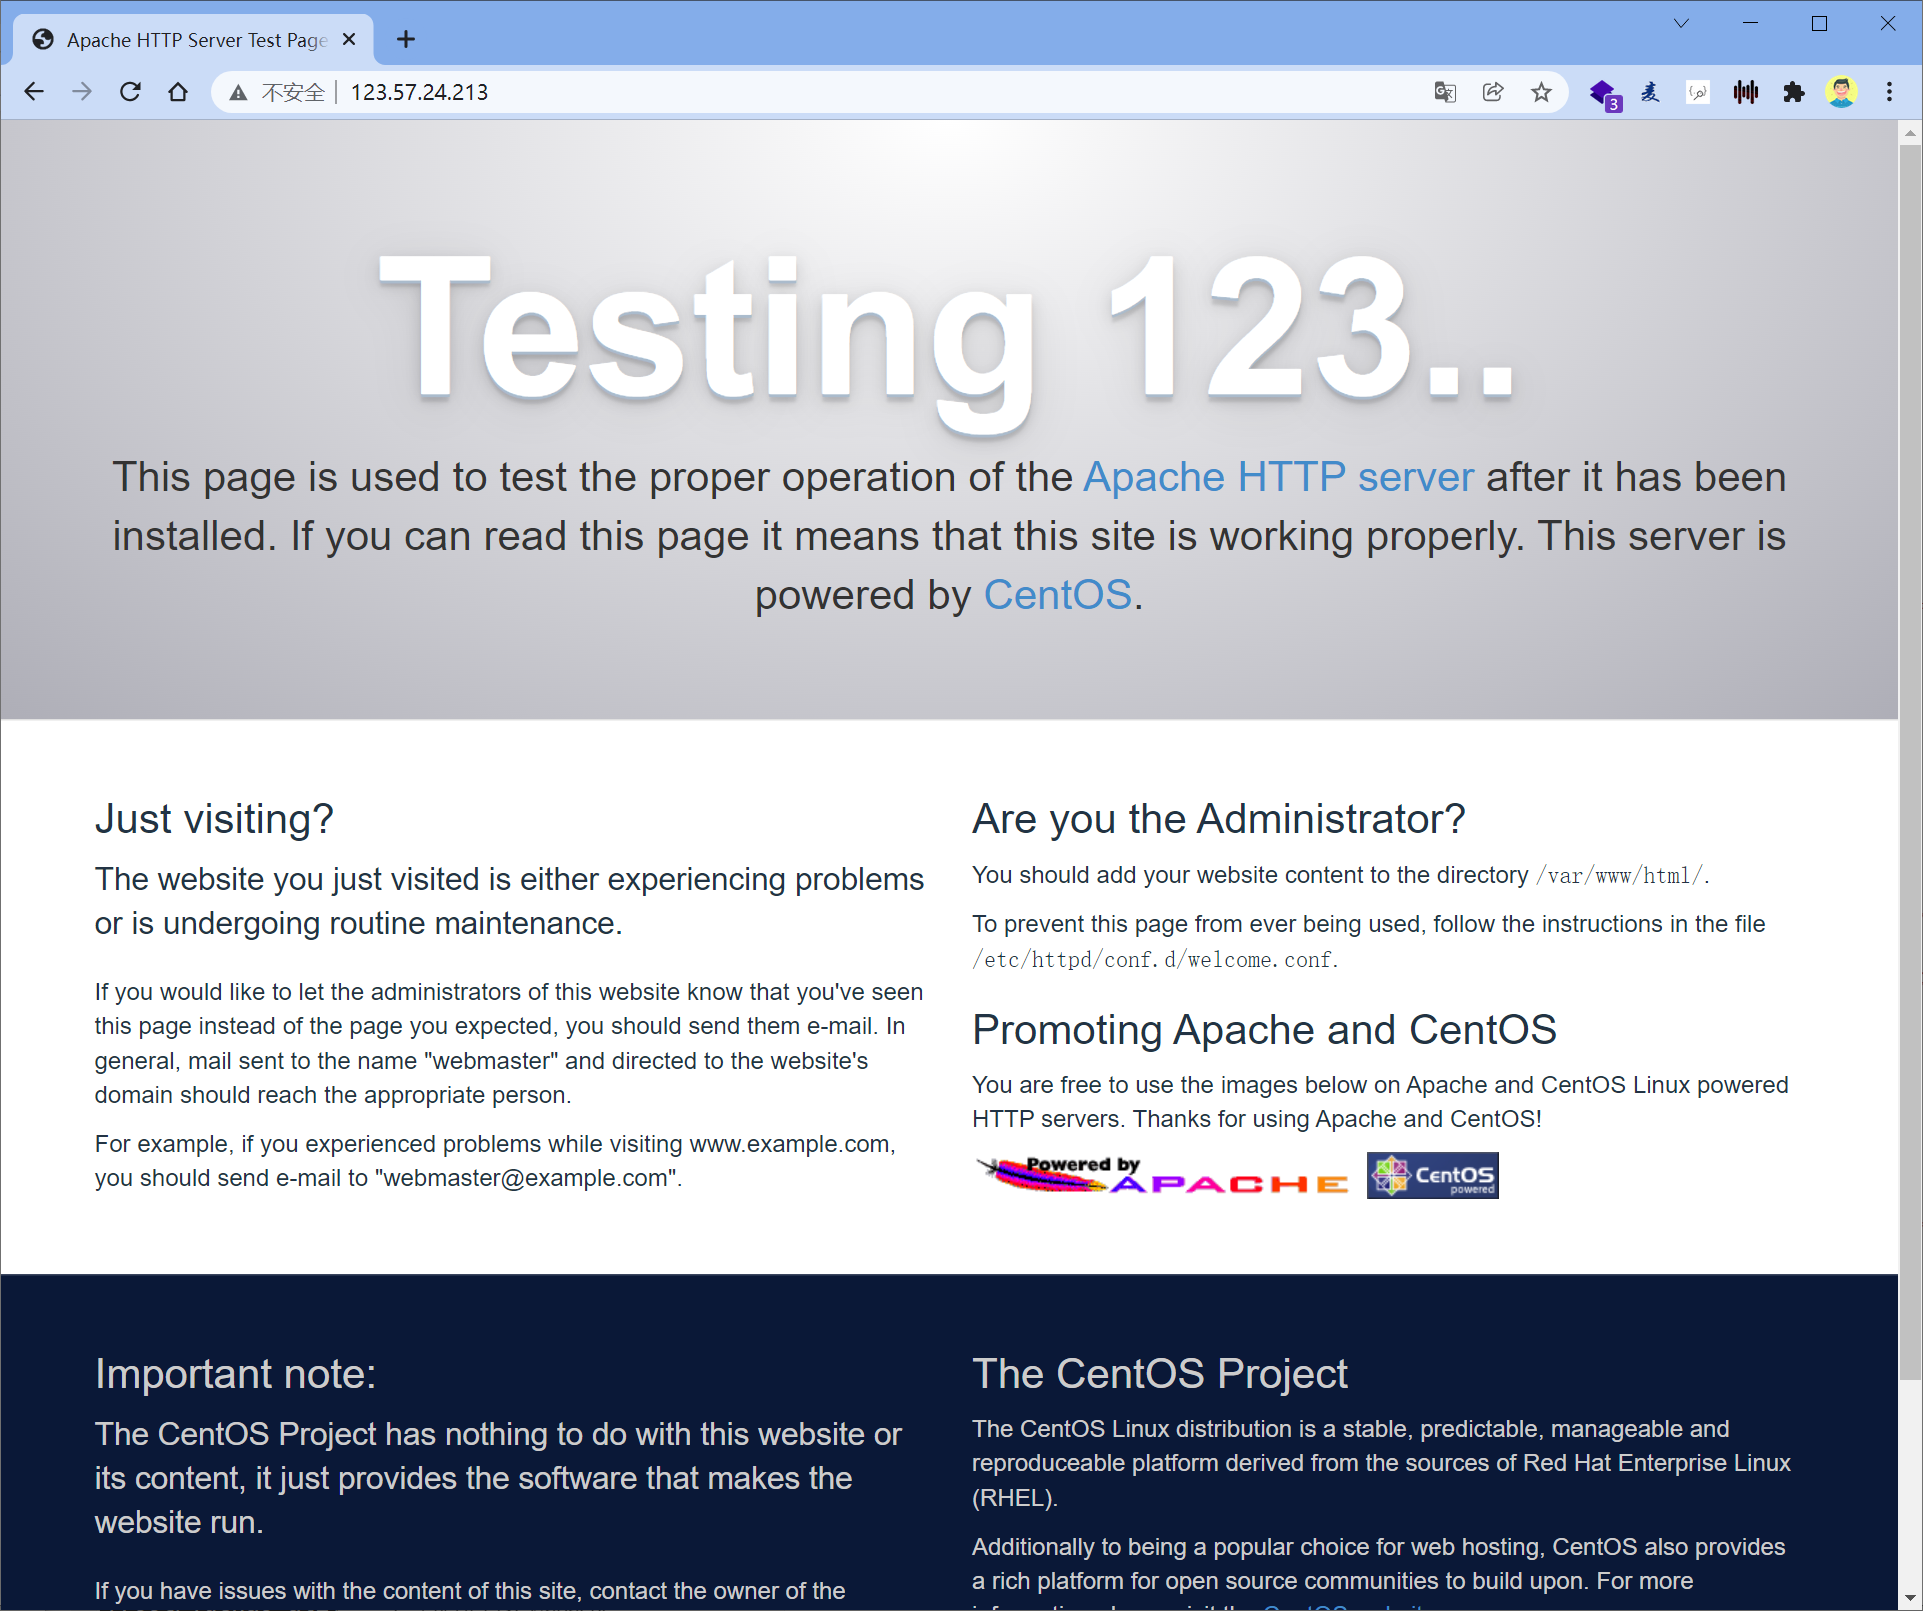
⑥在浏览器中,输入本机IP地址,如下图所示:
123.57.24.213
7、打开阿里云安全组(图解)
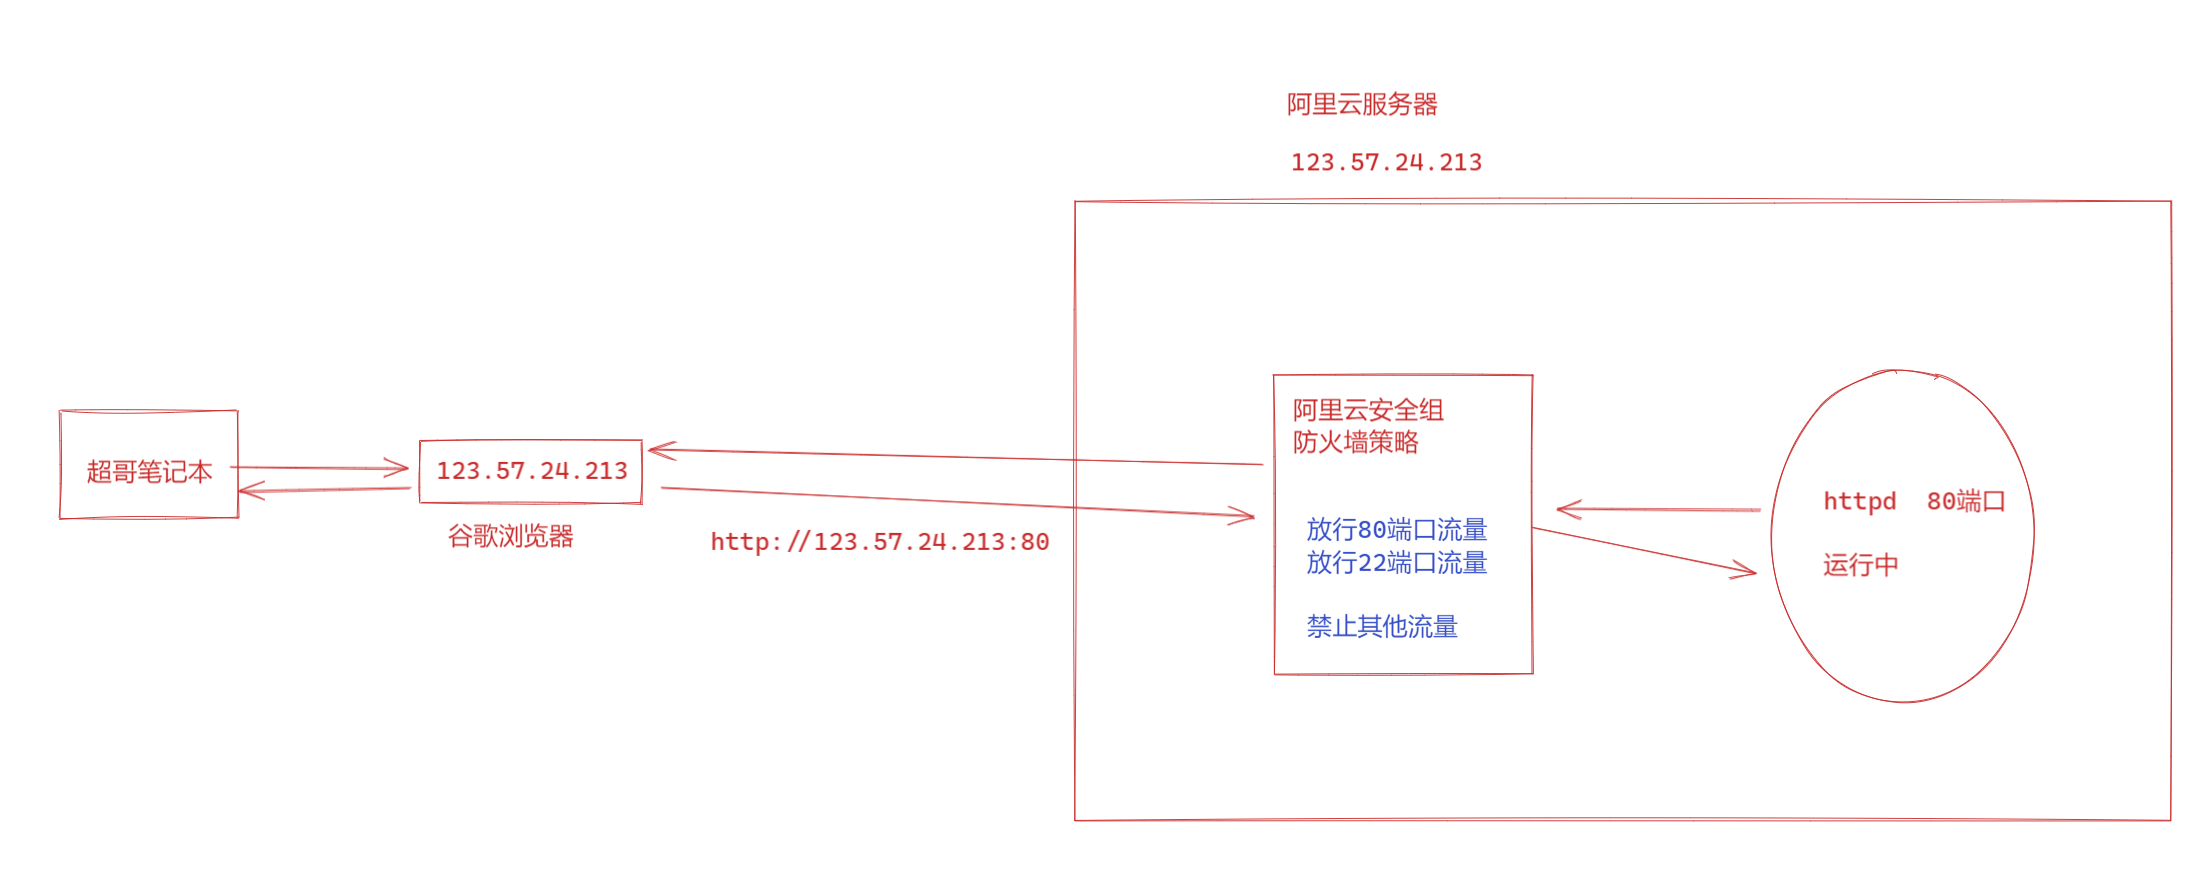
阿里云安全组
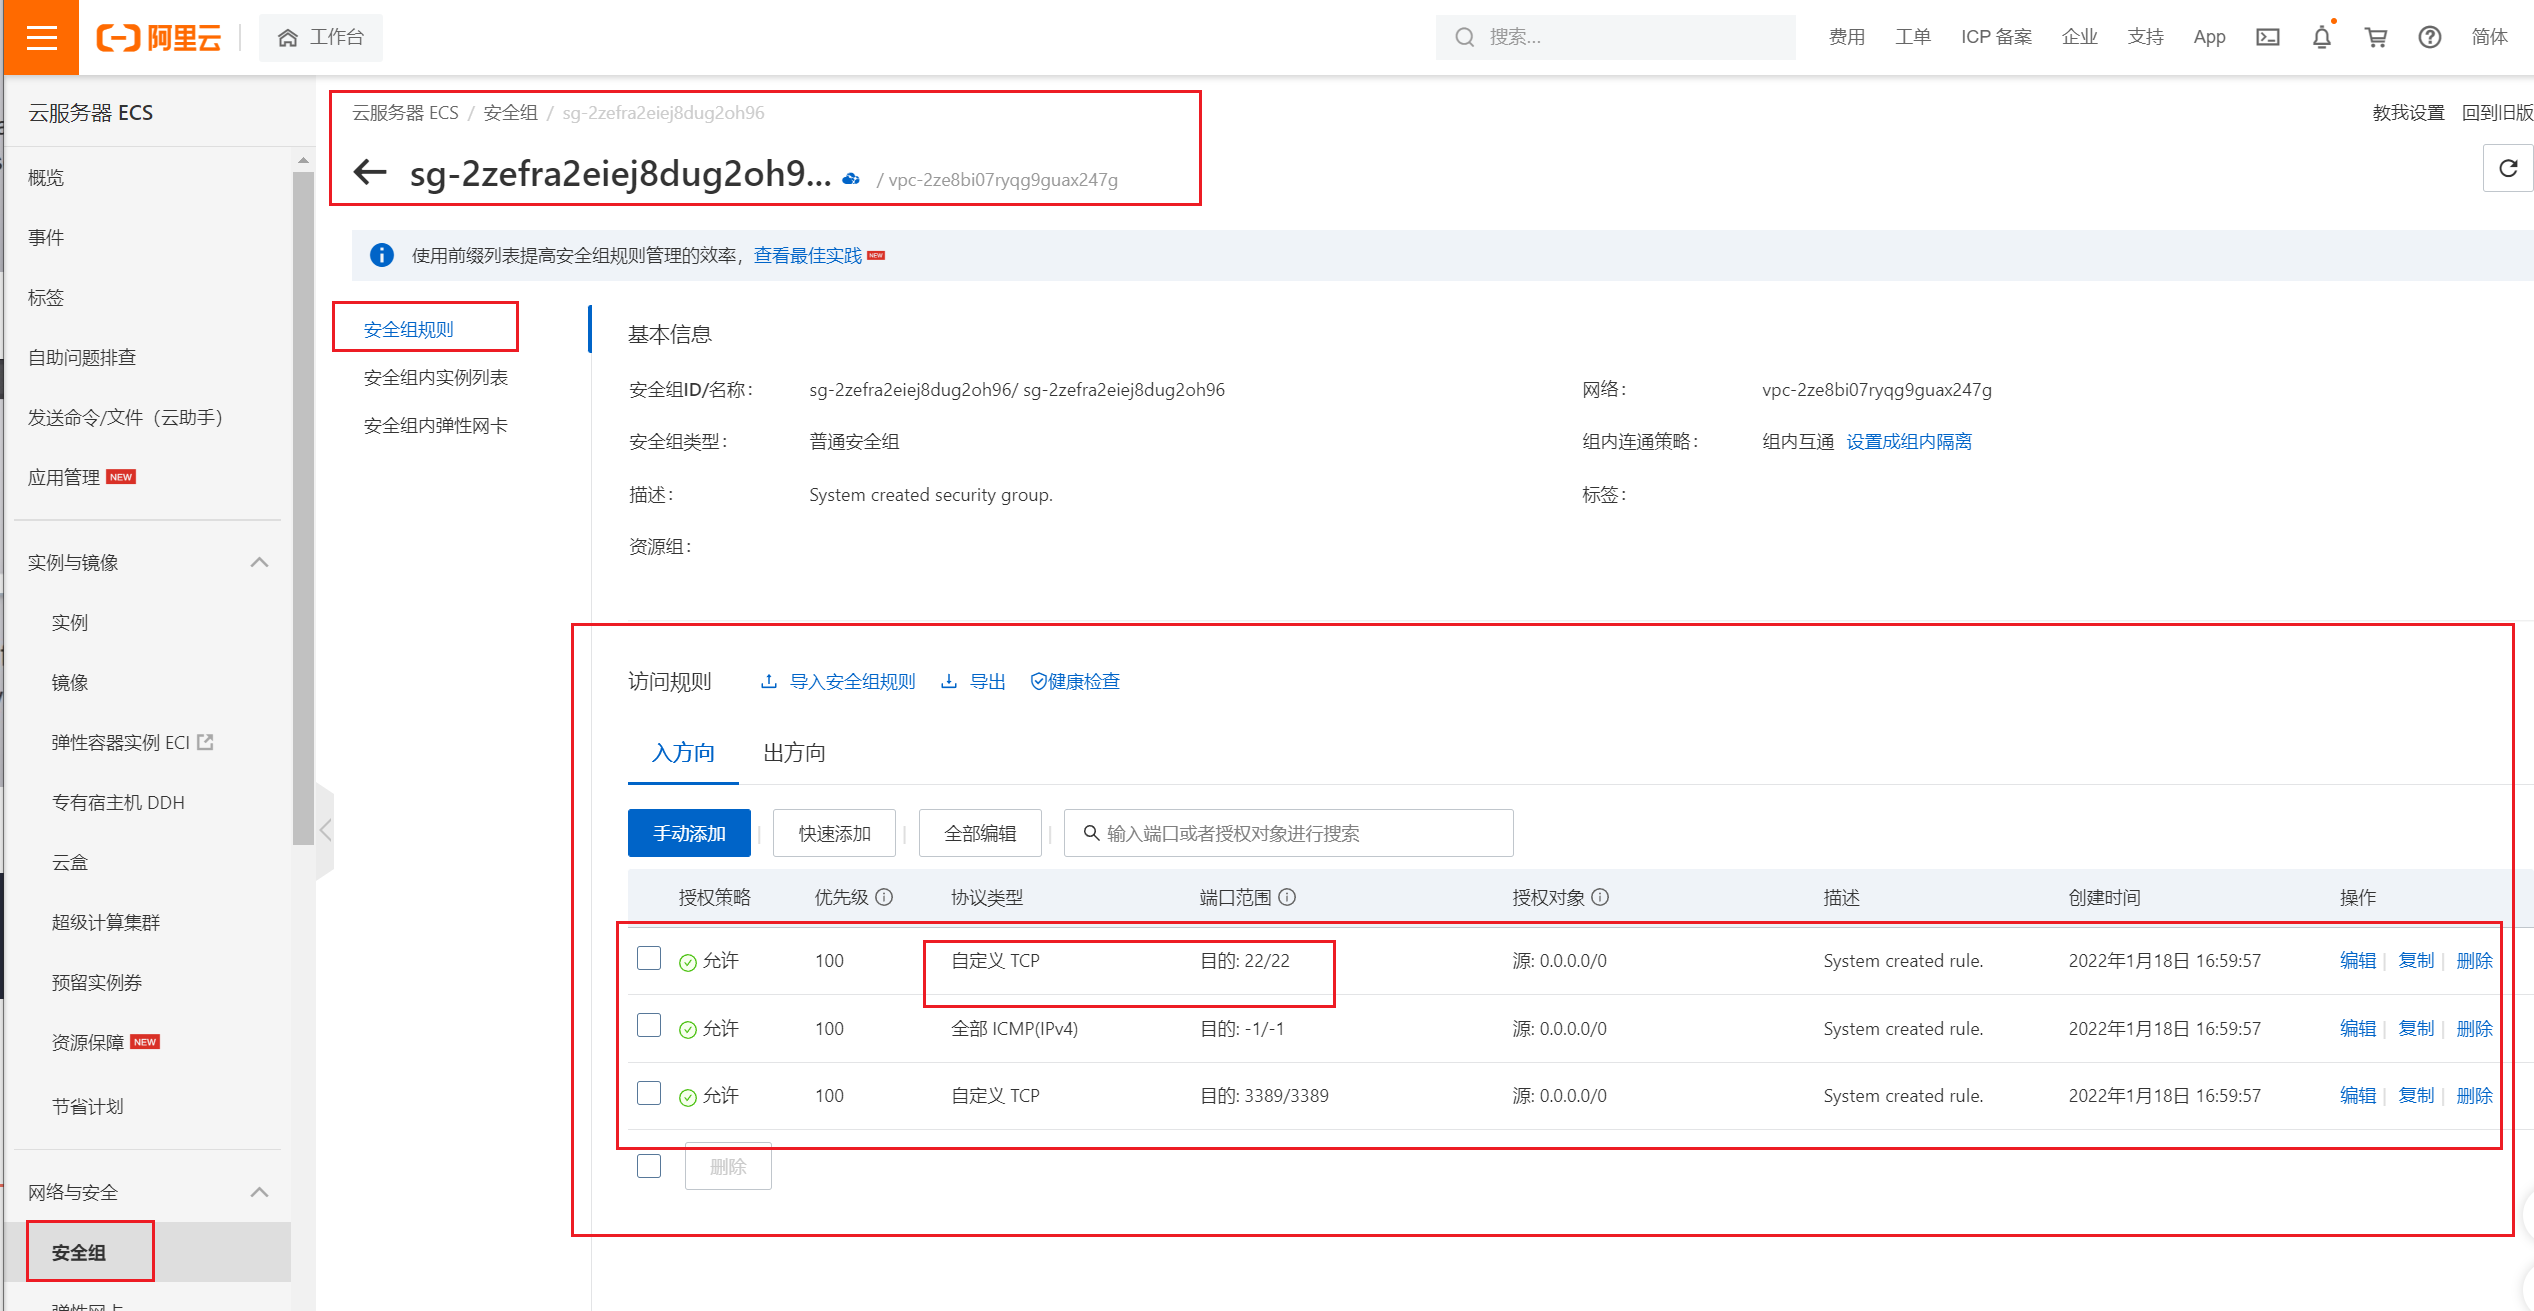
添加规则
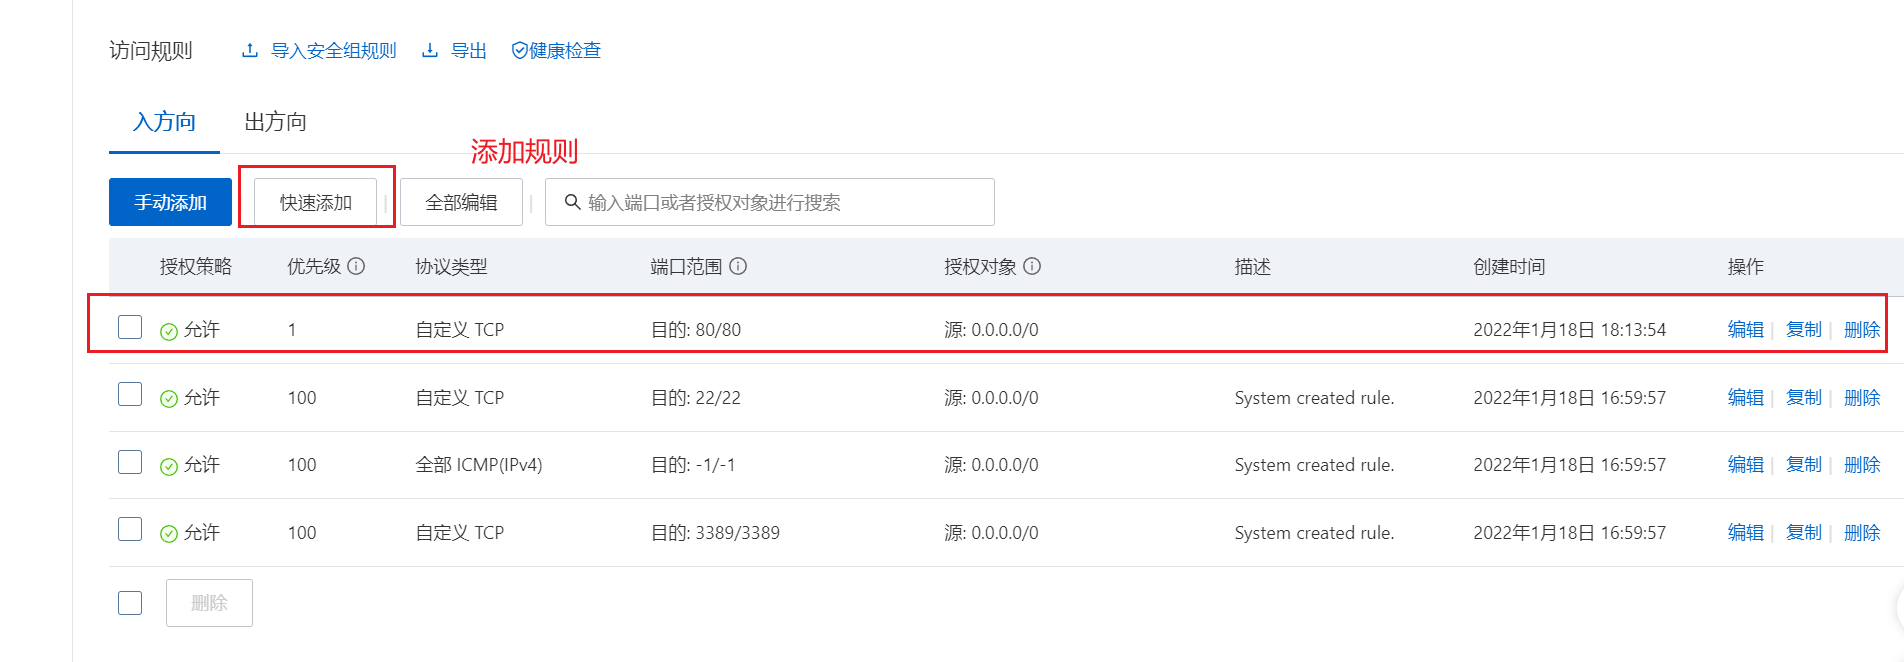
8、成功访问apache
http://123.57.24.213/
并且只要你有网络,其他人就可以访问这个网站。
检查ubuntu软件是否安装
你给出的这段内容看起来像是dpkg -l命令输出的一部分,它用于展示系统中已安装软件包的状态信息。下面来解读一下各字段的含义:
- Desired:表示软件包期望的状态,有以下几种可能:
- Unknown:不清楚这个软件包应处于什么状态,通常是数据库记录有问题才会这样。
- Install:期望这个软件包被安装。
- Remove:期望这个软件包被移除。
- Purge:期望这个软件包被彻底清除(连配置文件一起删除)。
- Hold:期望这个软件包维持当前状态,不再更新或更改。
- Status:描述软件包当前的实际状态:
- Not:软件包未安装。
- Inst:软件包已安装。
- Conf-files:软件包已被删除,但配置文件还保留着 ,对应
rc状态。 - Unpacked:软件包已经解压,但安装尚未完成,可能处于半安装状态。
- halF-conf:半配置状态,安装流程出现问题,部分配置完成了。
- Half-inst:半安装状态,安装中途受阻,可能是遇到依赖缺失等问题。
- trig-aWait:触发等待状态,软件包触发动作尚未执行。
- Trig-pend:触发挂起状态,与触发相关的一些动作等待被处理。
- Err?:显示软件包是否有错误:
- (none):没有错误。
- Reinst-required:需要重新安装,说明软件包有严重问题,可能无法正常使用。
后面的Name、Version、Architecture、Description就分别对应软件包的名称、版本、硬件架构和简要的功能描述了。如果你是想排查某个软件包的安装问题,可以把完整输出提供给我,咱们接着分析。
dpkg -l
- “rc”状态
- 含义:表示软件包已被删除(uninstalled),但是其配置文件(configuration files)仍保留在系统中。
- 例如,当你使用
apt - get remove命令(而不是apt - get purge命令)来卸载一个软件包时,软件包就会处于这种状态。这种状态下,如果你要重新安装该软件包,它可以使用之前保留的配置文件来恢复一些之前的设置。
- “hi”状态
- 含义:软件包处于“半安装(half - installed)”状态。这通常是由于安装过程中出现错误导致的。例如,在软件包安装过程中,可能因为依赖关系问题、文件系统错误或者网络问题等,使得安装无法正常完成,但部分文件已经被解压或者安装到系统中。
- “un”状态
- 含义:表示软件包处于未知(unknown)状态。这种情况比较少见,可能是由于软件包数据库(如
/var/lib/dpkg/status文件)损坏或者被错误修改,导致dpkg无法正确识别软件包的状态。
- 含义:表示软件包处于未知(unknown)状态。这种情况比较少见,可能是由于软件包数据库(如
- “pu”状态
- 含义:软件包处于“清除待处理(pending uninstall)”状态。这意味着软件包已经被标记为要清除(包括配置文件),但实际的清除操作尚未执行。例如,当你使用
apt - get purge命令卸载软件包时,在真正删除文件之前,软件包可能会处于这种状态。
- 含义:软件包处于“清除待处理(pending uninstall)”状态。这意味着软件包已经被标记为要清除(包括配置文件),但实际的清除操作尚未执行。例如,当你使用
- “tr”状态
- 含义:软件包处于“触发等待(trigger - pending)”状态。这种状态与软件包的触发器(triggers)有关。在Debian和Ubuntu系统中,软件包可以定义一些触发器,当软件包的某些操作(如安装、升级、删除等)发生时,这些触发器会被触发。“tr”状态表示软件包正在等待其触发器被执行。
9、LAMP之MYSQL
阿里云yum源默认是没有mysql的软件的,因此你直接用装不了。
比如
# centos
yum -y install mysql-community-server

# [root@www.yuchaoit.cn ~]$netstat -tunlp|grep 3306

# ubuntu
apt install mysql-server mysql-client -y

[root@www.yuchaoit.cn ~]$dpkg -l |grep mysql
ii  libdbd-mysql-perl:amd64               4.050-5ubuntu0.22.04.1                  amd64        Perl5 database interface to the MariaDB/MySQL database
ii  libmysqlclient21:amd64                8.0.39-0ubuntu0.22.04.1                 amd64        MySQL database client library
ii  mysql-client                          8.0.40-0ubuntu0.22.04.1                 all          MySQL database client (metapackage depending on the latest version)
ii  mysql-client-8.0                      8.0.40-0ubuntu0.22.04.1                 amd64        MySQL database client binaries
ii  mysql-client-core-8.0                 8.0.40-0ubuntu0.22.04.1                 amd64        MySQL database core client binaries
ii  mysql-common                          5.8+1.0.8                               all          MySQL database common files, e.g. /etc/mysql/my.cnf
ii  mysql-server                          8.0.40-0ubuntu0.22.04.1                 all          MySQL database server (metapackage depending on the latest version)
ii  mysql-server-8.0                      8.0.40-0ubuntu0.22.04.1                 amd64        MySQL database server binaries and system database setup
ii  mysql-server-core-8.0                 8.0.40-0ubuntu0.22.04.1                 amd64        MySQL database server binaries

# 确认端口,进程,无冲突
mysqld will log errors to /var/log/mysql/error.log
mysqld is running as pid 1070305
Created symlink /etc/systemd/system/multi-user.target.wants/mysql.service → /lib/systemd/system/mysql.service.


# 检查服务状态
[root@www.yuchaoit.cn ~]$!net
netstat -tunlp|grep 3306
tcp        0      0 127.0.0.1:33060         0.0.0.0:*               LISTEN      1070509/mysqld
tcp        0      0 127.0.0.1:3306          0.0.0.0:*               LISTEN      1070509/mysqld

# 云服务器下,程序127.0.0.1 外部可以访问吗??
[root@www.yuchaoit.cn ~]$systemctl status mysql
● mysql.service - MySQL Community Server
     Loaded: loaded (/lib/systemd/system/mysql.service; enabled; vendor preset: enabled)
     Active: active (running) since Fri 2024-12-27 16:53:56 CST; 1min 11s ago
    Process: 1070501 ExecStartPre=/usr/share/mysql/mysql-systemd-start pre (code=exited, status=0/SUCCESS)
   Main PID: 1070509 (mysqld)
     Status: "Server is operational"
      Tasks: 37 (limit: 4563)
     Memory: 369.1M
        CPU: 1.007s
     CGroup: /system.slice/mysql.service
             └─1070509 /usr/sbin/mysqld

Dec 27 16:53:56 www.yuchaoit.cn systemd[1]: Starting MySQL Community Server...
Dec 27 16:53:56 www.yuchaoit.cn systemd[1]: Started MySQL Community Server.

# 修改为绑定0.0.0.0,让公网中其他用户可以访问数据库(确保安全性!对公,存在被攻击可能性)
# 修改服务端配置文件
[root@www.yuchaoit.cn ~]$vim /etc/mysql/mysql.conf.d/mysqld.cnf

# vim快捷替换,默认127地址改为0.0.0.0地址
:%s/127.0.0.1/0.0.0.0/g
# localhost which is more compatible and is not less secure.
bind-address            = 0.0.0.0
mysqlx-bind-address     = 0.0.0.0

# 让程序重启,重新弄读取配置文件,加载数据到内存
[root@www.yuchaoit.cn ~]$vim /etc/mysql/mysql.conf.d/mysqld.cnf
[root@www.yuchaoit.cn ~]$systemctl restart mysql


[root@www.yuchaoit.cn ~]$
[root@www.yuchaoit.cn ~]$
[root@www.yuchaoit.cn ~]$!net
netstat -tunlp|grep 3306
tcp        0      0 0.0.0.0:3306            0.0.0.0:*               LISTEN      1071187/mysqld
tcp        0      0 0.0.0.0:33060           0.0.0.0:*               LISTEN      1071187/mysqld

[root@www.yuchaoit.cn ~]$mysql
Welcome to the MySQL monitor.  Commands end with ; or \g.
Your MySQL connection id is 8
Server version: 8.0.40-0ubuntu0.22.04.1 (Ubuntu)

Copyright (c) 2000, 2024, Oracle and/or its affiliates.

Oracle is a registered trademark of Oracle Corporation and/or its
affiliates. Other names may be trademarks of their respective
owners.

Type 'help;' or '\h' for help. Type '\c' to clear the current input statement.

mysql> select version();
+-------------------------+
| version()               |
+-------------------------+
| 8.0.40-0ubuntu0.22.04.1 |
+-------------------------+
1 row in set (0.01 sec)

mysql>


mysql> show databases;
+--------------------+
| Database           |
+--------------------+
| information_schema |
| mysql              |
| performance_schema |
| sys                |
+--------------------+
4 rows in set (0.00 sec)

mysql>

# 远程连接mysql配置

mysql> show databases;
mysql> use mysql;
mysql> show tables;
mysql> desc user; # 连接,登录mysql的账户信息,用户名,密码,允许从哪些主机登录mysql


mysql> select host,user,plugin from mysql.user;
+-----------+------------------+-----------------------+
| host      | user             | plugin                |
+-----------+------------------+-----------------------+
| localhost | debian-sys-maint | caching_sha2_password |
| localhost | mysql.infoschema | caching_sha2_password |
| localhost | mysql.session    | caching_sha2_password |
| localhost | mysql.sys        | caching_sha2_password |
| localhost | root             | auth_socket           |
+-----------+------------------+-----------------------+
5 rows in set (0.00 sec)

mysql>

# 在创建一个用户,root以远程,ip:port 密码认证形式登录
# 创建用户root,从%任意客户端都可以登录,并且密码是 chaoge666

mysql> CREATE USER 'root'@'%' IDENTIFIED WITH mysql_native_password BY 'chaoge666';
Query OK, 0 rows affected (0.00 sec)

# 还得授权,授予改账户,允许远程登录,SQL如下
# 所有库.所有的表
# 允许 root@'%' 这个账户的连接,最大化权限
mysql> GRANT ALL PRIVILEGES ON *.* TO 'root'@'%' WITH GRANT OPTION;
Query OK, 0 rows affected (0.00 sec)

# mysql系统性学章节知识。
# 高速mysql,请你刷新权限!
mysql> flush privileges;
Query OK, 0 rows affected (0.01 sec)


# pycharm,开发编辑器
# linux的mysql命令去远程连接

# 创建云数据库上的db
mysql> create database douyin_db;
Query OK, 1 row affected (0.00 sec)

mysql> show databases;
+--------------------+
| Database           |
+--------------------+
| douyin_db          |
| information_schema |
| mysql              |
| performance_schema |
| sys                |
+--------------------+
5 rows in set (0.01 sec)

mysql>

# 用远程,另一台机器,测试mysql远程登录
101.126.78.228

配置mysql防火墙,外网访问云数据库

配置mysql的软件rpm源
这个教程去mysql官网即可
==超哥的笔记认第二、谁认第一?==
https://dev.mysql.com/
http://dev.mysql.com/get/mysql-community-release-el7-5.noarch.rpm
# 1.下载mysql的yum源
[root@yuchao-aliyun local]# cd /usr/local/
[root@yuchao-aliyun local]# wget http://dev.mysql.com/get/mysql-community-release-el7-5.noarch.rpm
# 2.安装,查看mysql的yum源
[root@yuchao-aliyun local]# rpm -ivh mysql-community-release-el7-5.noarch.rpm
Preparing... ################################# [100%]
Updating / installing...
1:mysql-community-release-el7-5 ################################# [100%]
[root@yuchao-aliyun local]#
[root@yuchao-aliyun local]# ls -l /etc/yum.repos.d/
total 16
-rw-r--r-- 1 root root 675 Jan 18 17:00 CentOS-Base.repo
-rw-r--r-- 1 root root 230 Jan 18 17:00 epel.repo
-rw-r--r-- 1 root root 1209 Jan 29 2014 mysql-community.repo
-rw-r--r-- 1 root root 1060 Jan 29 2014 mysql-community-source.repo
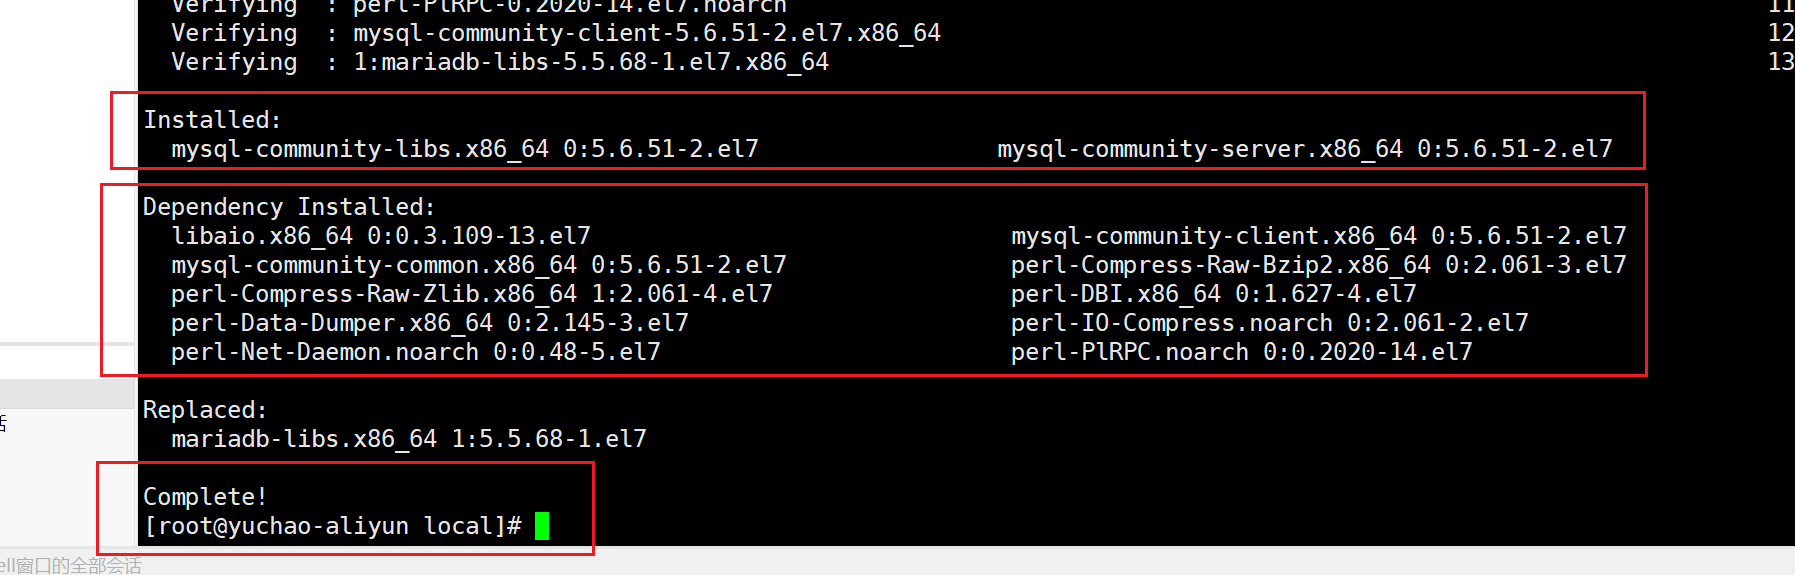
# 3.此时可以安装mysql
yum -y install mysql-community-server
# 4.安装完毕后,启动mysql
完成后,系统自动生成mysql服务管理脚本,systemctl可以去调用
也是我们通过systemctl 去管理的服务的名字
[root@yuchao-aliyun local]# systemctl start mysqld
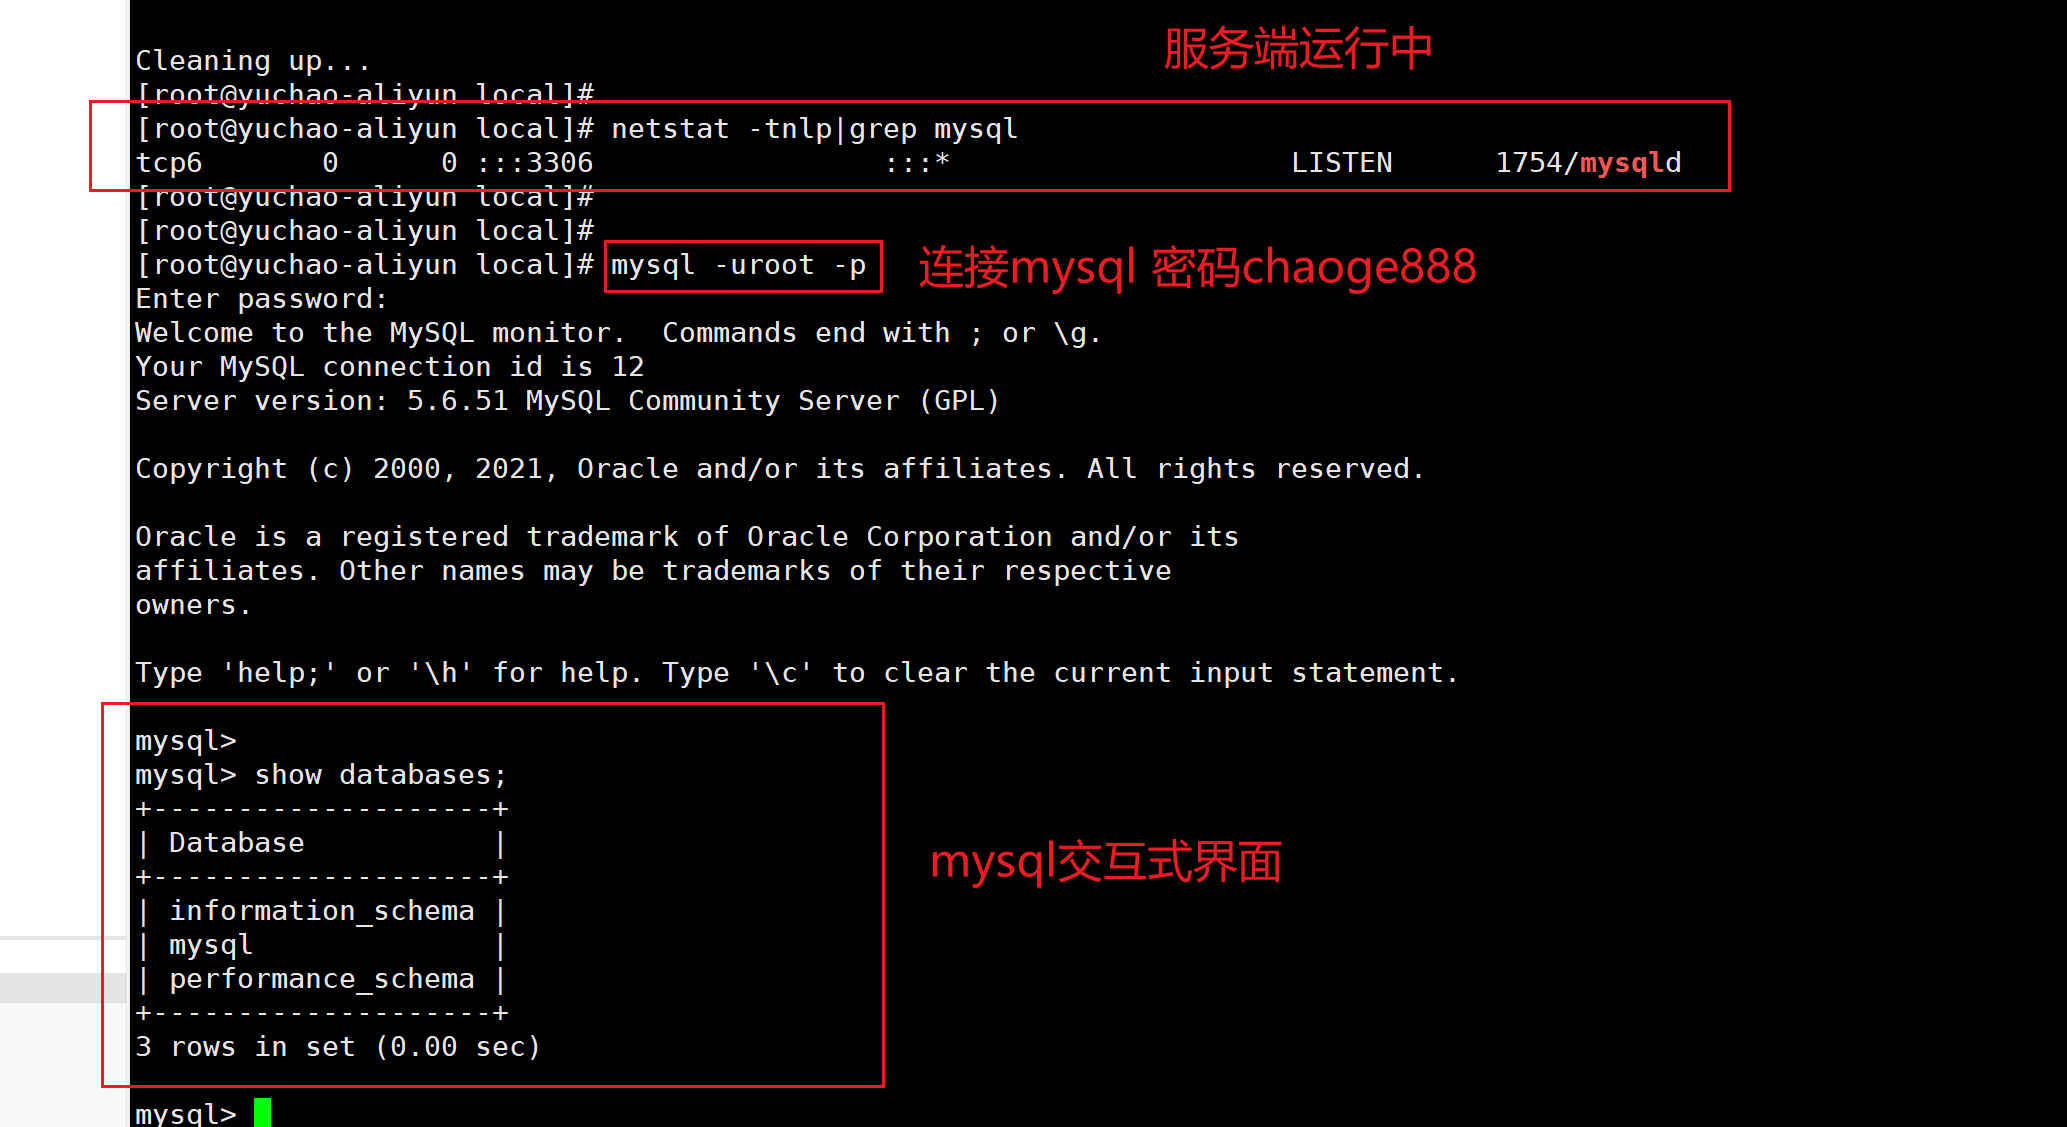
# 5.查看mysql运行端口,进程
[root@yuchao-aliyun local]# netstat -tnlp|grep mysql
tcp6 0 0 :::3306 :::* LISTEN 1754/mysqld
[root@yuchao-aliyun local]# ps -ef|grep mysql
mysql 1587 1 0 18:43 ? 00:00:00 /bin/sh /usr/bin/mysqld_safe --basedir=/usr
mysql 1754 1587 0 18:43 ? 00:00:00 /usr/sbin/mysqld --basedir=/usr --datadir=/var/lib/mysql --plugin-dir=/usr/lib64/mysql/plugin --log-error=/var/log/mysqld.log --pid-file=/var/run/mysqld/mysqld.pid --socket=/var/lib/mysql/mysql.sock
root 12022 1202 0 18:54 pts/0 00:00:00 grep --color=auto mysql
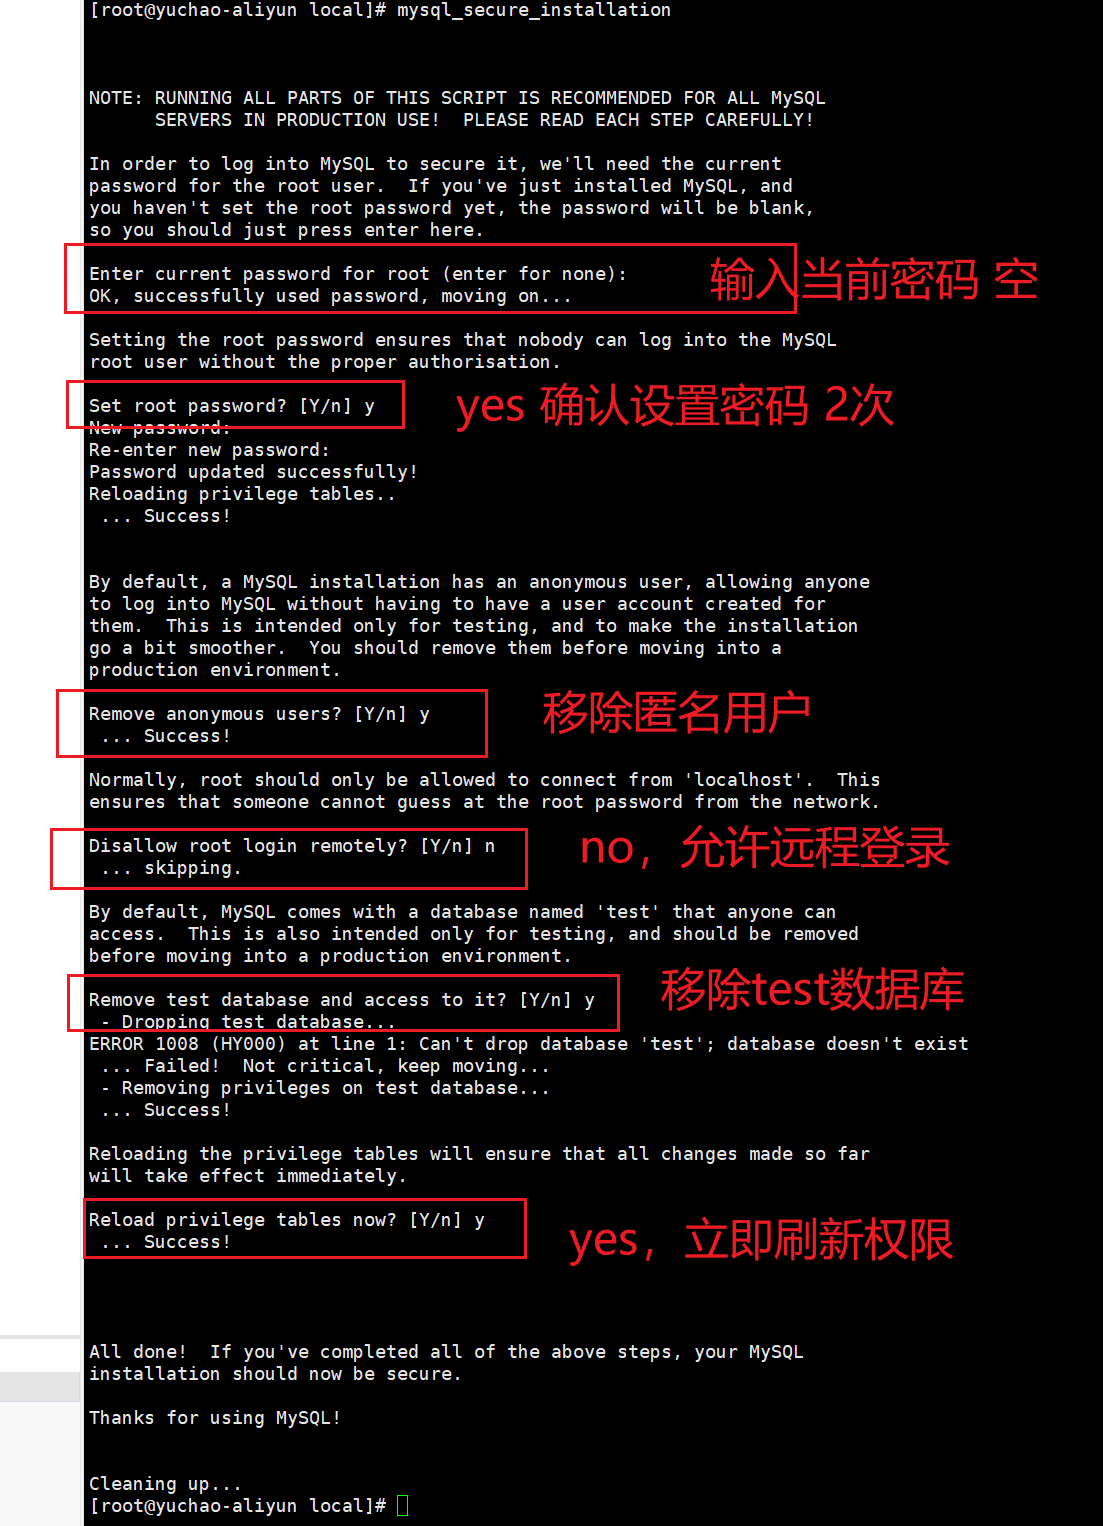
# 6.确保mysql启动后,初始化数据,进行使用
默认的mysql没有密码,没数据,得初始化使用
[root@yuchao-aliyun local]# mysql_secure_installation
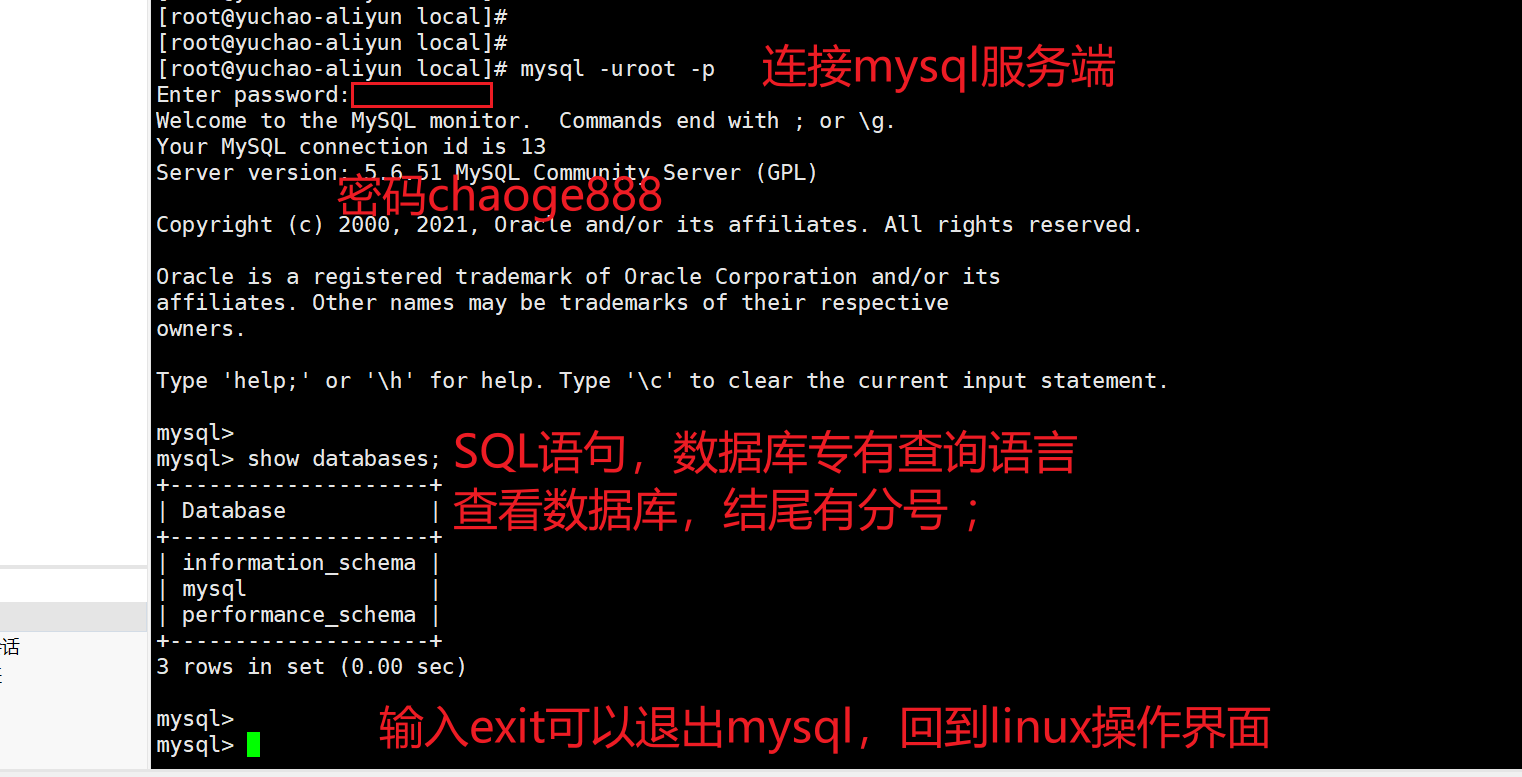
# 7.连接mysql服务端
[root@yuchao-aliyun local]# mysql -uroot -p
Enter password:
Welcome to the MySQL monitor. Commands end with ; or \g.
Your MySQL connection id is 13
Server version: 5.6.51 MySQL Community Server (GPL)
Copyright (c) 2000, 2021, Oracle and/or its affiliates. All rights reserved.
Oracle is a registered trademark of Oracle Corporation and/or its
affiliates. Other names may be trademarks of their respective
owners.
Type 'help;' or '\h' for help. Type '\c' to clear the current input statement.
mysql>
mysql> show databases;
+--------------------+
| Database |
+--------------------+
| information_schema |
| mysql |
| performance_schema |
+--------------------+
3 rows in set (0.00 sec)
mysql>
mysql> exit
Bye
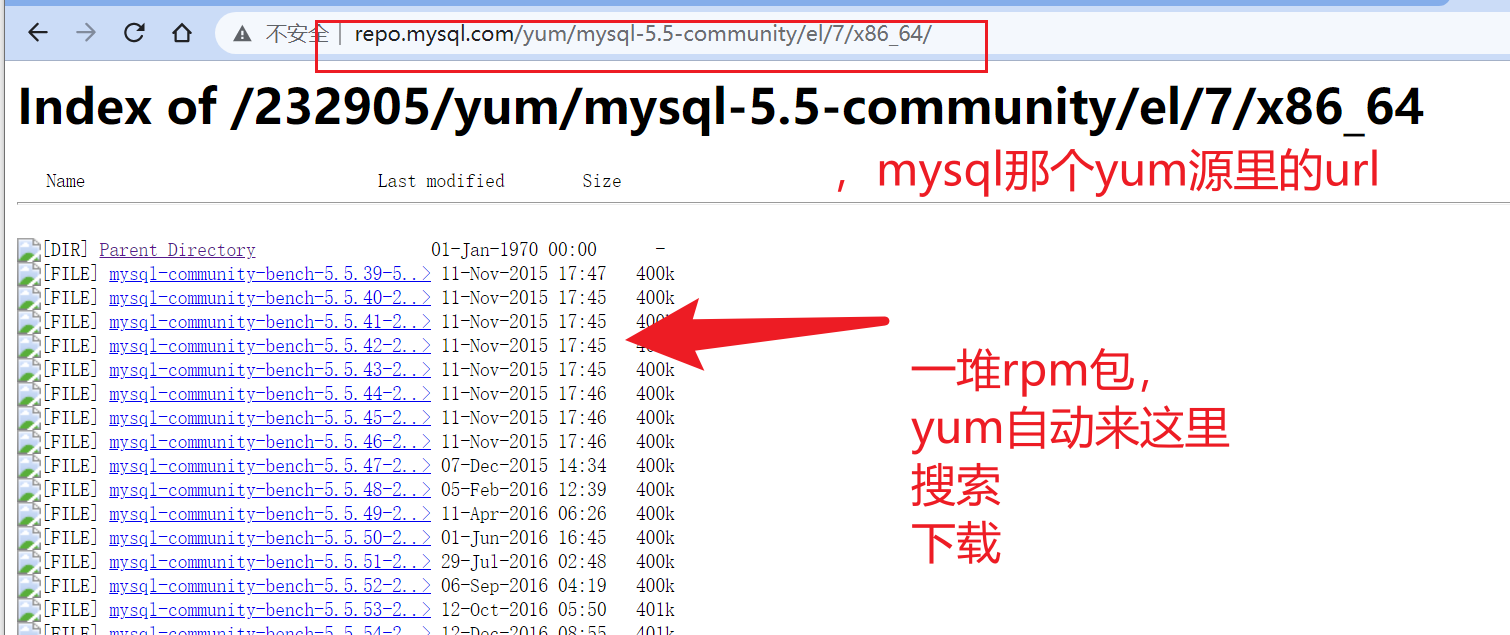
这个repo文件,就是指定了一个rpm包的下载地址
安装完成
查看mysql服务的名字,已经启动mysql
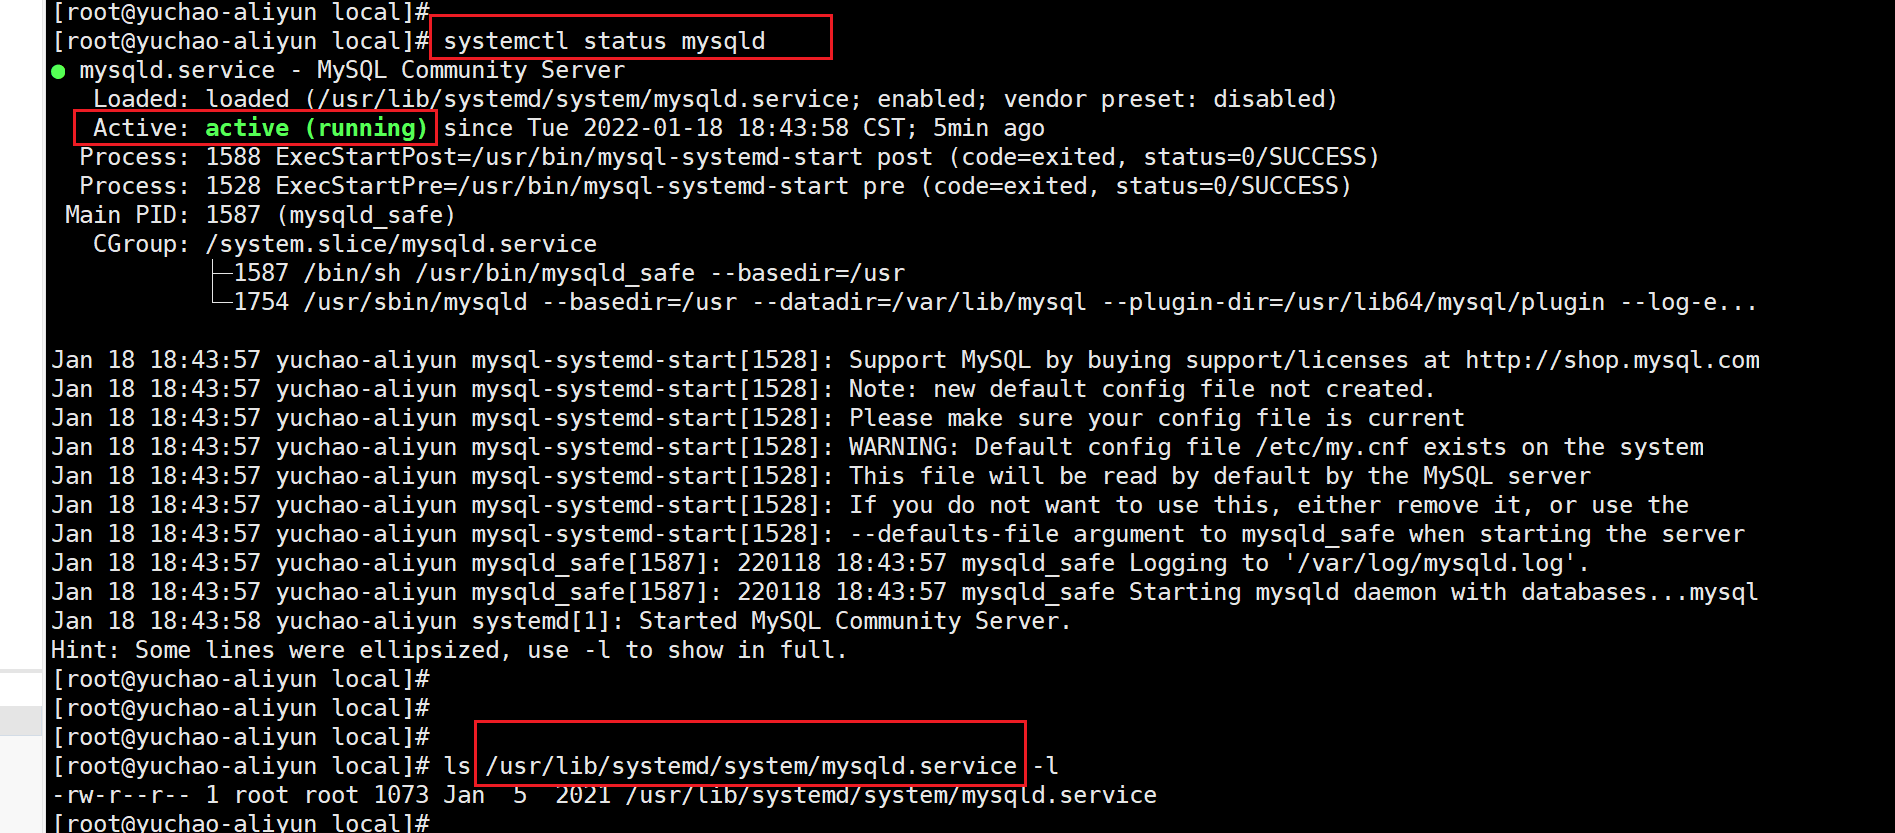
查看进程

初始化数据库
连接mysql客户端
c/s模式
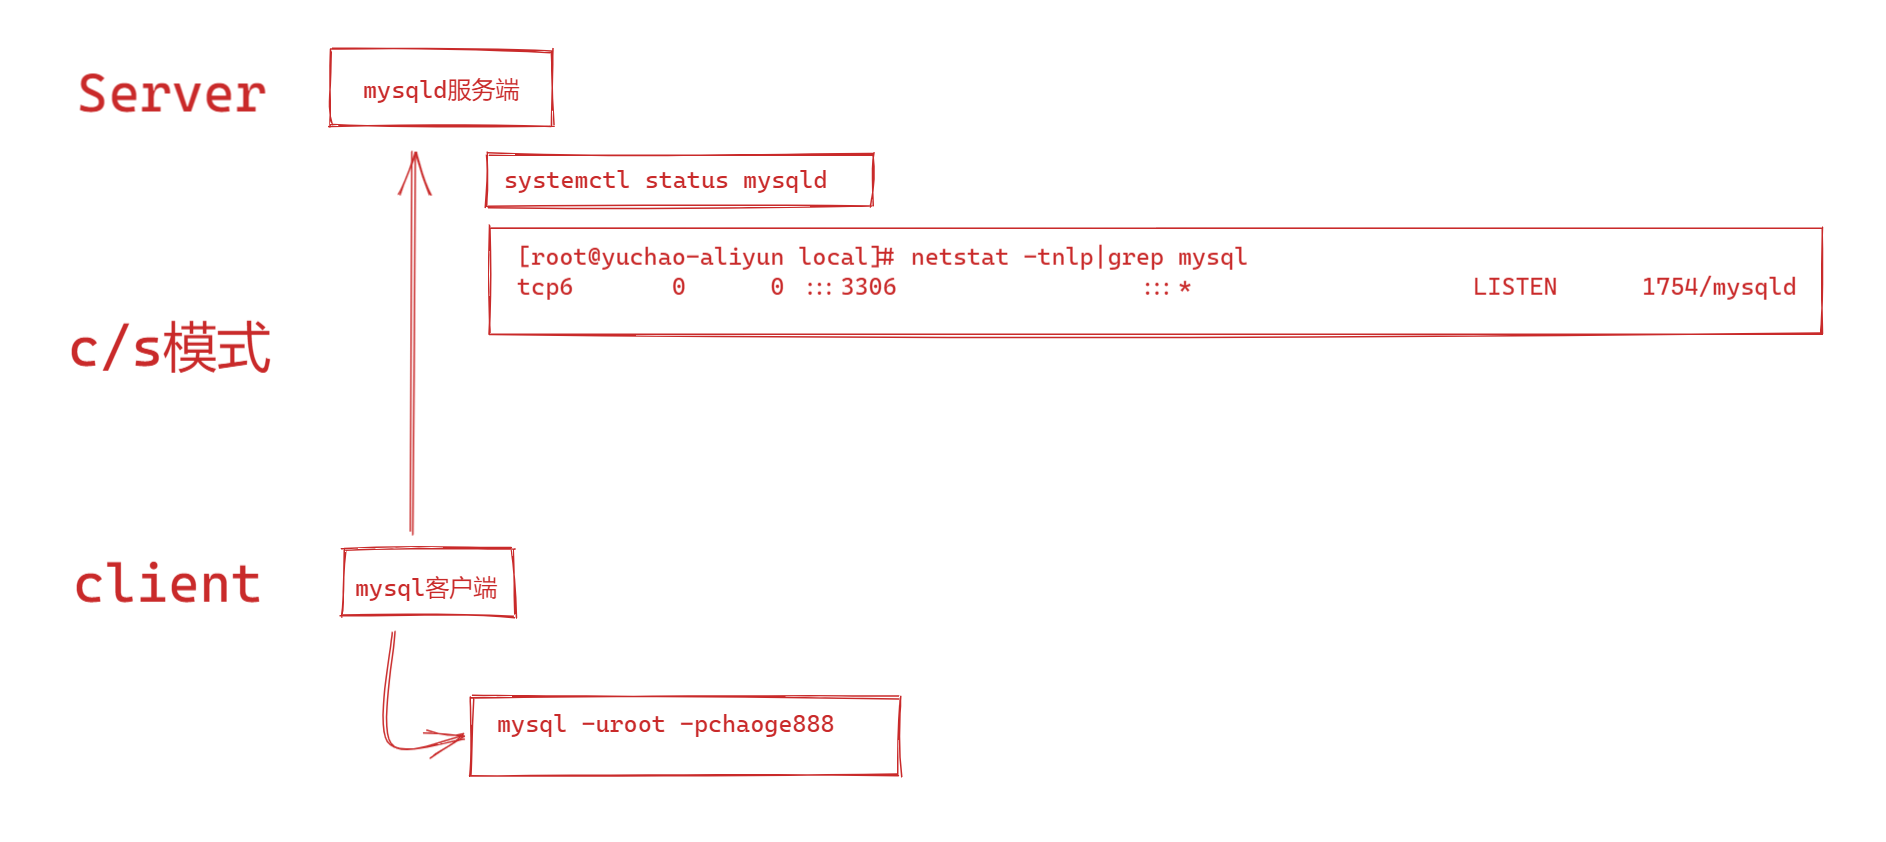
查看数据库
10、LAMP安装PHP
1、使用yum安装php即可
[root@yuchao-aliyun local]# yum install php -y

# ubuntu
# php  开发编译器
# libapache2-mod-php  php > 连接 apache的驱动
# php-mysql

# 更新apt仓库缓存
sudo apt-get update
sudo apt install php libapache2-mod-php php-mysql -y

[root@www.yuchaoit.cn ~]$php -v
PHP 8.1.2-1ubuntu2.20 (cli) (built: Dec  3 2024 20:14:35) (NTS)
Copyright (c) The PHP Group
Zend Engine v4.1.2, Copyright (c) Zend Technologies
    with Zend OPcache v8.1.2-1ubuntu2.20, Copyright (c), by Zend Technologies


[root@www.yuchaoit.cn ~]$file /usr/bin/php8.1
/usr/bin/php8.1: ELF 64-bit LSB pie executable, x86-64, version 1 (GNU/Linux), dynamically linked, interpreter /lib64/ld-linux-x86-64.so.2, BuildID[sha1]=a7c9f19a25e8349c2f6956aade2ef51160d7eb7a, for GNU/Linux 3.2.0, stripped
验证LAMP通信结果
# 原理
1. linux ubuntu
2. apache 可访问了,网页根目录
[root@www.yuchaoit.cn ~]$ls /var/www/html/
index.html
[root@www.yuchaoit.cn ~]$curl 127.0.0.1
<meta charset=utf-8>
于超老师带你学linux sre ,冲月薪2w
hello,wolrd


3. 数据库也ok了


4.php,连接apache的模块也装l

5. 测试,能否apache会吧代码,交给,转发给php去执行!
[root@www.yuchaoit.cn ~]$
[root@www.yuchaoit.cn ~]$systemctl restart apache2.service


准备好php代码文件,放入网站目录
[root@www.yuchaoit.cn html]$cat /var/www/html/test-info.php
<?php
        phpinfo();
        echo '超哥带你学LAMP、学习Linux云计算';
?>


# 6.发请求,浏览器访问
http://101.126.78.228:80/test-info.php

2、重启httpd服务
apache是需要和php结合起来工作的,我们这里主要练习yum工具,安装,部署网站,其中原理,超哥会在网站架构篇,详细,通透的讲解其中原理。
[root@yuchao-aliyun local]# systemctl restart httpd

1.在安装php之后,重启httpd
2.php能够自动和apache结合工作了。
测试LAMP
1.进入httpd,apache的网站根目录,也就是这个网页存放的地方。
[root@yuchao-aliyun local]# cd /var/www/html/
[root@yuchao-aliyun html]#
[root@yuchao-aliyun html]#
[root@yuchao-aliyun html]# vim index.php
[root@yuchao-aliyun html]#
[root@yuchao-aliyun html]# pwd
/var/www/html
[root@yuchao-aliyun html]#
[root@yuchao-aliyun html]# cat index.php
<?php
    echo '超哥带你学LAMP、学习Linux云计算';
?>
[root@yuchao-aliyun html]#


2.这里的意思是,我们访问apache,然后看到php脚本,脚本内的代码是打印一句话。

此时我们已经能够正确访问到
一个支持linux+apache+mysql+php体系的系统平台
也已经看到了网站显示的内容
此时你已经准备好了一个LAMP环境,部署论坛网站,换一套代码就好了。
apacha2和php如何连接工作原理,LAMP,练习apt安装运维架构案例
apache已经out了,不用多琢磨,直接琢磨nginx就行了。
面试10家,9.5家都是用的nginx。
lightHTTP
运维软件,都用配置文件,定义功能,修改功能
apt > /etc'
[root@www.yuchaoit.cn ~]$ls /etc/apache2/
apache2.conf     conf-enabled/    magic            mods-enabled/    sites-available/
conf-available/  envvars          mods-available/  ports.conf       sites-enabled/
PHP作为Apache模块的连接方式(以Linux系统为例)
- 安装配置:
- 在安装LAMP(Linux - Apache - MySQL - PHP)环境时,通常会安装
libapache2 - mod - php(在Ubuntu等基于Debian的系统中)这样的模块来实现PHP与Apache的集成。安装完成后,Apache会在启动时加载PHP模块。
- 在安装LAMP(Linux - Apache - MySQL - PHP)环境时,通常会安装
- 工作原理:
- 当客户端向Apache服务器发送一个请求,请求的文件如果是PHP文件(例如
.php结尾的文件),Apache会识别这个文件类型。因为libapache2 - mod - php模块已经加载,Apache会将请求转交给PHP模块进行处理。 - PHP模块会解析PHP代码,执行其中的脚本指令,例如连接数据库、生成动态内容等。在解析过程中,PHP模块会利用系统资源(如内存、CPU等)按照PHP代码的逻辑进行运算。
- 执行完PHP代码后,PHP模块会将生成的HTML、CSS、JavaScript等内容返回给Apache。Apache再将这些内容作为响应发送回客户端浏览器,这样客户端就能看到由PHP代码生成的网页内容。
- 当客户端向Apache服务器发送一个请求,请求的文件如果是PHP文件(例如
- 配置文件关联:
- 在Apache的配置文件(通常是
/etc/apache2/apache2.conf或/etc/httpd/httpd.conf,取决于Linux发行版)中,有一些与PHP相关的配置。例如,在Ubuntu系统中,/etc/apache2/mods - enabled/php.ini文件是与PHP模块相关的配置文件。这个文件可以用来设置PHP的一些参数,如上传文件大小限制、内存限制等。
- 在Apache的配置文件(通常是
- 安装配置:
/etc/apache2/apache2.conf或/etc/apache2/httpd.conf:这是Apache2的主要配置文件,在不同的Linux发行版中可能使用不同的文件名或有不同的默认配置路径.- 启用PHP模块:在文件中找到
LoadModule指令来加载PHP模块。例如,在基于Debian的系统中,可能会有LoadModule php_module /usr/lib/apache2/modules/libphp.so这样的配置项来加载PHP模块. - 设置PHP文件处理方式:通过
FilesMatch指令来指定如何处理.php文件。通常会有类似于<FilesMatch \.php$>SetHandler application/x-httpd-php</FilesMatch>的配置,告诉Apache将.php文件交给PHP模块来处理.
- 启用PHP模块:在文件中找到
/etc/php/php.ini:这是PHP的配置文件,用于设置PHP的各种参数和行为.- 内存限制:可以通过修改
memory_limit参数来调整PHP脚本能够使用的最大内存量。例如,memory_limit = 128M表示PHP脚本最多可以使用128MB的内存. - 错误显示和日志记录:
display_errors参数用于控制是否在网页上显示PHP错误信息,log_errors参数用于决定是否将错误信息记录到日志文件中,error_log参数则指定了错误日志文件的路径. - 文件上传设置:
upload_max_filesize参数限制了PHP允许上传的文件的最大大小,post_max_size参数则限制了POST数据的最大大小.
- 内存限制:可以通过修改
[root@www.yuchaoit.cn html]$ls /etc/apache2/mods-enabled/
access_compat.load  authz_core.load  deflate.load  mime.load         php8.1.load      status.load
alias.conf          authz_host.load  dir.conf      mpm_prefork.conf  reqtimeout.conf
alias.load          authz_user.load  dir.load      mpm_prefork.load  reqtimeout.load
auth_basic.load     autoindex.conf   env.load      negotiation.conf  setenvif.conf
authn_core.load     autoindex.load   filter.load   negotiation.load  setenvif.load
authn_file.load     deflate.conf     mime.conf     php8.1.conf       status.conf
[root@www.yuchaoit.cn html]$vim /etc/apache2/mods-enabled/php8.1.
php8.1.conf  php8.1.load
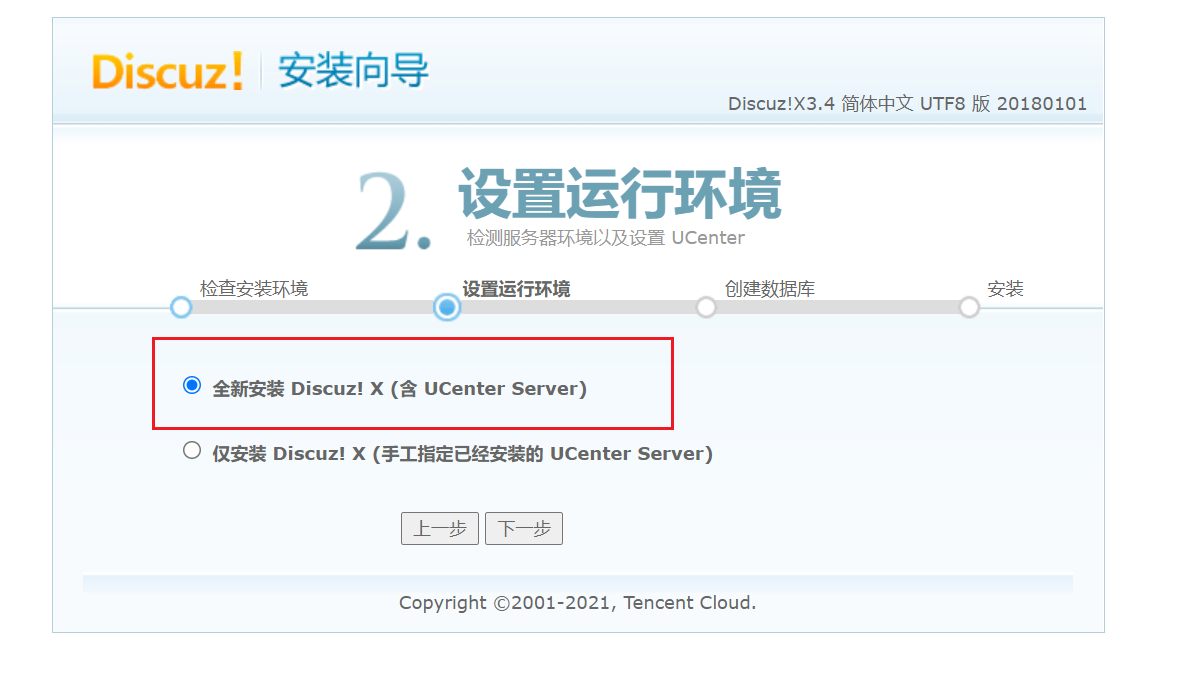
五、部署Discuz论坛
# 先确保LAMP页面正常,参考上一节课程的 phpinfo页面
# 下载discuz,放入网站代码目录
[root@www.yuchaoit.cn html]$pwd
/var/www/html
[root@www.yuchaoit.cn html]$unzip Discuz_X3.5_SC_UTF8_20240520.zip
[root@www.yuchaoit.cn html]$ls
Discuz_X3.5_SC_UTF8_20240520.zip index.html LICENSE qqqun.png readme readme.html test-info.php upload utility.html
[root@www.yuchaoit.cn html]$mv upload/* /var/www/html/
# 访问安装入口
http://101.126.78.228/install
# 经典网站权限大坑
[root@www.yuchaoit.cn html]$ps -ef |grep apache
www-data 1038353 1 0 12:40 ? 00:00:00 /usr/bin/htcacheclean -d 120 -p /var/cache/apache2/mod_cache_disk -l 300M -n
root 1094979 1 0 19:12 ? 00:00:00 /usr/sbin/apache2 -k start
www-data 1094980 1094979 0 19:12 ? 00:00:00 /usr/sbin/apache2 -k start
www-data 1094981 1094979 0 19:12 ? 00:00:00 /usr/sbin/apache2 -k start
www-data 1094982 1094979 0 19:12 ? 00:00:00 /usr/sbin/apache2 -k start
www-data 1094983 1094979 0 19:12 ? 00:00:00 /usr/sbin/apache2 -k start
www-data 1094984 1094979 0 19:12 ? 00:00:00 /usr/sbin/apache2 -k start
www-data 1095163 1094979 0 19:13 ? 00:00:00 /usr/sbin/apache2 -k start
www-data 1098617 1094979 0 19:39 ? 00:00:00 /usr/sbin/apache2 -k start
root 1099894 1098104 0 19:48 pts/1 00:00:00 grep --color=auto apache
# 修改源代码目录为www-data
# user,group other r w x 学废了吗?
[root@www.yuchaoit.cn html]$chown -R www-data:www-data /var/www/html/
# 缺少php处理xml的驱动,复制报错,搜索引擎查阅,解决问题多了,技术也就沉淀了。
apt-get install php-xml -y
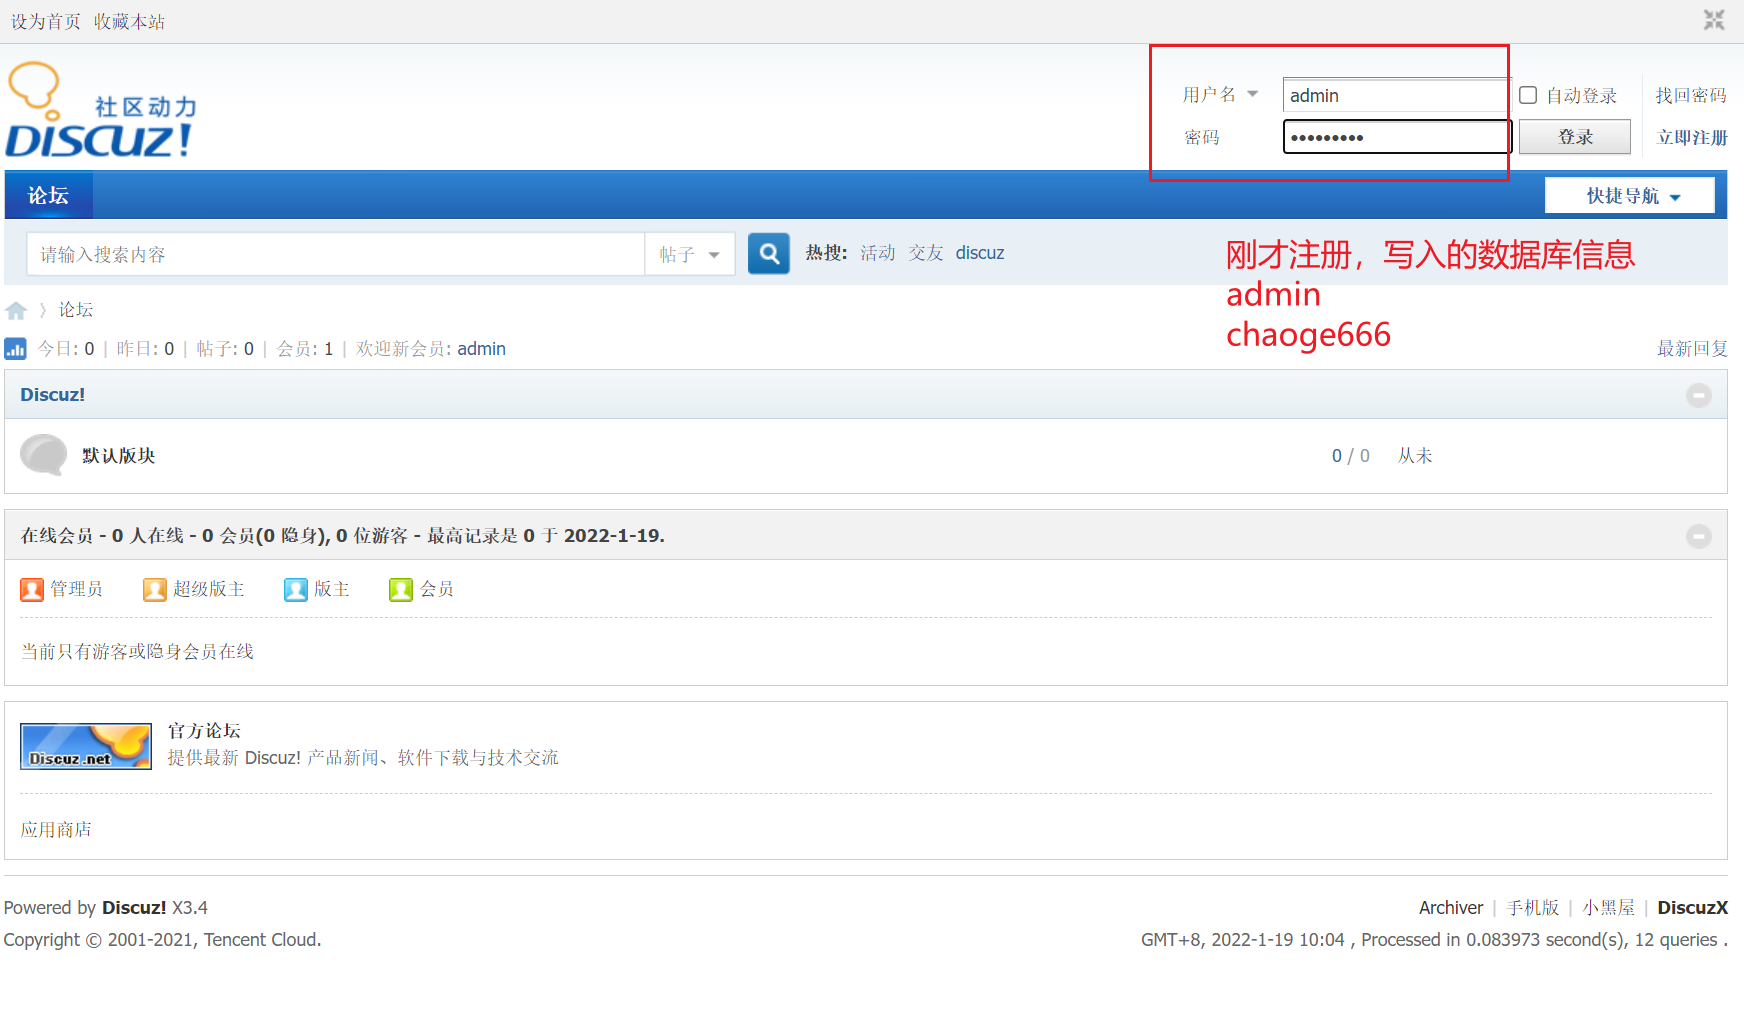
# 最后的discuz连接数据库的账密信息
101.126.78.228,而不能是127.0.0.1 等学mysql章节,于超,老师给你再说,权限问题
root
chaoge666
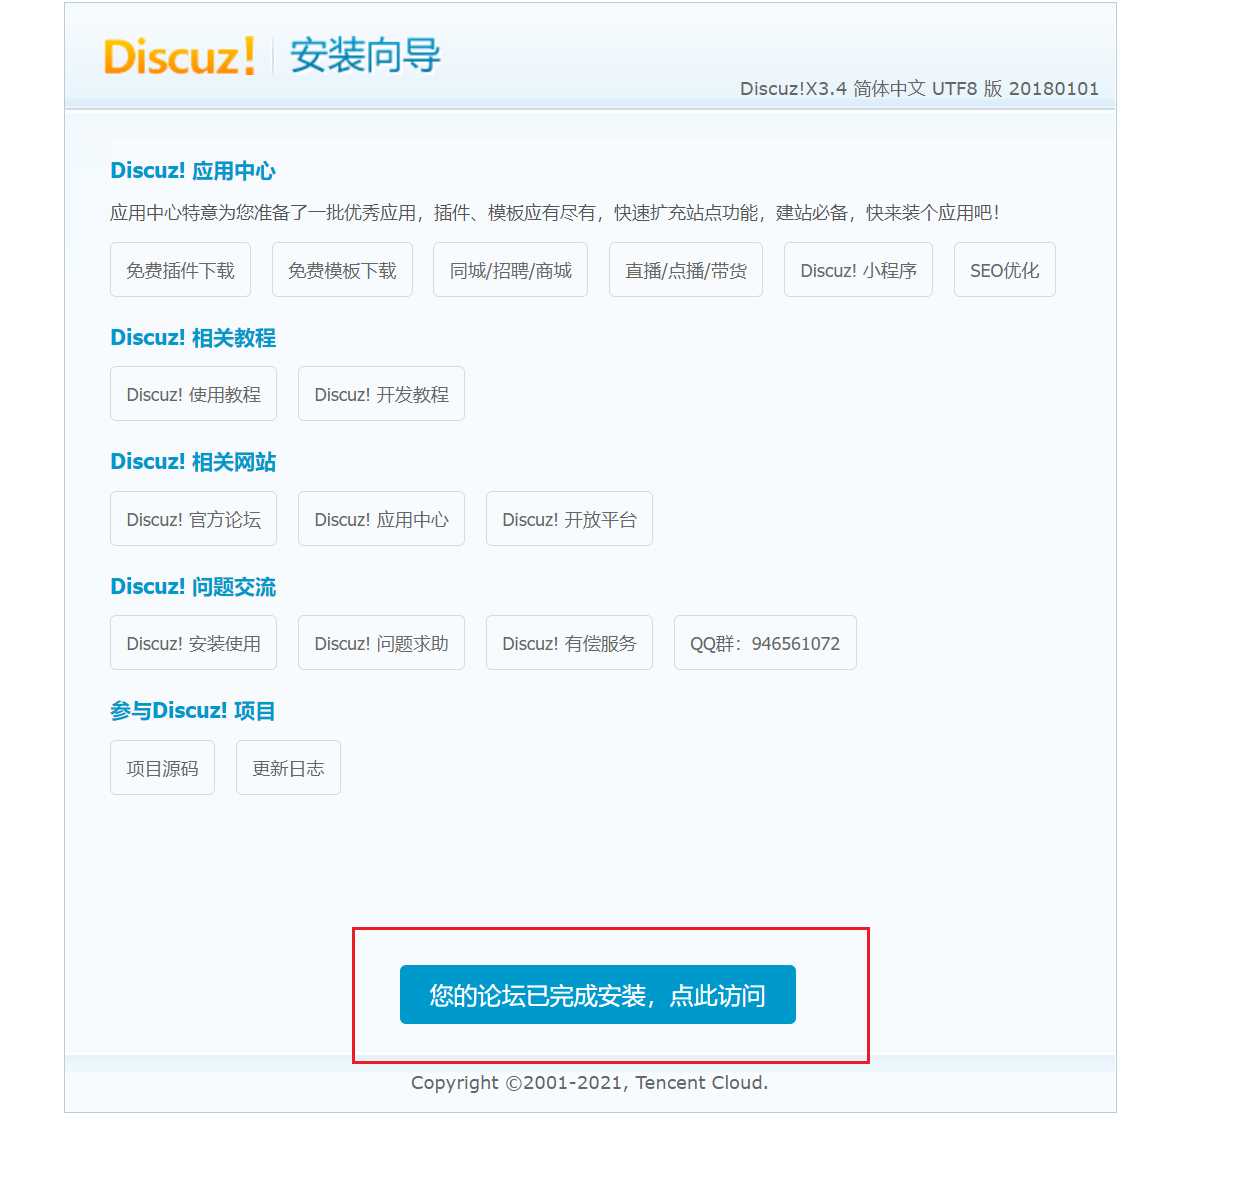
# 成功访问你的第一个人生博客,页面是
# 首页
http://101.126.78.228/index.php
# 后台管理,老板视角
http://101.126.78.228/admin.php?frames=yes&action=styles
#修改apache的默认页面,是index.php

点击下载
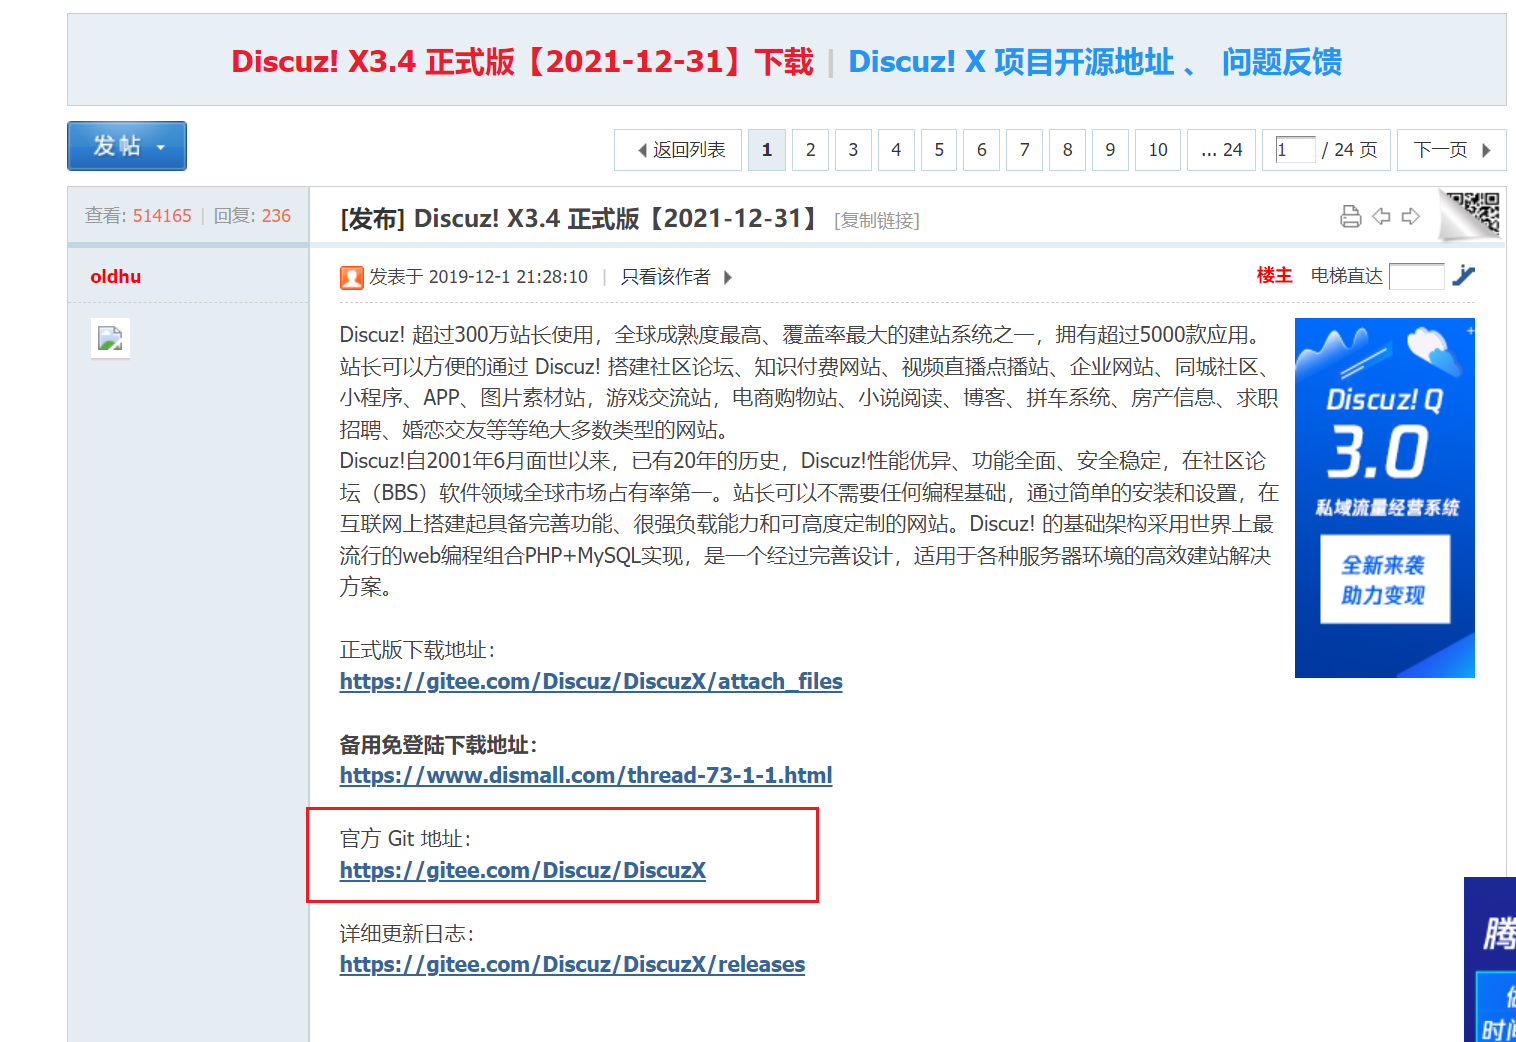
码云下载Discuz下载
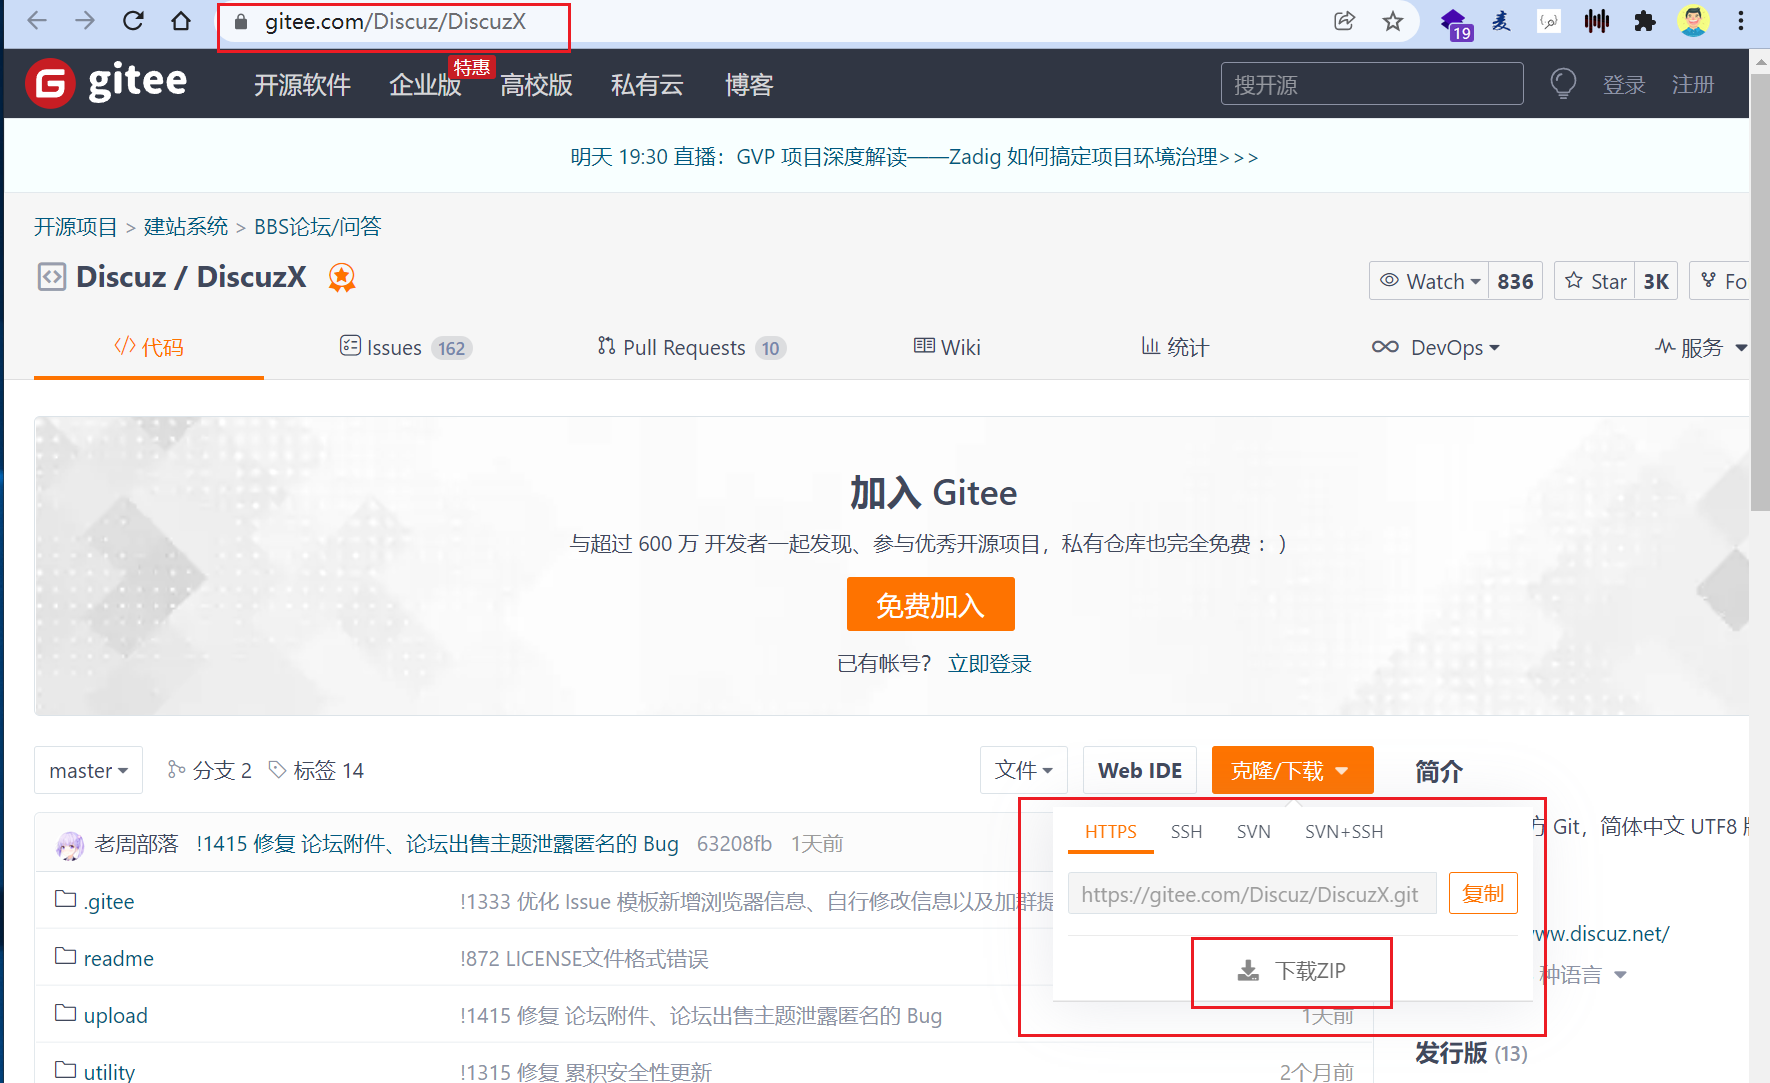
上传到linux
1.linux里安装lrzsz软件,用于上传下载、或者用FTP。
[root@yuchao-aliyun html]# yum install lrzsz -y
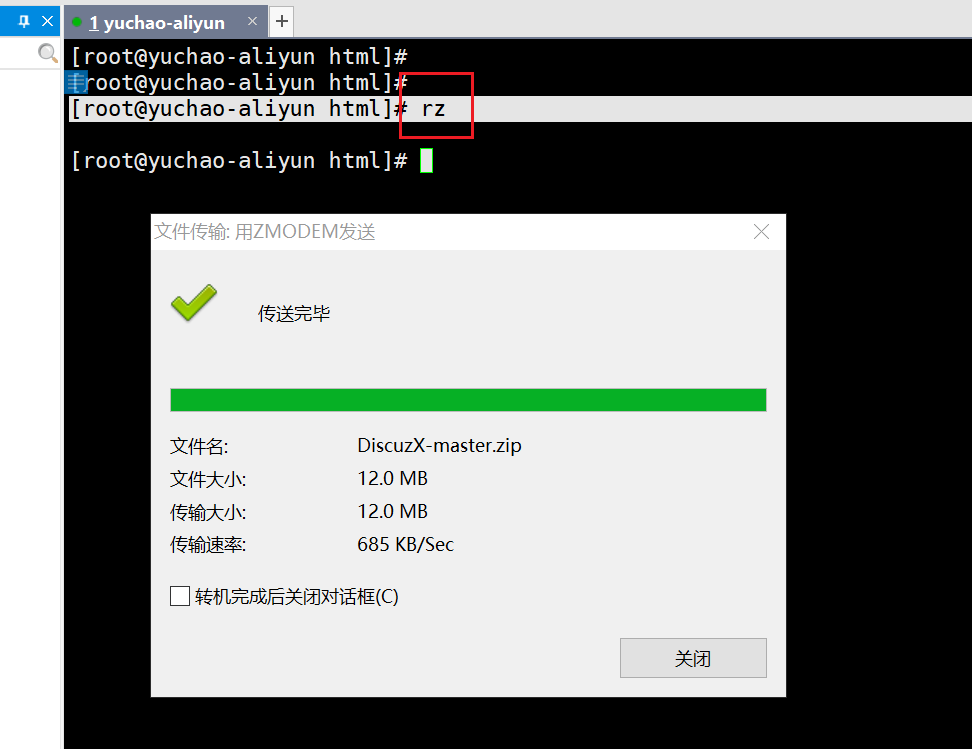
2.用命令上传文件
# 输入rz命令,xshell自动弹出文件接收功能
# 后面传输大量文件,还是使用FTP工具,一般如XFTP
[root@yuchao-aliyun html]# rz
# 上传到apache的网页根目录,这个目录下,只要存放了HTML文件,php文件,就能访问到
[root@yuchao-aliyun html]# pwd
/var/www/html
[root@yuchao-aliyun html]# ls
DiscuzX-master.zip index.php
# 安装unzip
[root@yuchao-aliyun html]# yum install -y unzip
# 解压缩Discuz代码
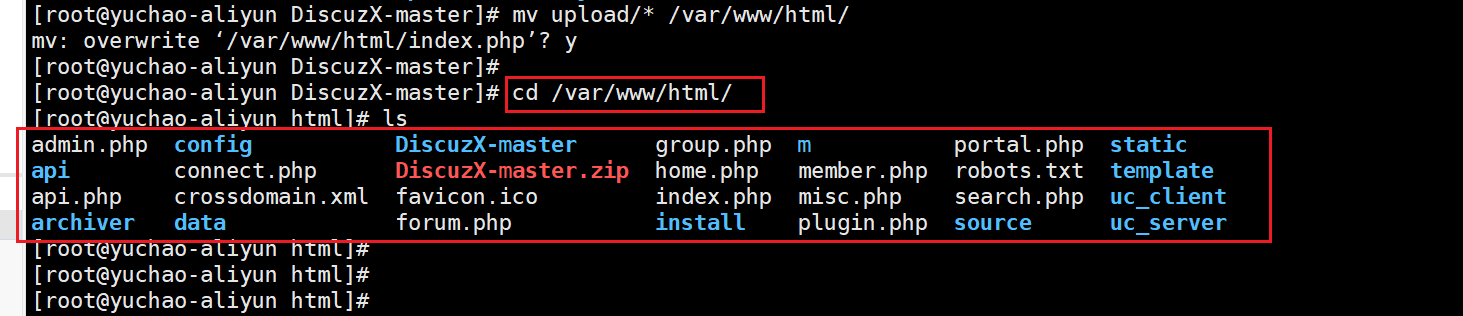
[root@yuchao-aliyun html]# unzip DiscuzX-master.zip
# 这个论坛的源代码,就在这里了。
[root@yuchao-aliyun DiscuzX-master]# pwd
/var/www/html/DiscuzX-master
[root@yuchao-aliyun DiscuzX-master]# ls
LICENSE readme README.md upload utility
# 最后异步,需要把/var/www/html/DiscuzX-master/upload下代码,全部移动到 /var/www/html 这个位置,且必须在这个位置
注意看,最终,Discuz论坛的代码,要放在哪里
六、访问Discuz论坛
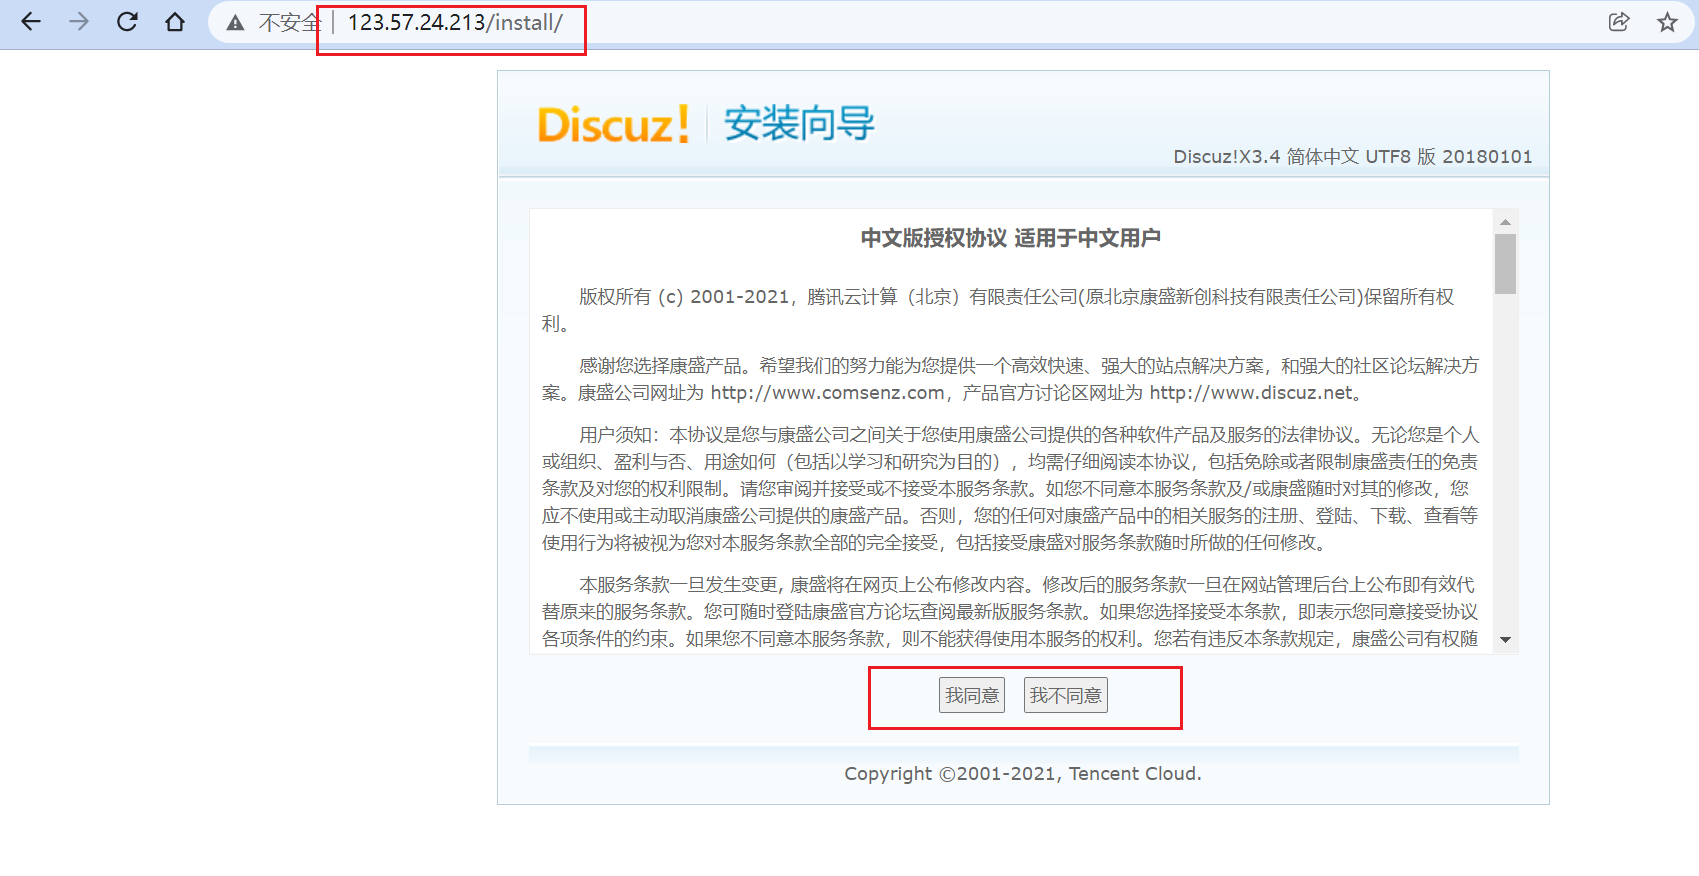
此时再访问这个apache,也就是阿里云服务器的地址,就可以自动访问到discuz论坛安装界面了。
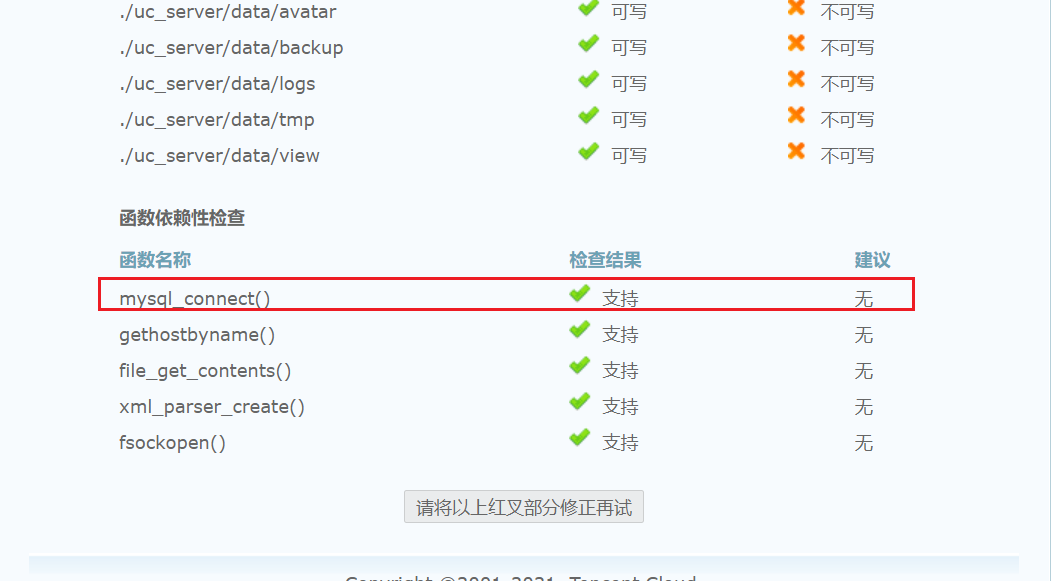
安装环境监察

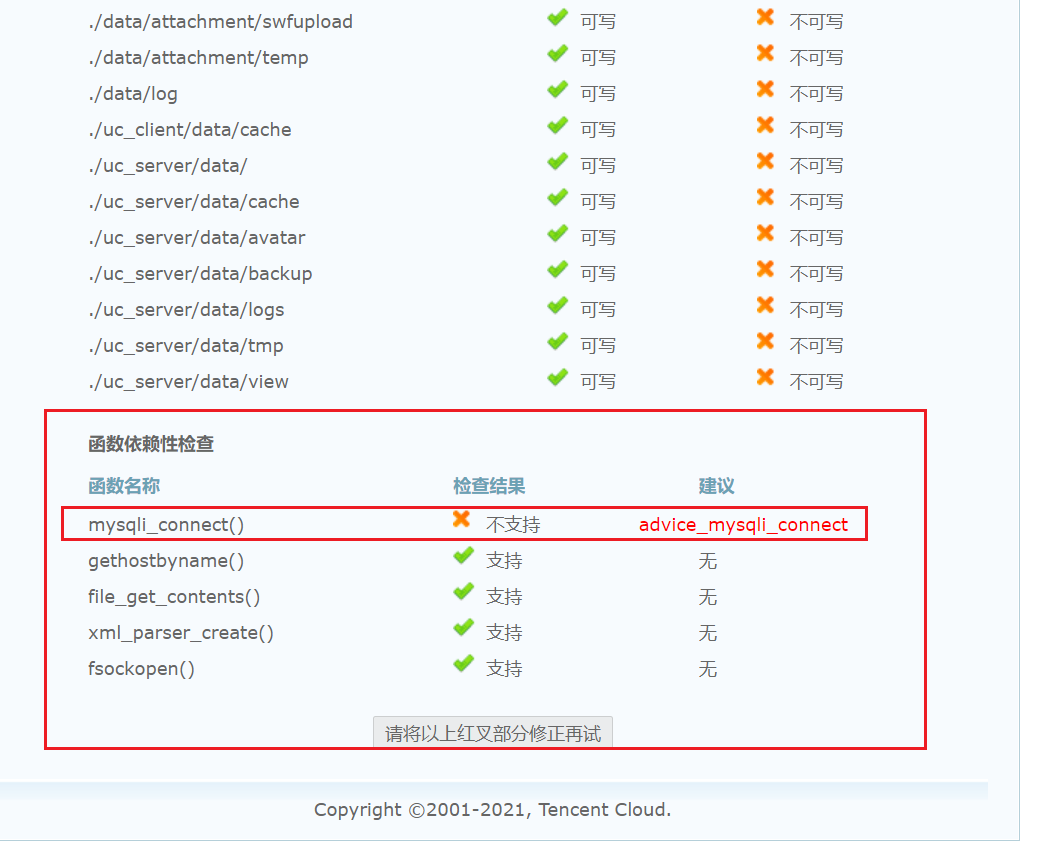
发现少了一个关于mysql的连接驱动
安装mysql连接驱动
linux运维的日常就是,根据手册,部署,遇见问题,1、看懂 2、琢磨怎么解决 3、yum可以安装大部分软件,解决大部分问题。
你可以借助搜索引擎,搜索报错信息,找到网络上大部分经验相同的人,如何解决
你可以问超哥 哈哈,有时候,向老师傅请教,能更快的先解决问题,然后自己再吸收这个解决的经验。
上述问题,可以直接yum安装
[root@yuchao-aliyun html]# yum install php-mysqli -y
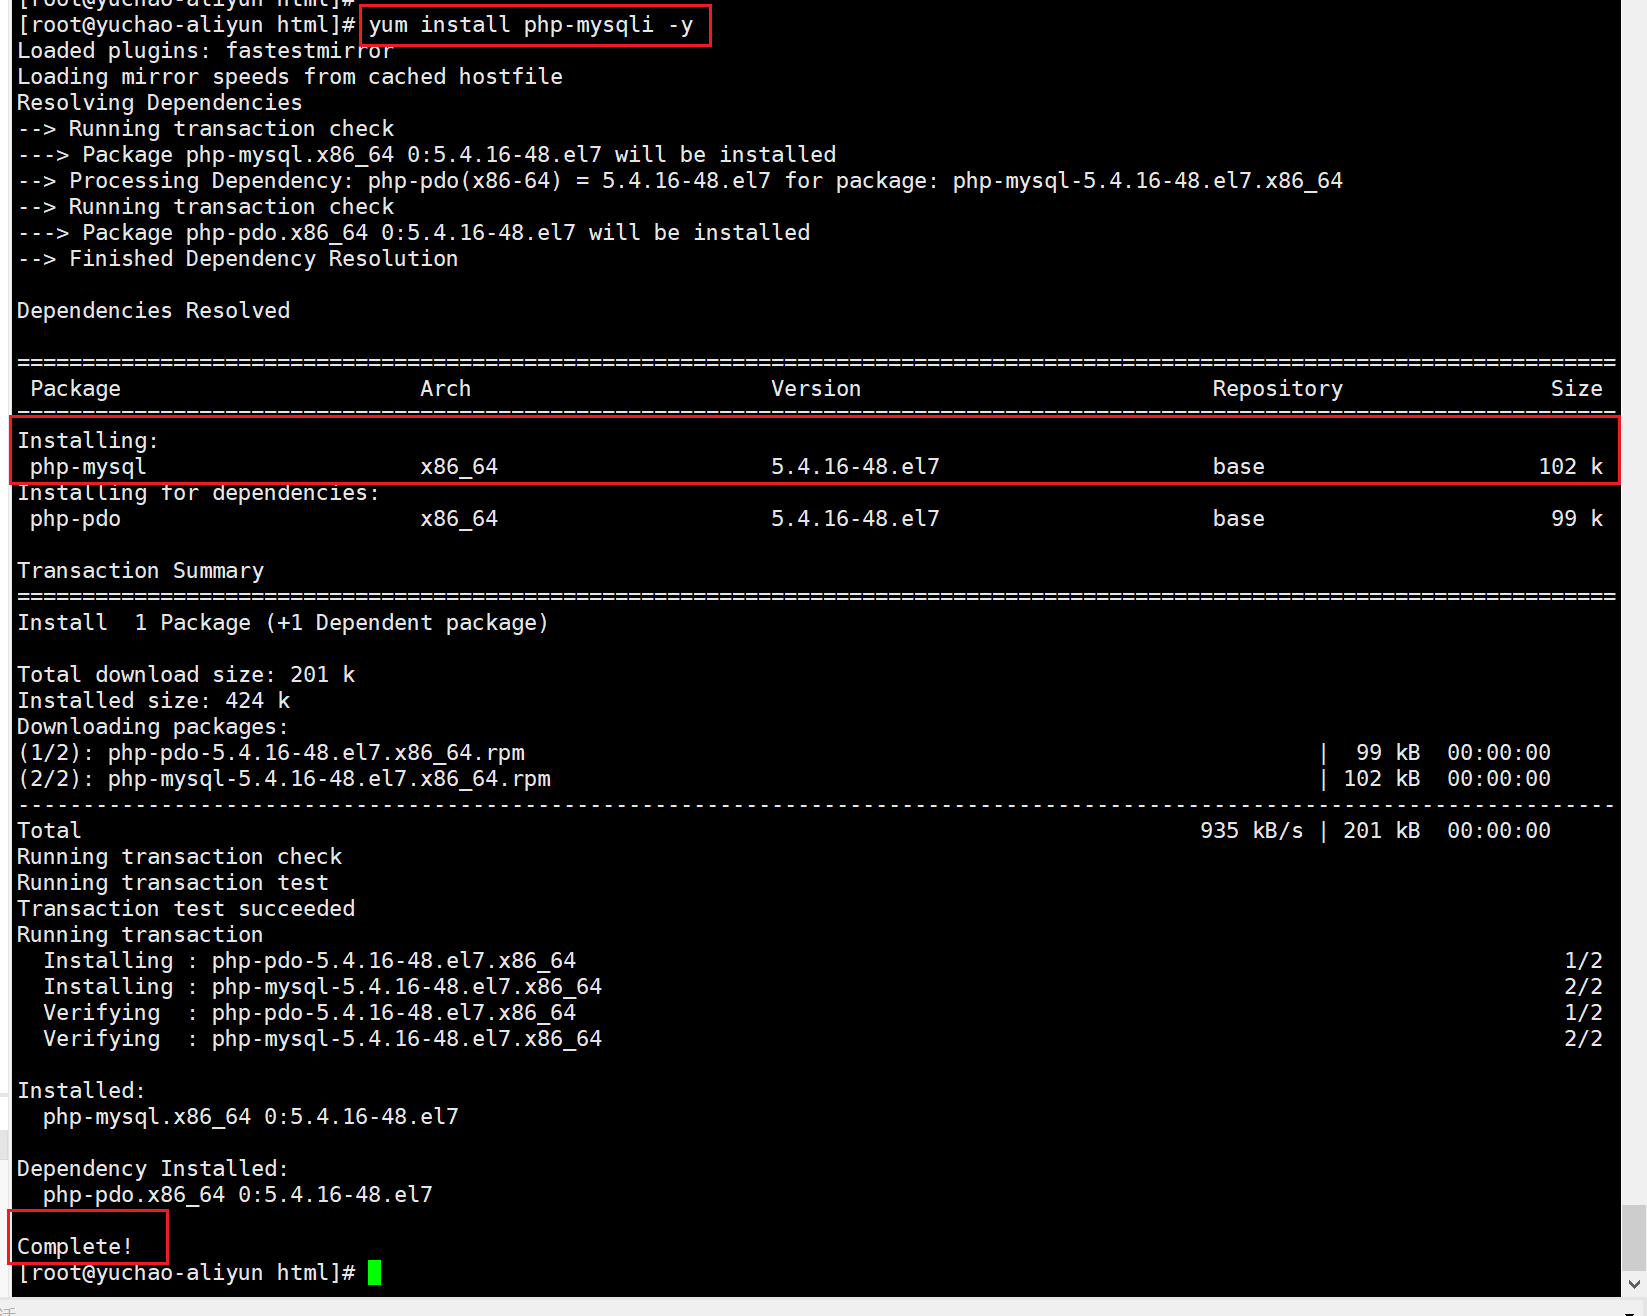
一般有安装更新,软件都会重启,让其生效,我这里访问的是apache,因此重启httpd服务,让这个新驱动生效。
[root@yuchao-aliyun html]# systemctl restart httpd
再次访问Discuz安装界面,刷新即可。
解决目录权限问题
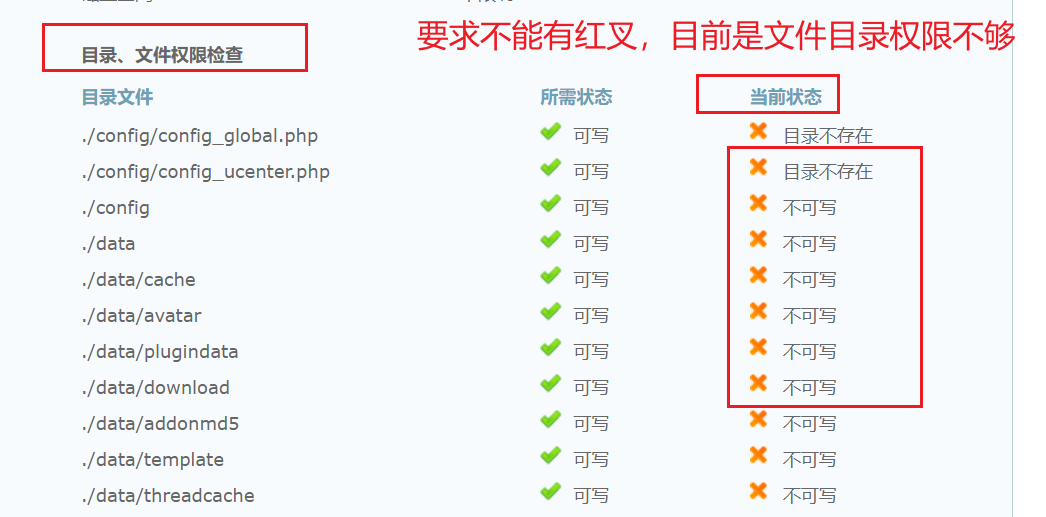
1.确认我们的httpd目录,Discuz代码存放的目录
# 页面提示的错误信息,就是这里的目录权限不够
[root@yuchao-aliyun html]# ll
total 12452
-rw-r--r--  1 root root     2848 Jan 17 10:56 admin.php
drwxr-xr-x  9 root root     4096 Jan 17 10:56 api
-rw-r--r--  1 root root      727 Jan 17 10:56 api.php
drwxr-xr-x  2 root root     4096 Jan 17 10:56 archiver
drwxr-xr-x  2 root root     4096 Jan 17 10:56 config
-rw-r--r--  1 root root     1040 Jan 17 10:56 connect.php
-rw-r--r--  1 root root      106 Jan 17 10:56 crossdomain.xml
drwxr-xr-x 12 root root     4096 Jan 17 10:56 data
drwxr-xr-x  6 root root     4096 Jan 17 10:56 DiscuzX-master
-rw-r--r--  1 root root 12630971 Jan 18 20:37 DiscuzX-master.zip
-rw-r--r--  1 root root     5558 Jan 17 10:56 favicon.ico
-rw-r--r--  1 root root     2245 Jan 17 10:56 forum.php
-rw-r--r--  1 root root      821 Jan 17 10:56 group.php
-rw-r--r--  1 root root     1280 Jan 17 10:56 home.php
-rw-r--r--  1 root root     7044 Jan 17 10:56 index.php
drwxr-xr-x  5 root root     4096 Jan 17 10:56 install
drwxr-xr-x  2 root root     4096 Jan 17 10:56 m
-rw-r--r--  1 root root      998 Jan 17 10:56 member.php
-rw-r--r--  1 root root     2371 Jan 17 10:56 misc.php
-rw-r--r--  1 root root     1788 Jan 17 10:56 plugin.php
-rw-r--r--  1 root root      977 Jan 17 10:56 portal.php
-rw-r--r--  1 root root      615 Jan 17 10:56 robots.txt
-rw-r--r--  1 root root     1274 Jan 17 10:56 search.php
drwxr-xr-x 10 root root     4096 Jan 17 10:56 source
drwxr-xr-x  7 root root     4096 Jan 17 10:56 static
drwxr-xr-x  3 root root     4096 Jan 17 10:56 template
drwxr-xr-x  7 root root     4096 Jan 17 10:56 uc_client
drwxr-xr-x 14 root root     4096 Jan 17 10:56 uc_server
2.添加权限
[root@yuchao-aliyun html]#
[root@yuchao-aliyun html]# chmod -R 777 /var/www/html/*
3.再次查看安装
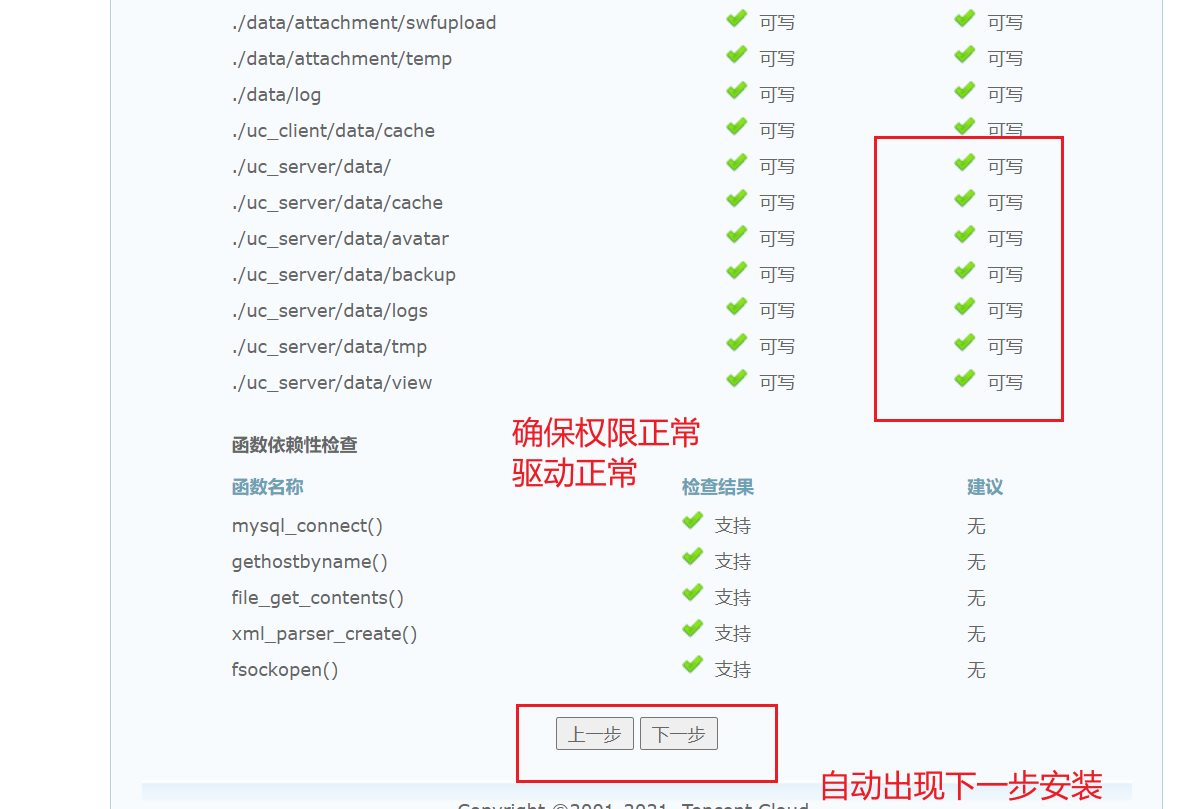
开始安装
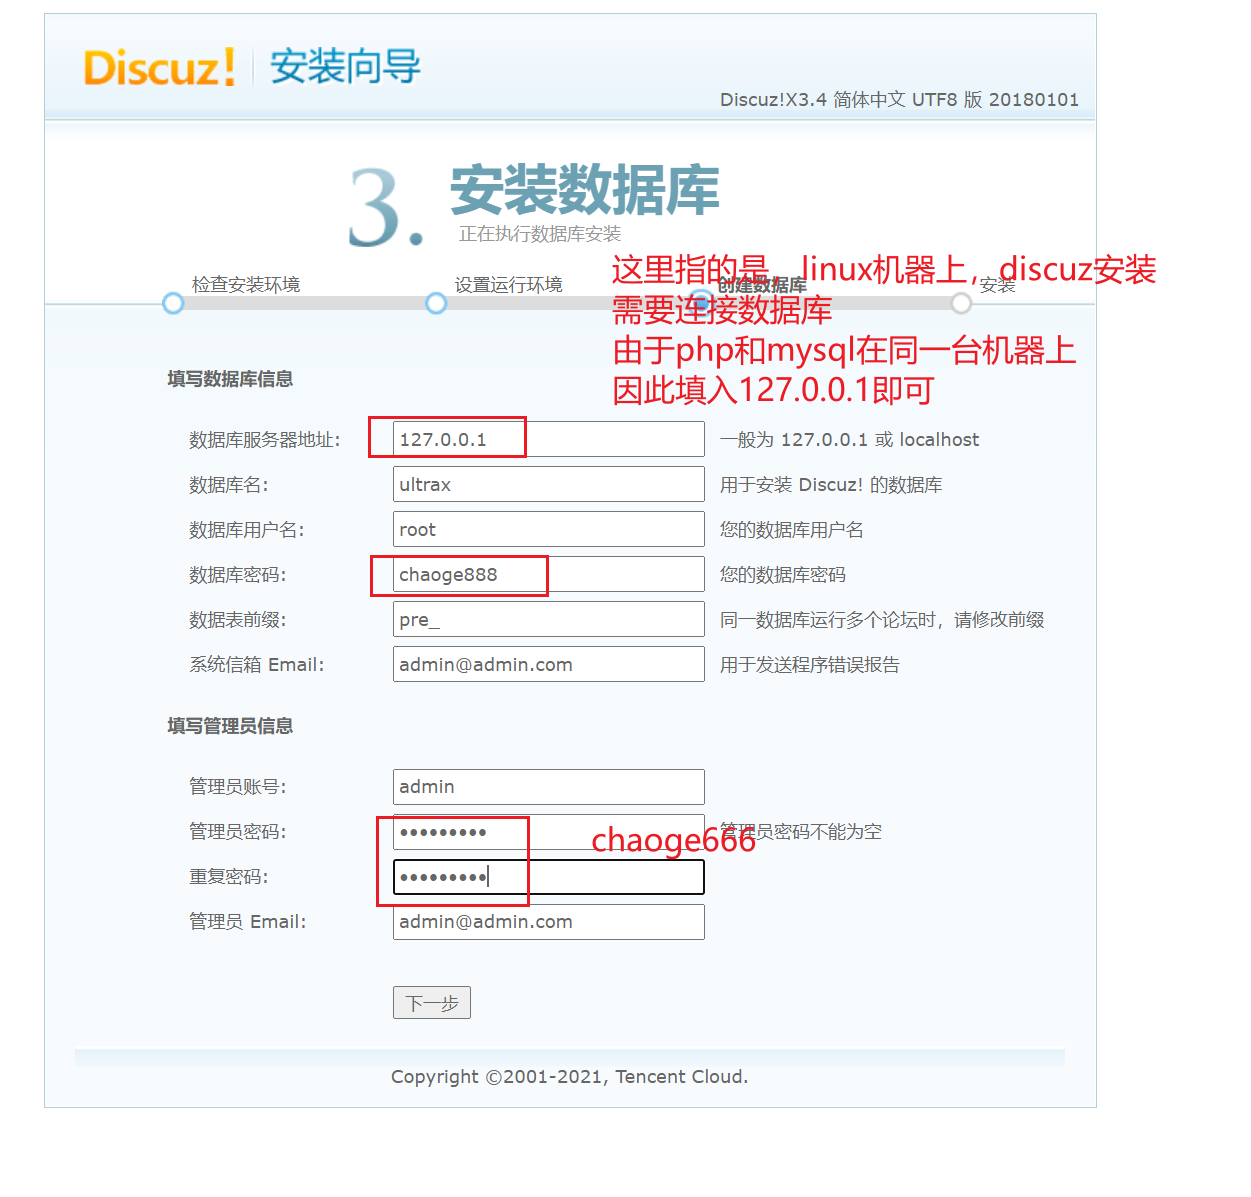
如果信息填入正常,php正确读取到mysql数据库,即刻自动安装,数据也会写入到数据库里。
登录admin管理员账户
使用discuz发帖子

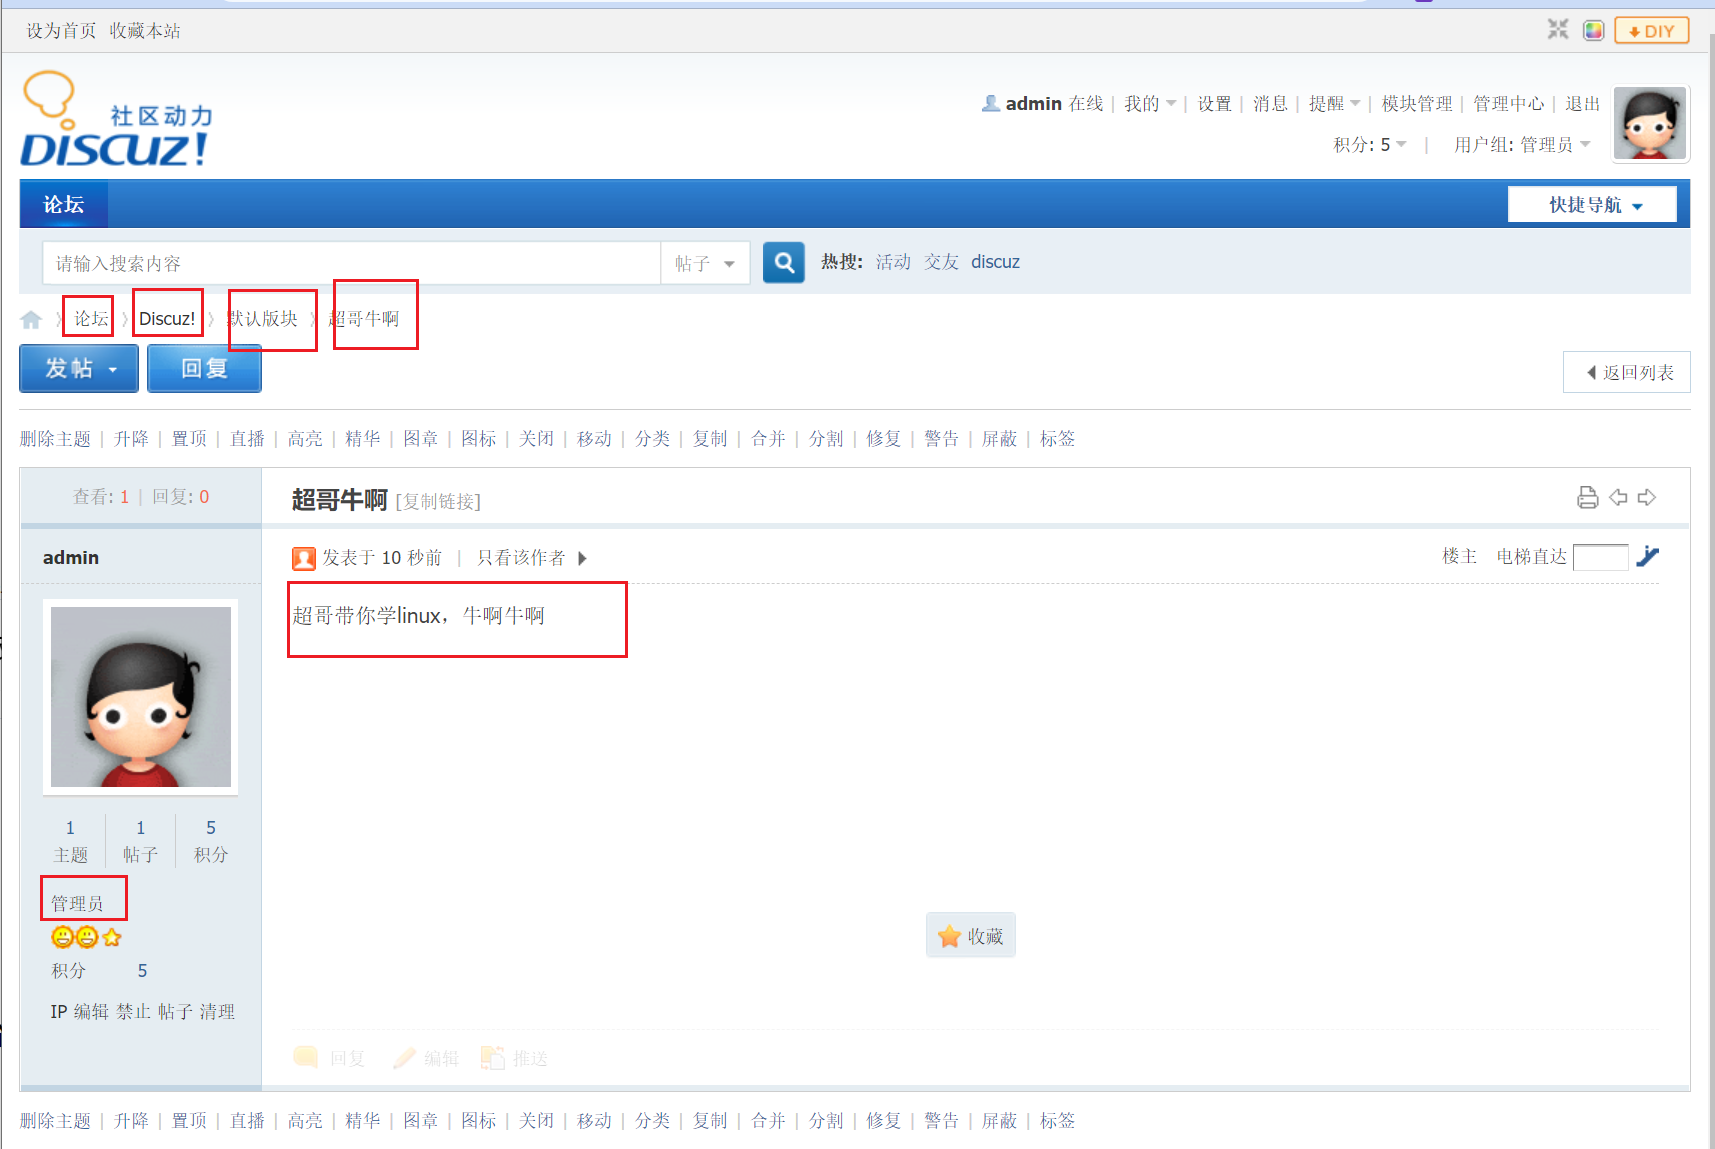
至此,基于LAMP环境部署的DIscuz论坛,已经部署完毕了,你学废了吗?
最终,我们还差一个网站的域名解析,就更完美了,但是域名涉及备案流程,较为复杂,我们在学习阿里云计算篇,继续学习。